Occasionally the joysticks on devices such as controllers or handheld PCs can lose their calibration resulting in incorrect and inaccurate input. This guide will walk you through step by step how to install the necessary software and how to calibrate your AYANEO joysticks on all AYANEO devices, as well as get the latest firmware. However first, we need to install some software that we’ll need along the way.
Upgrade Controller Firmware
The first thing we’ll do is upgrade the controller firmware. If you’re already up to date then ignore this step.
First is to download the Firmware. Head to AYANEO’s super helpful downloads site. This is what it looks like.

Find the ‘AYANEO Handle Firmware’ for your device. It will say underneath for which series of device each download is for. For example, ‘AYANEO 2 Series Only’ is only for the AYANEO 2 and its series of devices. Once you have located your device click ‘Download’ and download the file(s) necessary.
This will download a .ZIP file with your update on it. Extract that and there will be a single .bin file. Hold onto that and remember where it’s stored. You now need to completely shut down your device, not restart, shut down. Once it’s shut down after a minute or so click down the left joystick, or LS and hold it. With it down, press the power button and let it boot.
Once you’re into Windows, AYASpace, if you have it, will open and try to update. Ignore that and go to the desktop. Open File Explorer and go to ‘This PC’. You should see an additional drive called ‘AYANEO (D:)’. If you don’t, shut the device down again and hold down LS as you boot again.

Copy the .bin file that you downloaded and extracted, and paste it into D drive. After a few moments the drive will automatically disconnect, this is good.
Once it’s gone, shut down the machine. Leave it for a good two minutes or so before pressing the power button. You’ll know whether the drivers have been successfully installed because the device will vibrate 3 times in rapid succession when powering on. Congratulations you have upgraded your controller firmware.
AYANEO Joystick Calibration Method
Now we can get to calibrating your joysticks. There are two main ways to do so, the AYANEO way and through Windows. The AYANEO way is different for every device, find yours below and follow the instructions.
| Model | Instruction |
| AYANEO 2, 2S, Geek, Air, Air Plus | Press the right and left bumpers, the left d pad and “B” simultaneously and release the buttons when the device vibrates a second time. |
| AYANEO 2021 | Press the Select and the A button at the same time for 2 seconds. It vibrates, swirl the joysticks around a couple of times, push RB and throttle 3 times down at the same time and it vibrates again. Fixes my controllers every time. |
| General | With the device plugged in and fully off, power on the device and continuously rotate each analogue stick to the outer edges of their range + press / release both triggers until the device reaches the login screen. |
Windows Calibration Method + Testing
To calibrate within Windows we need to first open up Windows Run, if you have a keyboard attached this can be done be pressing Windows+R, if not open the start menu and search for ‘Run’.

Once open type in joy.cpl and click ‘OK’.

It will open this window, Windows will see your controller as an XBOX 360 controller, and that’s okay.

Click on ‘Properties’. It will open up this screen.

You can use this to test your controller.
- Z Axis is the Trigger buttons
- X Rotation is the Right Joysticks horizontal movement
- Y Rotation is the Right Joysticks vertical movement
- X-Axis / Y-Axis is the Left Joysticks movement
- Point of Video Hat is the D-Pad
- Buttons are all the buttons on your device: A, B, X, Y, LB, RB, LS, RS, LC and RC. They will light up when pressed.
If they all work fine then chances are you don’t need to calibrate your device. But if you do, click over to ‘Settings’ and you’ll see this screen.

Click on ‘Calibrate’ to be taken through the calibration process.


Go through the process following the instructions to calibrate your controller. Once you’re done, you’ll be taken back to the Settings page, you can go over to the Test page to see how your work panned out. If you’re unhappy go back to Settings and click ‘Restore Default’. If you are then you can carry on and use your newly calibrated controller.
Gamepad-Tester.com
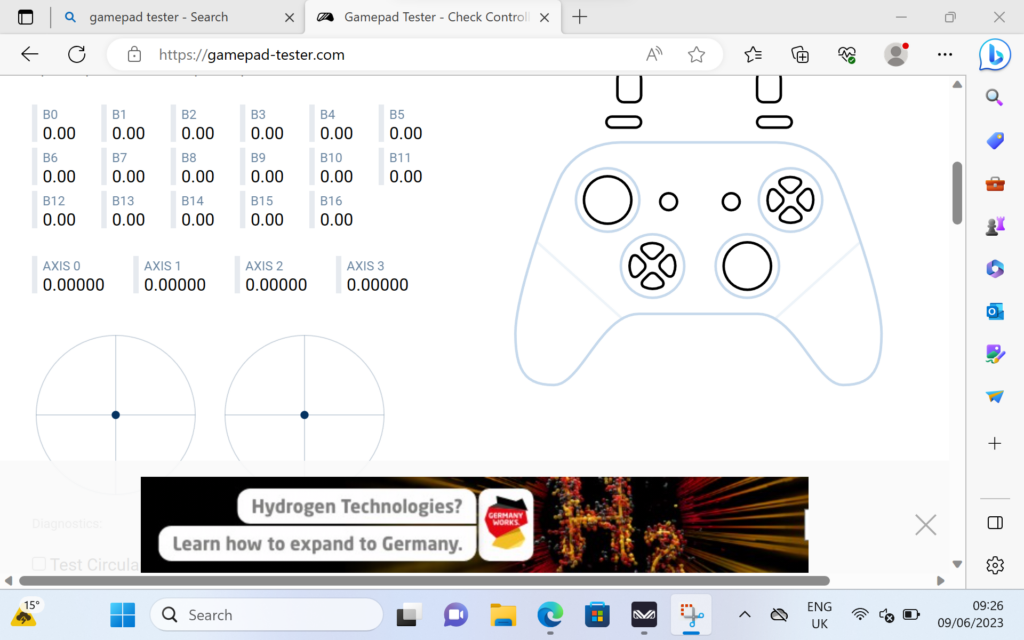
Gamepad Tester is a well-known website in the community, it offers an easy and accessible way to test your gamepad controllers. It even offers additional and more in-depth information than Windows. Head over to the site. You’ll be greeted with this screen.

Press any button to begin, and the testing interface will load.

From here you can see precisely the angle and force that the joysticks, triggers and buttons are being registered. With this information, you can find faults and properly calibrate your device.
To learn more about your AYANEO handhelds check our site here.
To learn more about our other offerings and products take a look at other Knowledge Base articles here.


