
- 1. Introduction
- 2. Section 1: Initial Triage: Your First 5 Minutes with a BSOD
- 3. Section 2: Software, Updates, and Corrupted System Files
- 4. Section 3: Driver Issues
- 5. Section 4: RAM (Memory) Issues
- 6. Section 5: SSD (Storage) Issues
- 7. Section 6: Other Hardware Issues (CPU, Overheating, BIOS)
- 8. Section 7: When All Else Fails: Reinstalling Windows 11
- 9. Still having issues and you are a DROIX customer?
- 10. Conclusion
Introduction
The Blue Screen of Death (BSOD), technically known as a “stop error,” is a critical safety mechanism within the Windows 11 operating system. When Windows encounters a problem so severe that it cannot recover without risking data corruption or hardware damage, it halts all operations and displays this error screen. While its appearance can be alarming, the BSOD is fundamentally a protective measure. In Windows 11, this screen may appear as a Black Screen of Death, a cosmetic change intended to align with the operating system’s new aesthetic, but its function remains identical.
This guide provides a definitive troubleshooting methodology tailored specifically for the unique ecosystem of high-performance devices, from a portable gaming PC to a mini PC. Devices from manufacturers such as GPD, ONEXPLAYER, AYANEO, Minisforum, GMKTec, and Beelink represent a specialized class of hardware, including the popular handheld gaming PC. The compact form factors of a mobile gaming PC or a mini PC for office use, along with their highly integrated components and custom hardware configurations, present unique challenges. These designs can lead to specific types of errors, particularly those related to bespoke device drivers, thermal management under heavy loads, and compatibility with major Windows updates.
The troubleshooting philosophy of this report follows a systematic, “funnel” approach. It begins with the simplest, least invasive software-based fixes and progressively moves toward more complex and time-consuming hardware diagnostics. This structured process is designed to help users efficiently identify and resolve the root cause of BSOD errors without undertaking unnecessary or potentially risky procedures. By following this guide, users can transform the frustrating experience of a system crash into a logical and effective diagnostic journey.
Section 1: Initial Triage: Your First 5 Minutes with a BSOD
When a BSOD occurs, the initial moments are critical for gathering information. Resisting the urge to immediately restart the device and instead adopting a structured diagnostic process can significantly shorten the time to resolution.
Deconstructing the Blue Screen: Gathering Intelligence
The error screen itself is the most important initial source of diagnostic information. Before taking any other action, it is essential to record the key details presented. This information provides the necessary clues to understand the nature of the critical failure.
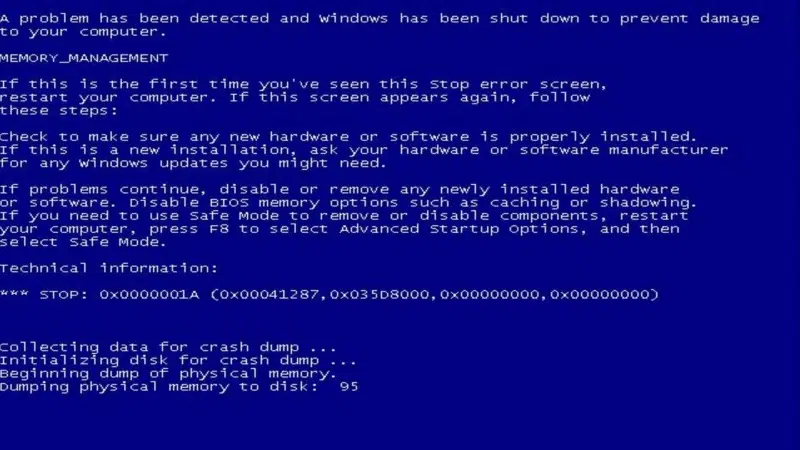
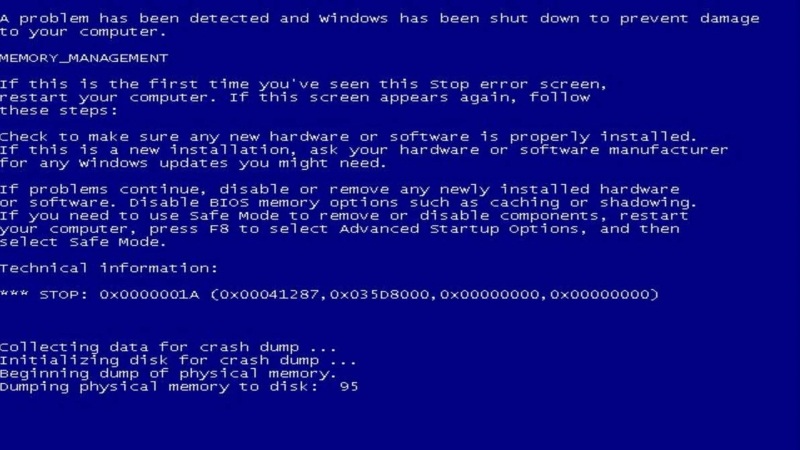
- The STOP Code: This is a hexadecimal code, typically formatted as $0x…$, such as $0x0000001A$. This code corresponds to a specific type of error and is the most precise piece of information for technical analysis.
- The Error Name: A more human-readable name, often in all caps with underscores, accompanies the stop code (e.g., MEMORY_MANAGEMENT). This name is useful for searching online forums and knowledge bases for common solutions.
- Associated File (if present): In some cases, the screen will list a specific system or driver file that was involved in the crash (e.g., amdgpio2.sys, ntoskrnl.exe). This is an invaluable clue, often pointing directly to a faulty device driver or a corrupted Windows component.
The First Responders’ Checklist
Once the on-screen information has been recorded, a few immediate physical checks can help isolate the problem.
- Disconnect Peripherals: A common and easily resolved cause of BSODs is a faulty external device or its associated driver. The system should be forced to shut down by holding the power button. Afterward, all non-essential peripherals—including USB drives, external hard drives, printers, webcams, and docking stations—should be disconnected.
- Check for Overheating: The compact chassis of a handheld gaming computer or other small gaming rigs makes them susceptible to thermal issues, which can directly cause system instability and BSODs. The device’s enclosure should be checked to see if it is unusually hot to the touch. It is also important to ensure that fan vents are not blocked by hands, a case, or the surface the device is resting on. A simple physical check for excessive heat can point directly to a hardware-related cause.
- Attempt a Normal Reboot: After disconnecting peripherals and allowing the device to cool for several minutes if it was hot, a normal reboot should be attempted. Occasionally, a BSOD can be a singular event caused by a temporary glitch, and a simple restart may resolve the issue without further intervention.
The Essential Diagnostic Tool: Booting into Safe Mode
If the BSOD persists after a reboot, the next step is to determine if the cause is related to core Windows components or third-party software. Safe Mode is the primary tool for this diagnostic step. It starts Windows with a minimal set of essential drivers and services. If the system is stable and does not crash in Safe Mode, the problem is almost certainly caused by a non-essential third-party driver or a startup application.
For systems that cannot boot normally, the Windows Recovery Environment (WinRE) provides access to Safe Mode. WinRE can typically be accessed by interrupting the boot process three consecutive times. This is done by powering on the device and then pressing and holding the power button to force a shutdown as soon as the Windows loading icon (spinning dots) appears. On the third attempt, the system should automatically load into WinRE, where advanced startup options, including Safe Mode, can be selected.
Quick-Reference BSOD Navigation Table
The vast number of potential stop codes can be overwhelming. The following table serves as a triage tool, mapping the most common BSOD errors to their likely cause and directing the user to the relevant section of this guide. This transforms the guide from a linear document into an interactive diagnostic resource, improving efficiency.
| STOP CODE | ERROR NAME | LIKELY CAUSE CATEGORY | SEE SECTION |
|---|---|---|---|
| $0x0000001A$ | MEMORY_MANAGEMENT | RAM (Memory) | 4 |
| $0x000000D1$ | DRIVER_IRQL_NOT_LESS_OR_EQUAL | Drivers | 3 |
| $0x0000000A$ | IRQL_NOT_LESS_OR_EQUAL | Drivers | 3 |
| $0x00000133$ | DPC_WATCHDOG_VIOLATION | Drivers | 3 / 2 |
| $0x00000124$ | WHEA_UNCORRECTABLE_ERROR | Other Hardware (CPU, Overheating, BIOS) | 6 |
| $0x0000007B$ | INACCESSIBLE_BOOT_DEVICE | SSD (Storage) / BIOS | 5 / 6 |
| $0x000000EF$ | CRITICAL_PROCESS_DIED | Software / System Files | 2 |
| $0x00000139$ | KERNEL_SECURITY_CHECK_FAILURE | Software / Drivers | 2 / 3 |
| $0x00000050$ | PAGE_FAULT_IN_NONPAGED_AREA | RAM / Drivers | 4 / 3 |
| $0x00000024$ | NTFS_FILE_SYSTEM | SSD (Storage) | 5 |
Section 2: Software, Updates, and Corrupted System Files
Issues originating from the Windows operating system itself are a frequent source of BSODs. These problems can arise from corrupted system files, problematic software updates, or conflicts with third-party applications. Common stop codes in this category include CRITICAL_PROCESS_DIED, which indicates a vital Windows service has failed; BAD_SYSTEM_CONFIG_INFO, pointing to a corrupted system registry; and KERNEL_SECURITY_CHECK_FAILURE, which can be triggered by data structure corruption or conflicts between drivers and Windows security features. These errors suggest that the integrity of the operating system has been compromised, often due to an improper shutdown, a failed update, or malware.
Solution 1: Repairing the Windows System Image with SFC and DISM
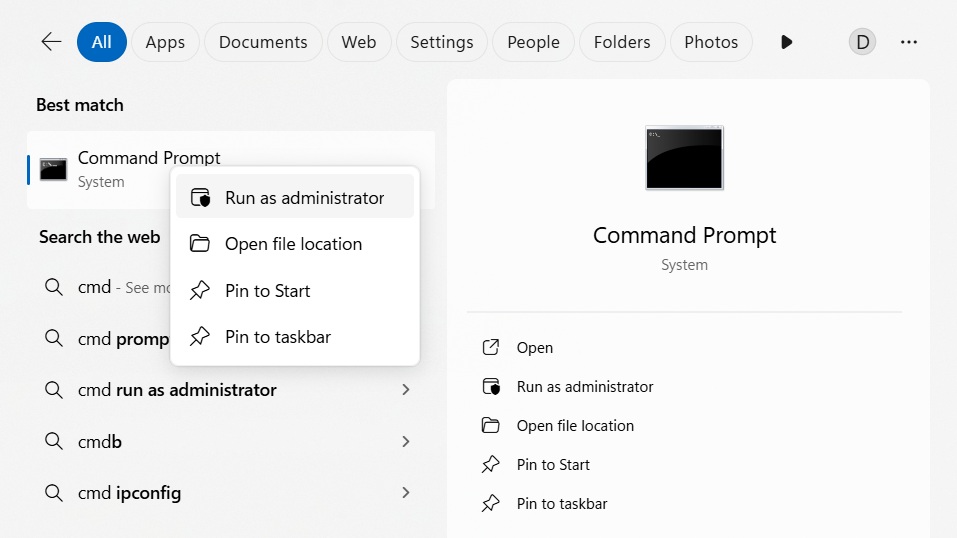
Two powerful command-line utilities are built into Windows to repair the operating system’s core files: System File Checker (SFC) and Deployment Image Servicing and Management (DISM). These should be run from an administrative Command Prompt, which can be accessed from Safe Mode or the Windows Recovery Environment. In the Windows search bar, type cmd, right click on the Command Prompt option and choose Run as administrator
First, the System File Checker tool should be run. This utility scans all protected operating system files and replaces corrupted, incorrect, or damaged versions with the correct versions. To execute it, the following command is used:
sfc /scannow
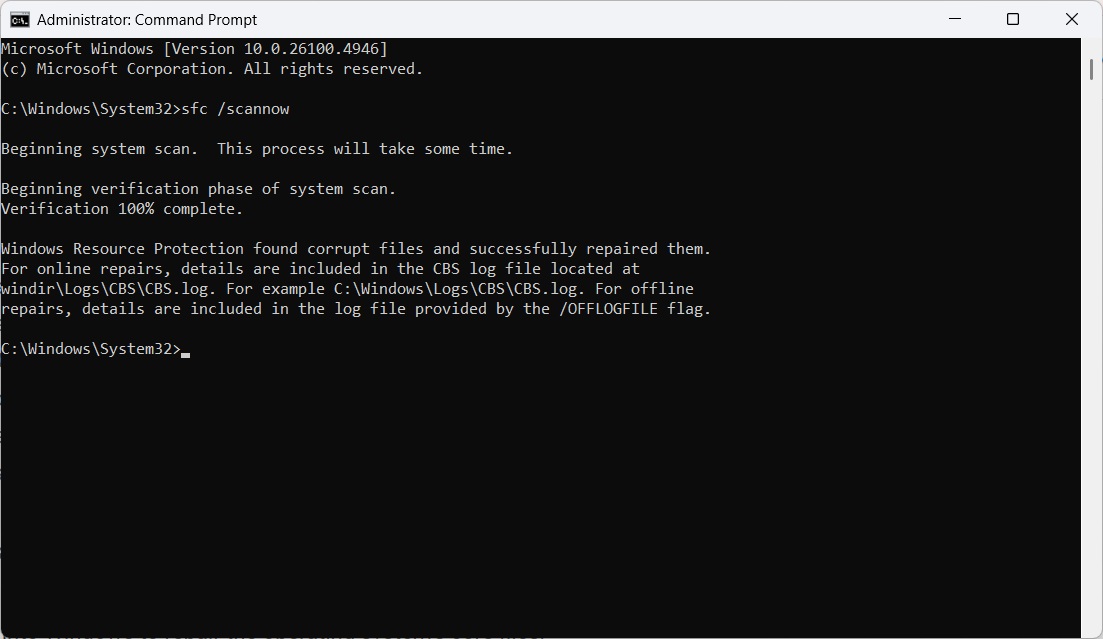
If SFC reports that it found corrupt files but was unable to fix some of them, it often means the underlying component store that SFC relies on is also damaged. In this case, the DISM tool must be used to repair the Windows image itself. DISM can download clean files from Windows Update to replace corrupted ones in the local image. The command to run is:
DISM /Online /Cleanup-Image /RestoreHealth

After the DISM command completes successfully, it is best practice to run sfc /scannow again to ensure all files have been repaired.
Solution 2: Managing Problematic Updates and Software
A significant pattern of instability has been observed across the landscape of handheld and Mini PCs in relation to a specific Windows update. Numerous user reports from the GPD, ONEXPLAYER, AYANEO, and Beelink communities indicate that the Windows 11 Version 24H2 feature update is a direct cause of severe BSODs, including DPC_WATCHDOG_VIOLATION, and persistent boot loops. This suggests a systemic incompatibility between the hardware and driver ecosystem of these specialized devices and the architectural changes introduced in that update. Consequently, it was strongly recommended to avoid installing the 24H2 update. If it has already been installed and is causing issues, it must be uninstalled.
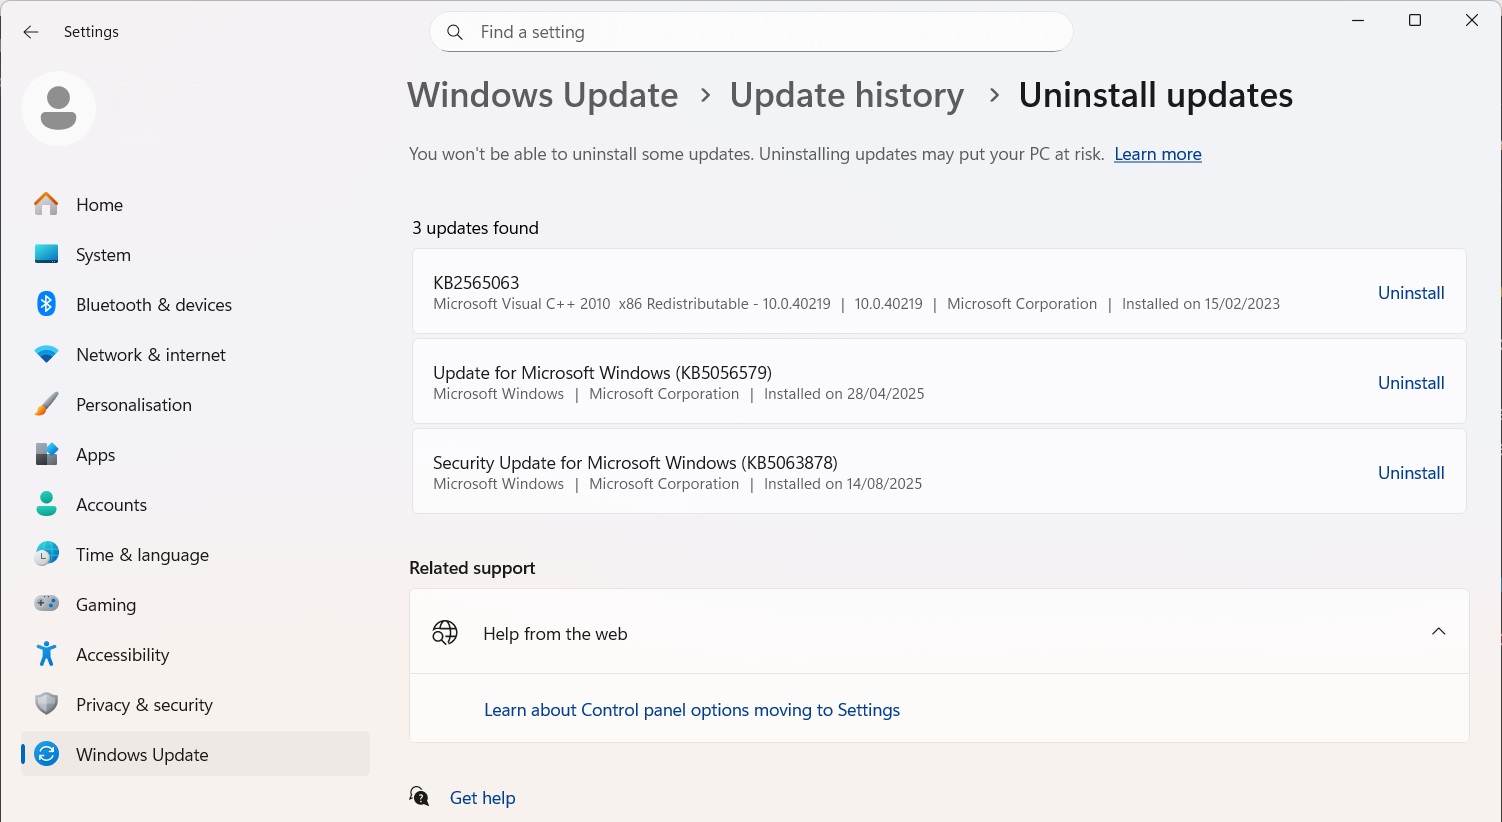
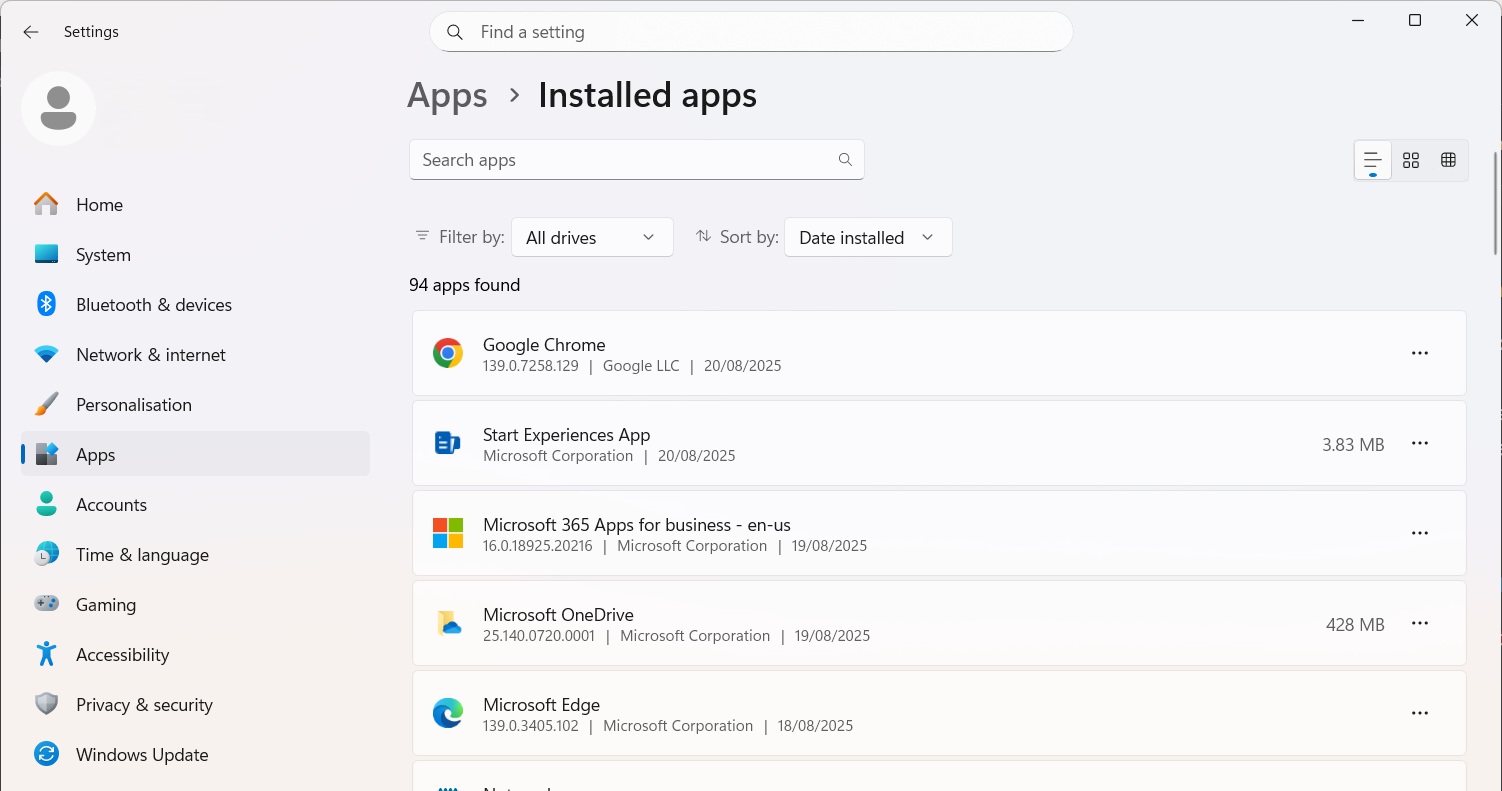
To remove a problematic update, the system should be booted into Safe Mode. From there, navigate to Settings > Windows Update > Update history > Uninstall updates. This will display a list of recently installed updates. The latest Quality Update or Feature Update can be selected and uninstalled. Similarly, if BSODs began after installing a new application, particularly system utilities or antivirus software, it should be uninstalled from Safe Mode via Settings > Apps > Installed Apps
Solution 3: Using System Restore
System Restore is a Windows feature that functions like a “time machine” for critical system settings, drivers, and registry entries. It allows the user to revert the system’s state to a previously created “restore point.” If BSODs began occurring after a specific date, using System Restore to revert to a point before that date can often resolve the issue. This tool is most effectively accessed from the Windows Recovery Environment by navigating to Troubleshoot > Advanced options > System Restore. From there, a list of available restore points will be shown, and the user can select one that predates the onset of the stability problems.
Section 3: Driver Issues
Device drivers are the single most common cause of Blue Screen of Death errors. These specialized software components act as the bridge of communication between the computer’s hardware and the Windows operating system. A bug within a driver, an incompatibility with a Windows update, or a conflict with another driver can destabilize the entire system, leading to a critical failure. This is particularly relevant for the highly customized hardware found in devices from GPD, Minisforum, and others, which often rely on specific drivers for their integrated GPUs (like the AMD Radeon 780M), chipsets, and other unique components found in a mini PC for gaming. Common driver-related stop codes include DRIVER_IRQL_NOT_LESS_OR_EQUAL or IRQL_NOT_LESS_OR_EQUAL, which indicate a driver attempted to access a memory address improperly, and VIDEO_TDR_FAILURE, which signifies that the graphics driver stopped responding and could not be recovered by Windows.
Solution 1: Standard Driver Management (Update and Rollback)
The first line of defense is proper driver maintenance. This involves ensuring all drivers are up-to-date while also having the ability to revert a recent update if it causes instability.
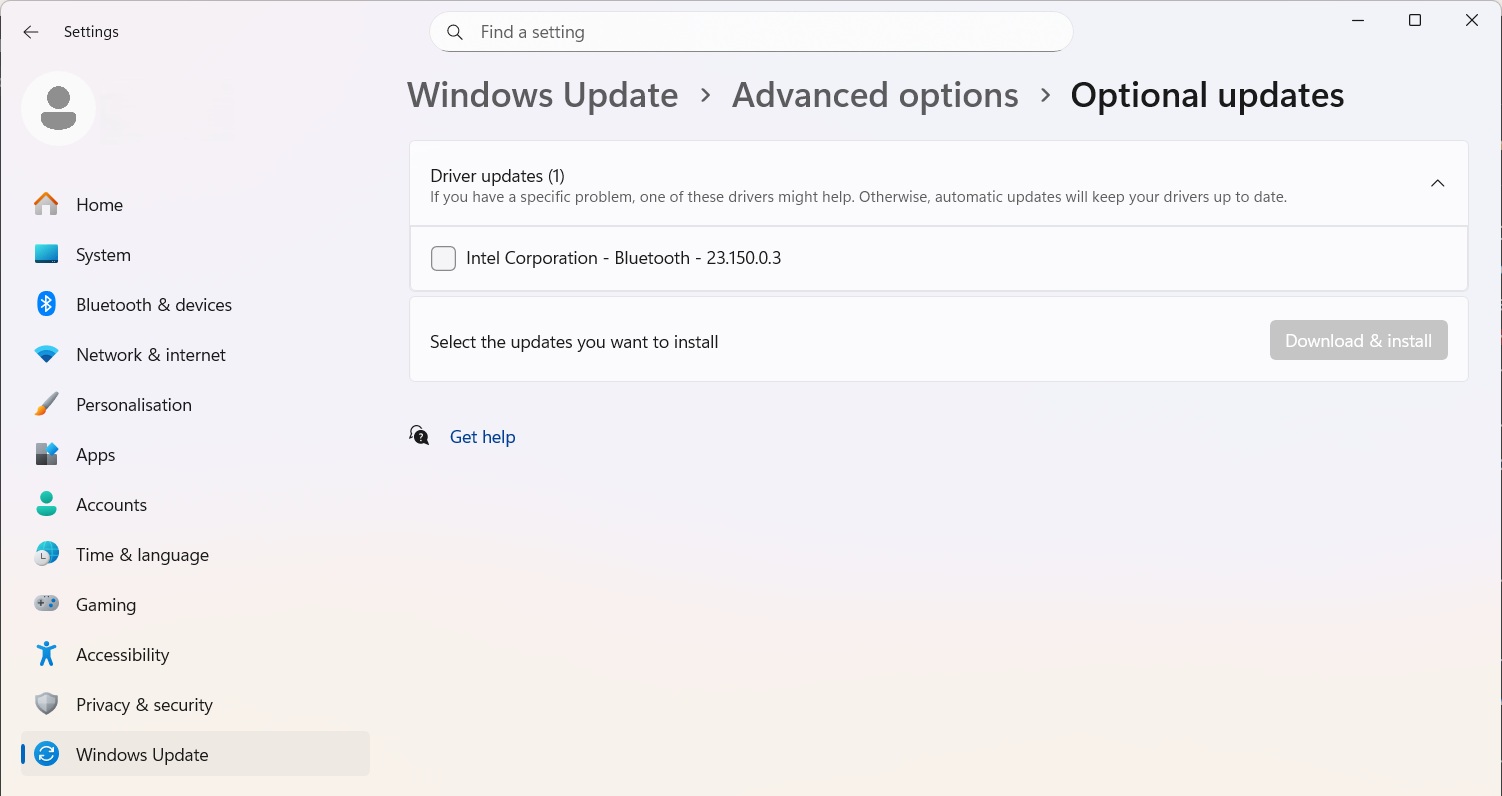
- Update Drivers: Drivers can be updated through multiple channels. The first is Windows Update, which often provides certified drivers. It is crucial to check the “Optional updates” section within Windows Update, as many hardware drivers are delivered through this channel. However, the most reliable source for drivers is our Knowledge Base updating drivers guide here (e.g., for Beelink, GMKTec) or the website of the component manufacturer (e.g., AMD, Intel, MediaTek). These direct-from-source drivers are typically tailored for the specific hardware and are often more stable than generic versions provided by Microsoft.
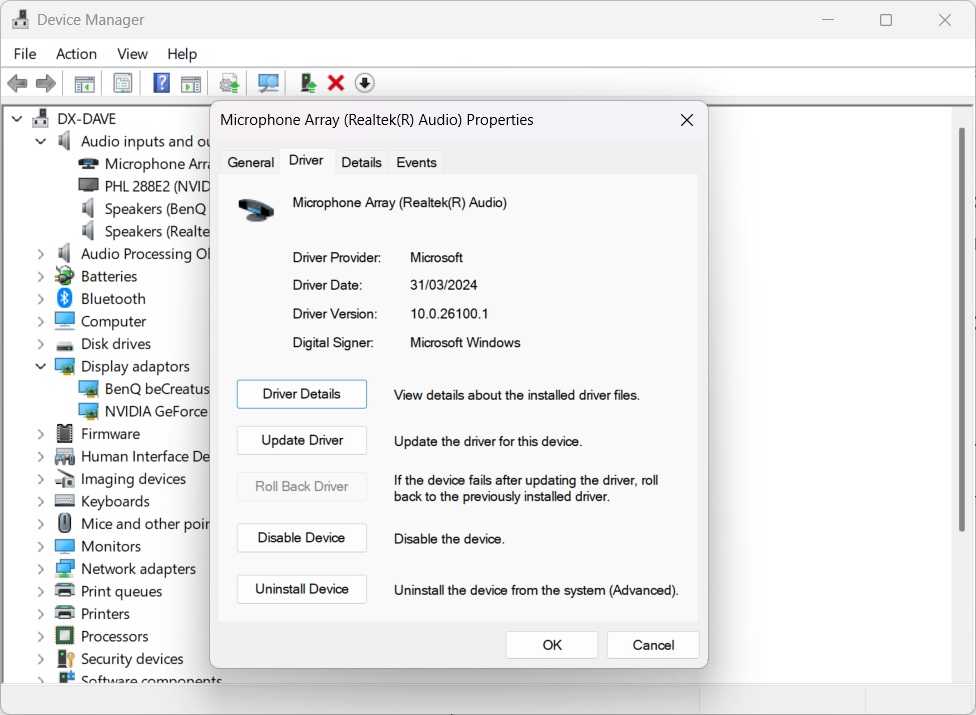
- Roll Back Driver: If BSODs begin immediately after a driver has been updated, the problematic update should be reversed. This can be done through the Device Manager. By locating the device, opening its Properties dialog, navigating to the Driver tab, and selecting Roll Back Driver, the system will revert to the previously installed version.
Solution 2: Advanced Diagnostics with Driver Verifier
When BSOD memory dump files are inconclusive, often blaming a generic Windows kernel file like ntoskrnl.exe, a more advanced tool is needed to identify the true culprit. Driver Verifier is a utility built into Windows specifically for this purpose. It subjects selected drivers to a series of extreme stress tests, monitoring them for illegal function calls or actions that could corrupt the system. This process is designed to force latent bugs within a driver to manifest immediately, causing a BSOD that directly implicates the faulty driver file.
However, because Driver Verifier intentionally destabilizes the system, it is a powerful but potentially hazardous tool. If used improperly, it can result in a boot loop that prevents access to the desktop. Therefore, a System Restore point must be created before enabling it, and the user must be prepared to disable it from Safe Mode.
The following is a safe, step-by-step process for using Driver Verifier:
- Create a System Restore point, search for System restore point on Windows Search and follow the prompts.
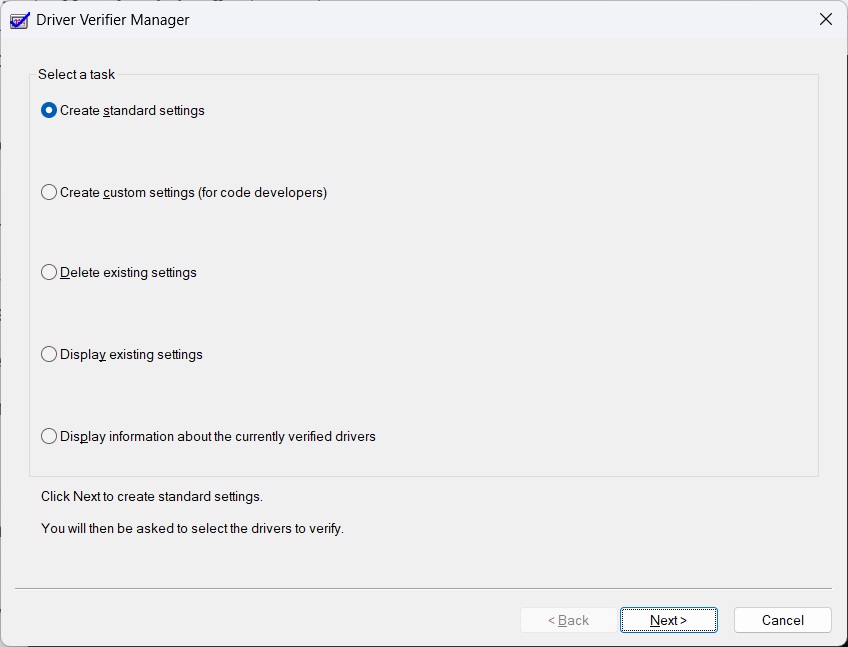
- Open Command Prompt or the Run dialog as an administrator and type verifier.exe to launch the Driver Verifier Manager.
- Select “Create custom settings (for code developers)” and click Next.
- From the list of individual settings, select all checkboxes except for “DDI compliance checking” and “Randomized low resources simulation.” Click Next.
- Select “Select driver names from a list.”
- Sort the list by Provider and select all drivers that are not provided by “Microsoft Corporation.” Click Finish.
- Reboot the computer. Use the device normally until it crashes. The resulting BSOD screen should provide a new stop code and, crucially, the name of the driver file that caused the violation (e.g., some_driver.sys).
- To regain access to the system, boot into Safe Mode.
- Once in Safe Mode, open an administrative Command Prompt and type the command verifier /reset to disable Driver Verifier.
- Reboot the computer. It should now start normally.
- With the faulty driver identified, it can be updated, rolled back, or uninstalled to resolve the BSODs.
Solution 3: Addressing Specific Driver Conflicts
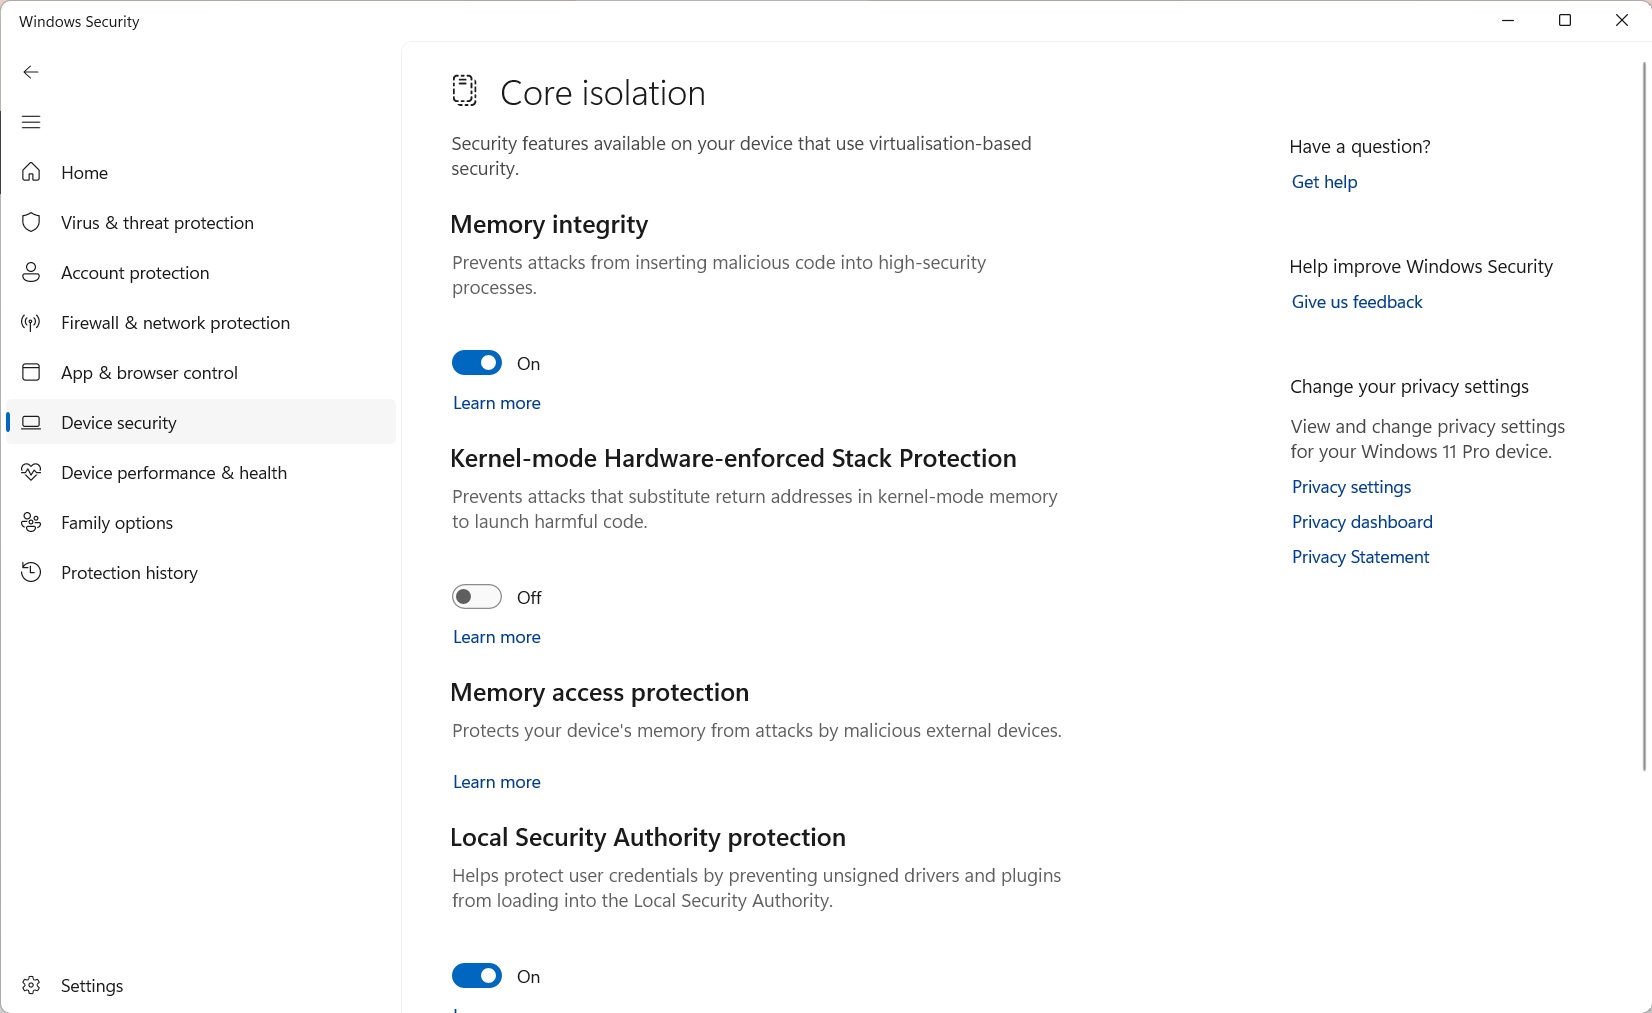
Certain BSOD errors are caused by known conflicts between specific software and Windows security features. A notable example is the KERNEL_SECURITY_CHECK_FAILURE error, which has been reported by users of gaming handhelds when launching games that use aggressive anti-cheat systems, such as Genshin Impact or Valorant. This specific crash is often triggered by a conflict between the anti-cheat’s kernel-level driver and a Windows 11 security feature called “Kernel-mode Hardware-enforced Stack Protection.” As a workaround, this feature can be disabled by navigating to
Settings > Privacy & Security > Windows Security > Device Security > Core Isolation details
and turning off the toggle. It is important to note that disabling this feature reduces system security, and it should be considered a temporary measure until the anti-cheat software provider releases a compatible update.
Section 4: RAM (Memory) Issues
Faulty Random Access Memory (RAM) is a primary hardware culprit for a wide range of system instabilities, including data corruption, application crashes, and random, seemingly unrelated BSODs. When a RAM module is defective, it can fail to correctly store or retrieve data, leading to critical errors when the operating system or an application attempts to access that corrupted information. The most common stop codes associated with memory failures are MEMORY_MANAGEMENT ($0x0000001A$), which indicates a severe error in the way Windows is managing memory, and PAGE_FAULT_IN_NONPAGED_AREA ($0x00000050$), which occurs when the system tries to access a page of memory that does not exist or is invalid.
Solution 1: Physical Inspection and Reseating (for Mini PCs)
For an office mini PC from brands like Beelink and Minisforum where the RAM is user-accessible, a physical check is a valuable first step. Over time, or due to shipping vibrations, RAM modules (SODIMMs) can become slightly unseated from their slots. This poor electrical contact can lead to intermittent errors that mimic a failing module. The process involves powering down the device, disconnecting it from power, opening the chassis according to the manufacturer’s instructions, and carefully unclipping the RAM modules. After a brief wait, the modules should be firmly reinserted into their slots until the retaining clips click into place. For many users, simply reseating the RAM can resolve persistent BSODs.
Solution 2: Windows Memory Diagnostic
Windows includes a built-in tool for performing a basic memory test. The Windows Memory Diagnostic tool can be launched by pressing Win + R, typing mdsched.exe in the Run dialog, and pressing Enter. The tool will prompt for a system restart to begin the test. While this utility is a convenient first step and can detect obvious hardware failures, it is not as exhaustive as more specialized third-party software. If the Windows tool reports no errors but memory-related BSODs continue, a more rigorous test is required.

Solution 3: Definitive Testing with MemTest86
For conclusive and reliable testing of system RAM, MemTest86 is the industry-standard utility. It is frequently recommended by technical support staff and enthusiast communities for diagnosing elusive memory problems. Unlike the Windows tool, MemTest86 runs from a bootable USB drive, completely outside of the Windows operating system. This allows it to directly access and test every memory address without interference from drivers or system processes, enabling it to detect subtle and intermittent faults that other tests might miss. Any error reported by MemTest86, no matter how small, is a definitive indicator of faulty hardware that needs to be replaced.
A comprehensive tutorial for using MemTest86 involves the following steps:
- On a separate, working computer, navigate to the official MemTest86 website and download the free version.
- The download includes an image file and a tool for creating a bootable USB drive. Run this tool and select a spare USB drive (note that all data on the drive will be erased).
- Insert the newly created MemTest86 USB drive into the computer that is experiencing BSODs.
- Power on the machine and immediately enter its BIOS/UEFI setup menu (this is typically done by pressing a key like ESC or Delete during startup).
- In the BIOS/UEFI settings, locate the boot options. It may be necessary to disable “Secure Boot” to allow the USB drive to load. Set the USB drive as the first boot priority.
- Save the changes and exit the BIOS/UEFI. The computer will restart and boot from the USB drive, automatically launching MemTest86.
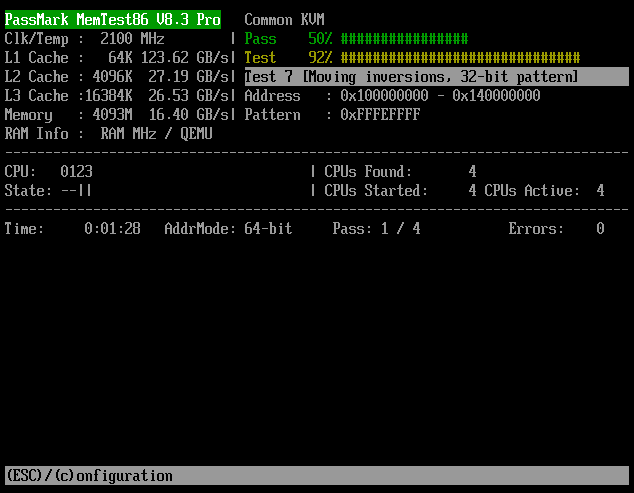
- The test will begin a countdown and then start running automatically. For a thorough and conclusive diagnosis, the test should be allowed to complete a minimum of four full passes. Depending on the amount and speed of the RAM, this process can take several hours.
- Monitor the screen for errors. If any errors are detected, they will be displayed in red. The presence of even a single error confirms that at least one of the RAM modules is physically faulty and must be replaced to achieve system stability.
Section 5: SSD (Storage) Issues
The Solid State Drive (SSD) is the foundation upon which the operating system rests. A failing drive, a corrupted file system, or misconfigured system settings can prevent Windows from loading correctly, often resulting in a BSOD during the startup process. Common stop codes related to storage failures include INACCESSIBLE_BOOT_DEVICE ($0x0000007B$), which signifies that Windows lost access to the system partition during boot, and NTFS_FILE_SYSTEM ($0x00000024$), which points to a fundamental error in the drive’s file system structure.
Solution 1: Check and Repair the File System
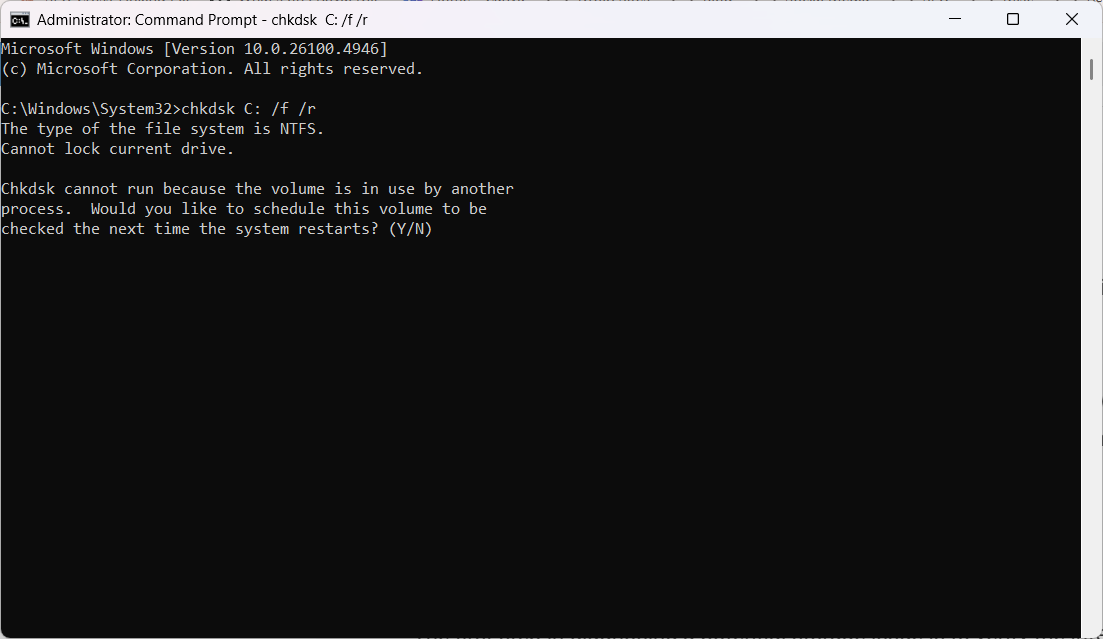
The first step in diagnosing a potential storage issue is to verify the integrity of the file system. The Windows Check Disk (chkdsk) utility is designed for this purpose. It can scan the drive for logical errors, find bad sectors, and attempt to repair them. To run this tool on an unbootable system, an administrative Command Prompt must be opened from the Windows Recovery Environment. The following command will perform a comprehensive scan and repair of the C: drive:
chkdsk C: /f /r
The /f parameter instructs the utility to fix any errors it finds, while the /r parameter tells it to locate bad sectors and recover readable information.
Solution 2: Analyze SSD Health with S.M.A.R.T. Utilities
Modern SSDs include a built-in monitoring technology called S.M.A.R.T. (Self-Monitoring, Analysis, and Reporting Technology), which tracks various health indicators to predict potential drive failures. While Windows does not have a user-friendly interface for viewing this data, several free third-party tools can provide a clear and immediate assessment of an SSD’s health.
- CrystalDiskInfo: This is a widely used and highly recommended utility that provides a straightforward health status report, typically labeled as “Good,” “Caution,” or “Bad,” along with detailed S.M.A.R.T. attributes like temperature and wear levels. A “Caution” or “Bad” status is a strong indicator that the drive is failing and should be replaced. Find it here.
- Manufacturer-Specific Tools: Many SSD manufacturers offer their own diagnostic software, such as Crucial Storage Executive or Kingston SSD Manager. These tools can provide detailed health information, update the drive’s firmware (which can sometimes resolve stability issues), and perform other maintenance tasks.
- HDDScan: For more advanced diagnostics, HDDScan can perform surface tests to check for read errors across the entire drive, providing a more in-depth analysis than S.M.A.R.T. data alone. Find it here.
Solution 3: Verify BIOS/UEFI Boot Settings
In some cases, a BSOD like INACCESSIBLE_BOOT_DEVICE is not caused by a failing drive but by incorrect settings in the system’s BIOS or UEFI. It is essential to enter the setup menu during startup and verify two key settings. First, the boot priority order must be correctly set, with “Windows Boot Manager” or the specific SSD model listed as the primary boot device.
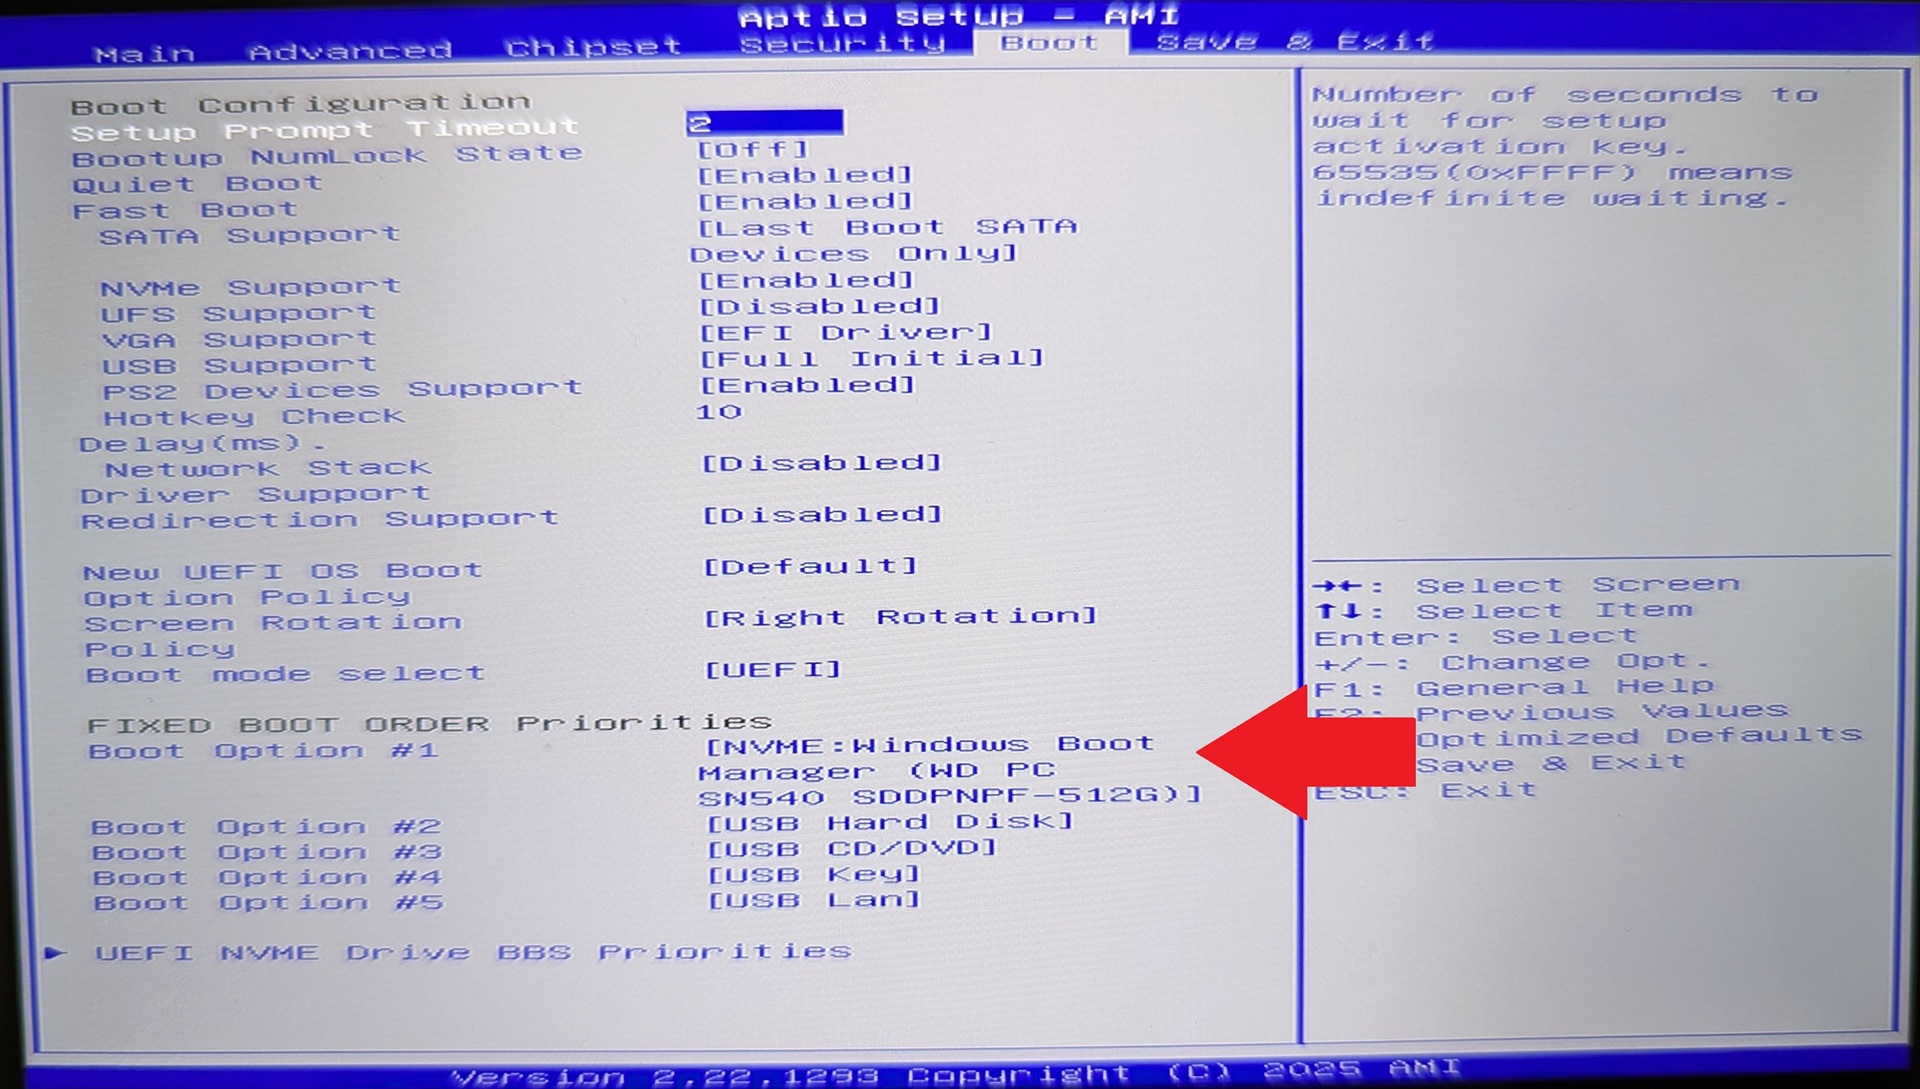
Second, the SATA operation mode should be checked. This setting, often found under storage configuration, typically has options for “AHCI” and “RAID.” If Windows was installed in one mode (e.g., AHCI), and the setting was later changed to the other, the system will be unable to find the boot drive. Ensuring this setting matches the mode used during Windows installation is critical.
Section 6: Other Hardware Issues (CPU, Overheating, BIOS)
This category addresses critical hardware failures that are less frequent but generally more severe than driver or software issues. The primary indicator of such a problem is the WHEA_UNCORRECTABLE_ERROR (Windows Hardware Error Architecture) stop code, with a value of $0x00000124$. This error is not ambiguous; it is a direct report from the hardware layer to the operating system that a significant, unrecoverable hardware fault has occurred. The source can be the Central Processing Unit (CPU), the motherboard, unstable power delivery, or, very commonly in compact devices, severe overheating. Another related, though less common, stop code is MACHINE_CHECK_EXCEPTION ($0x0000009C$).
Solution 1: Aggressively Tackle Overheating
In the constrained chassis of a high-performance portable gaming computer or other compact gaming computers, effective thermal management is paramount. Inadequate cooling is a leading cause of hardware stress and can directly trigger a WHEA_UNCORRECTABLE_ERROR. The high Thermal Design Power (TDP) of the processors in these miniature gaming desktops generates substantial heat during demanding tasks like gaming, and if this heat is not dissipated efficiently, component temperatures can rise to unsafe levels, causing instability.
To diagnose and mitigate overheating, specialized monitoring software such as HWMonitor or Core Temp should be used. These tools provide real-time temperature readings for the CPU and GPU. Under a heavy load, CPU temperatures should ideally remain below 85-90°C. Consistently higher temperatures could indicate a cooling problem if theres no overclocked or incorrect CPU/GPU tweaks. The most common cause is dust accumulation, which can clog heatsink fins and impede fan operation. A thorough cleaning with a can of compressed air is often an effective solution.
Solution 2: Reset Overclocking and BIOS/UEFI Settings
A WHEA_UNCORRECTABLE_ERROR is frequently caused by system instability resulting from overclocking. Pushing the CPU or RAM beyond its manufacturer-rated specifications, including enabling high-performance XMP (Extreme Memory Profile) settings for RAM, can lead to hardware errors under load. The most direct way to rule this out as a cause is to enter the system’s BIOS/UEFI during startup. Once inside, the user should find and execute the option to “Load Optimized Defaults” or “Reset to Default Settings.” This action will revert all settings, including any overclocks, to their stable, factory-shipped state.
Many handheld gaming PC’s have their own Windows software to control various aspects of performance management. Incorrect settings such as the TDP set too high may cause issues. We have a guide on changing the TDP here.
Solution 3: The Critical Role of BIOS Updates
For the specialized and highly integrated systems found in devices from GPD, Beelink, and Minisforum, BIOS updates are not merely for adding new features; they are often critical stability patches that address fundamental hardware compatibility and performance issues. There are documented cases where persistent, random BSODs that appeared to be caused by faulty RAM were completely resolved by a BIOS update provided by the manufacturer. The BIOS governs the most basic interactions between the CPU, RAM, and other motherboard components. A bug or misconfiguration at this foundational level can easily manifest as an error that appears to be a fault in an individual component.
Therefore, especially when faced with an otherwise inexplicable WHEA_UNCORRECTABLE_ERROR, checking the manufacturer’s support website for a BIOS update should be a high-priority step. Beelink support, for instance, often recommends a BIOS update as a primary troubleshooting measure. Performing the update must be done with extreme care, following the manufacturer’s instructions precisely, as a failed BIOS update can render the device inoperable. We have many BIOS updates for the products we sell which you can find on our Knowledge Base.
Section 7: When All Else Fails: Reinstalling Windows 11
When all preceding diagnostic and repair steps have been exhausted and the system remains unstable, or if the operating system is so corrupted that it cannot be effectively troubleshooted, a clean installation of Windows 11 is the final and most definitive solution. This process erases the storage drive and installs a fresh, uncorrupted copy of the operating system, eliminating any software, driver, or configuration issues that may have accumulated over time. Follow our installing Windows 11 guide here.
The process for a clean installation involves several critical steps:
- Data Backup: Before proceeding, it is absolutely essential to back up all important personal files to an external storage device, as the installation process will wipe the primary drive clean.
- Create Installation Media: On a separate, functional computer, the official Microsoft Media Creation Tool should be downloaded. This tool will create a bootable USB installation drive for Windows 11.
- Select the Correct Windows Version: Based on widespread reports of severe instability and BSODs on handheld and Mini PCs, it is imperative to create installation media for Windows 11 Version 23H2. The 24H2 version has demonstrated significant compatibility issues with this class of hardware, whether it’s a compact gaming PC or a Mini PC with high-end graphics card, and should be avoided.
- Perform the Installation: The bootable USB drive should be inserted into the malfunctioning device. The system must then be booted from this USB drive, which may require changing the boot order in the BIOS/UEFI. During the Windows setup process, the “Custom” installation option should be chosen. On the screen that shows the drive partitions, all existing partitions on the main drive should be deleted until only “Unallocated Space” remains. This unallocated space should then be selected as the installation target.
- Post-Installation Driver Setup: Once Windows 11 is installed, the first and most crucial step is to install the official drivers provided by the device manufacturer (e.g., Beelink, GPD, AYANEO). These drivers should be downloaded from the manufacturer’s support website ahead of time and installed before allowing Windows Update to run. This ensures that the system starts with a stable, manufacturer-verified driver foundation.
Still having issues and you are a DROIX customer?
Our products come with a one year warranty, backed up with an excellent customer service. If the product you were having issues was purchased from DROIX, then please get in contact with us and our team will be happy to assist.
You may be required to perfom some checks and provide a photo or details of the blue screen error code. This will better help us identify the cause of the issue.
Conclusion
Resolving a Windows 11 Blue Screen of Death error, while initially daunting, is a manageable process when approached with a logical and systematic methodology. The key to success lies in a structured approach of isolating the problem, diagnosing the root cause, and applying the appropriate repair. By beginning with simple software and driver fixes before escalating to more complex hardware diagnostics, users can often resolve the issue efficiently.
The troubleshooting process can be summarized as follows:
- Isolate: Gather information from the BSOD screen, disconnect peripherals, and use Safe Mode to determine if the issue is software or hardware-related.
- Diagnose: Employ built-in Windows tools like SFC, DISM, and Memory Diagnostic, as well as more powerful third-party utilities like Driver Verifier and MemTest86, to pinpoint the exact faulty component, driver, or system file.
- Repair: Apply targeted solutions, such as updating or rolling back drivers, uninstalling problematic software, reseating components, or, as a last resort, performing a clean installation of the operating system.
For the specific ecosystem of handheld and Mini PCs from GPD, ONEXPLAYER, AYANEO, Minisforum, GMKTec, and Beelink, particular attention must be paid to manufacturer-specific drivers, BIOS updates, and potential incompatibilities with major Windows feature updates like 24H2. If, after following this comprehensive guide, hardware diagnostic tools like MemTest86 conclusively identify a physical fault with a component such as RAM or the SSD, the final step is to contact our customer service if purchased from DROIX, or the device manufacturer for warranty service or professional repair.
