
It’s super important to keep your device running smoothly. A large part is ensuring that you’ve got the latest updates and firmware to ensure that you’ve got the best security, squashed the latest bugs and have your device running as smoothly as possible. We’re going to go through a few different fixes for issues that have arisen in the GPD WIN 4 (2022).
You should flash your BIOS only when it’s absolutely necessary. Do it if you need to resolve security vulnerabilities, fix hardware/firmware bugs, add compatibility to new components, or if there’s a major system enhancement update available.
| Issue | Resolution |
| WIN 4 Gamepad Firmware Update v4.05 | Link |
| GPD WIN 4 LCD Firmware Update Stuttering Fix – No more 60Hz Refresh Bug | Link |
| How to install the GPD WIN 4 BIOS update | Link |
| How to Calibrate GPD Joysticks | Link |
| How to Reinstall Windows on GPD WIN Devices | Link |
WIN 4 Gamepad Firmware Update
That includes the GPD WIN 4, which we know has been having some issues with it’s gamepad. GPD has release an install software for v4.05 of the gamepad firmware and we’re going to go through the process to install.
On your GPD WIN 4, head to the link here to download the firmware update. It contains a ZIP file called ‘GPD Gamepad WIN4 X405K405.zip’. Find where you downloaded it on your device, right click and press ‘Extract All’.
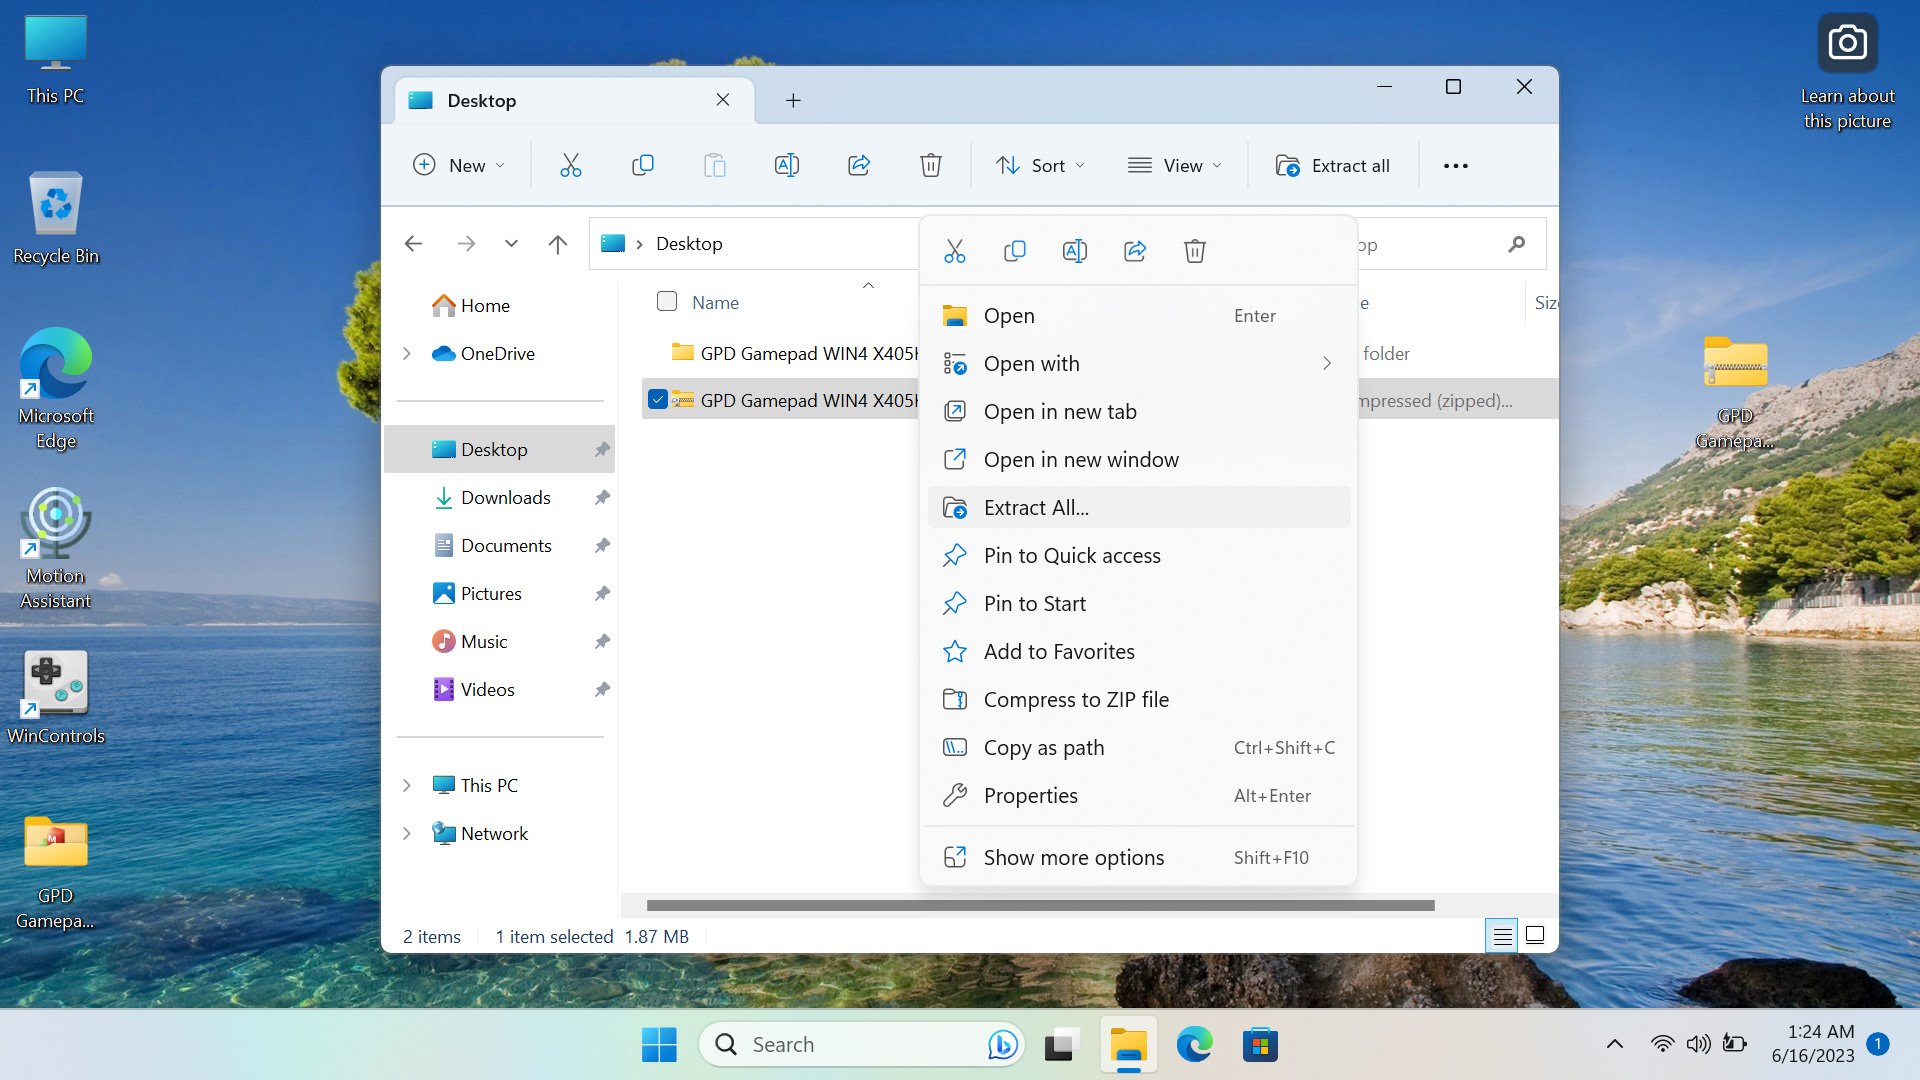
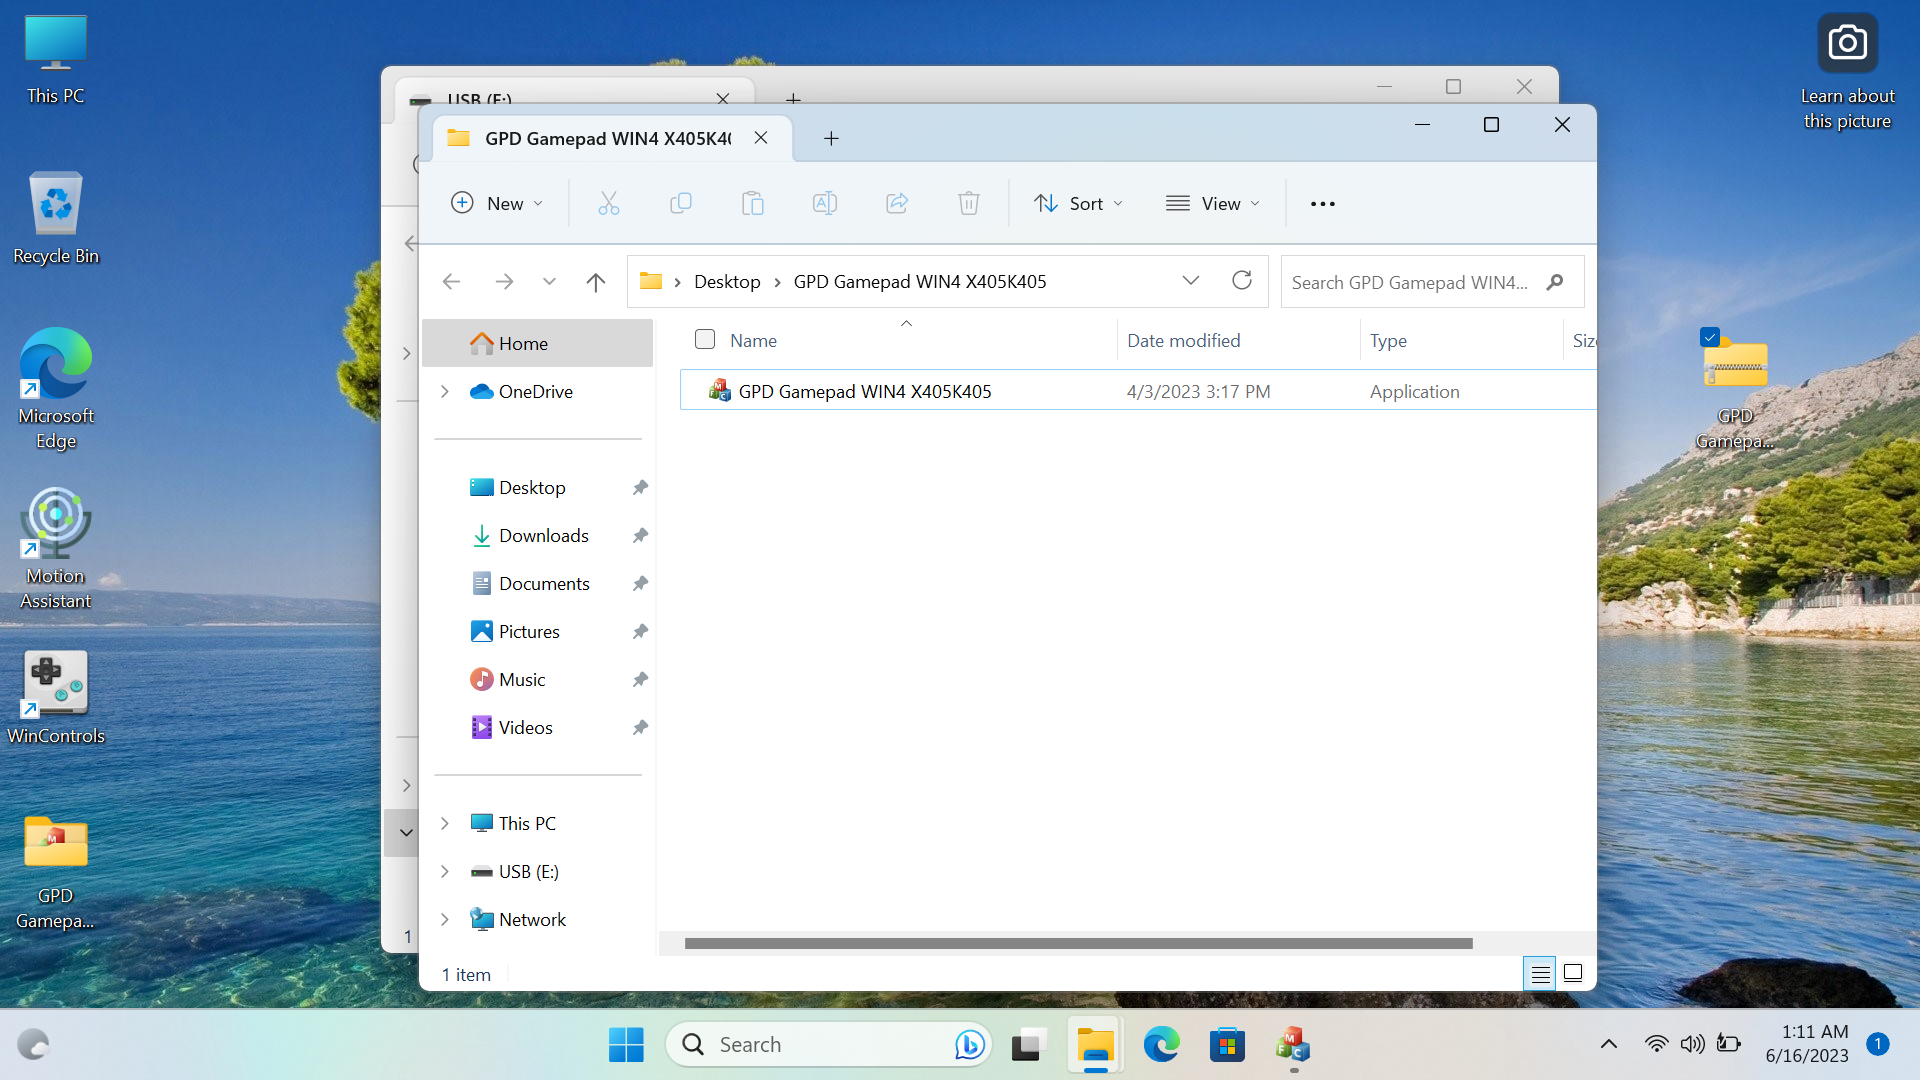
Within the extracted folder you’ll find a program called ‘GPD Gamepad WIN4 X405K405’. Right click and press ‘Run as Administrator’.
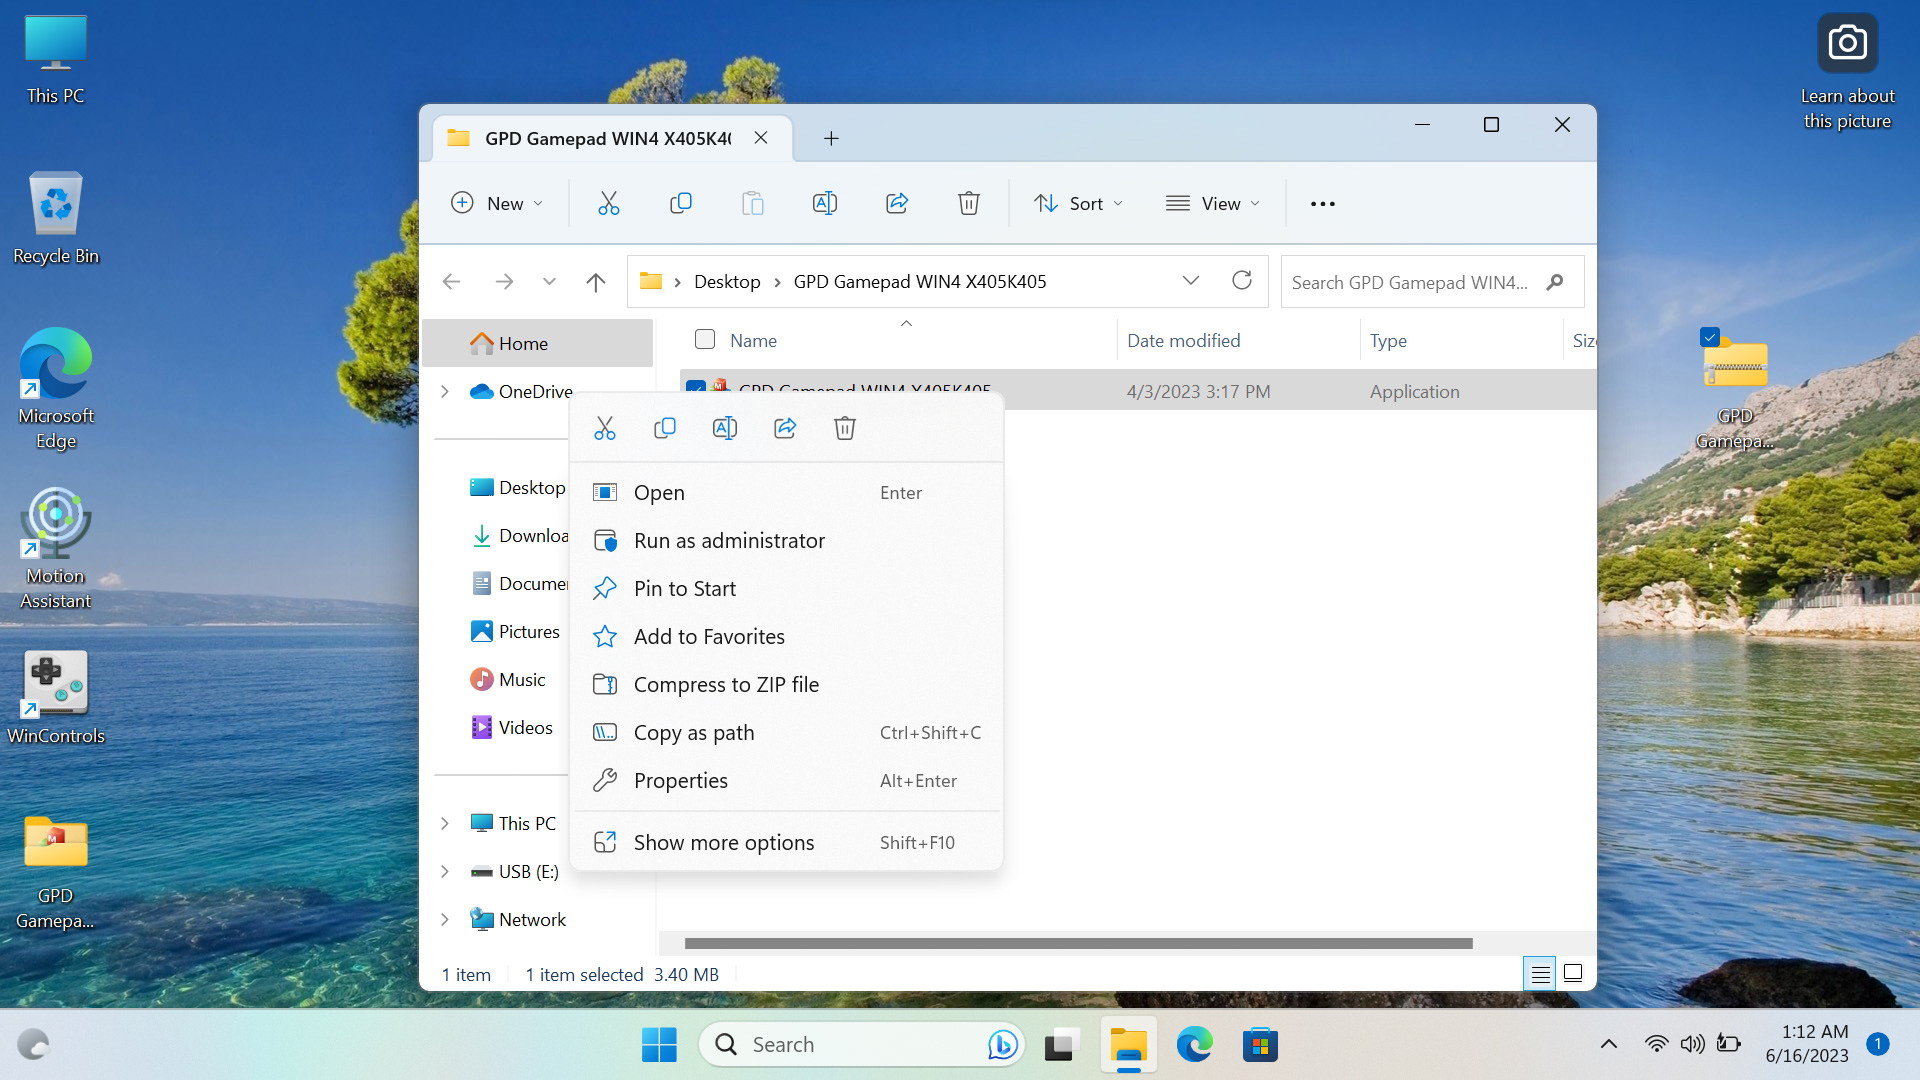
Accept as an administrator, if you are not the administrator ask the person who is to accept, and the program will open. Your device will vibrate as it determines your current firmware version and the latest version available with the program.
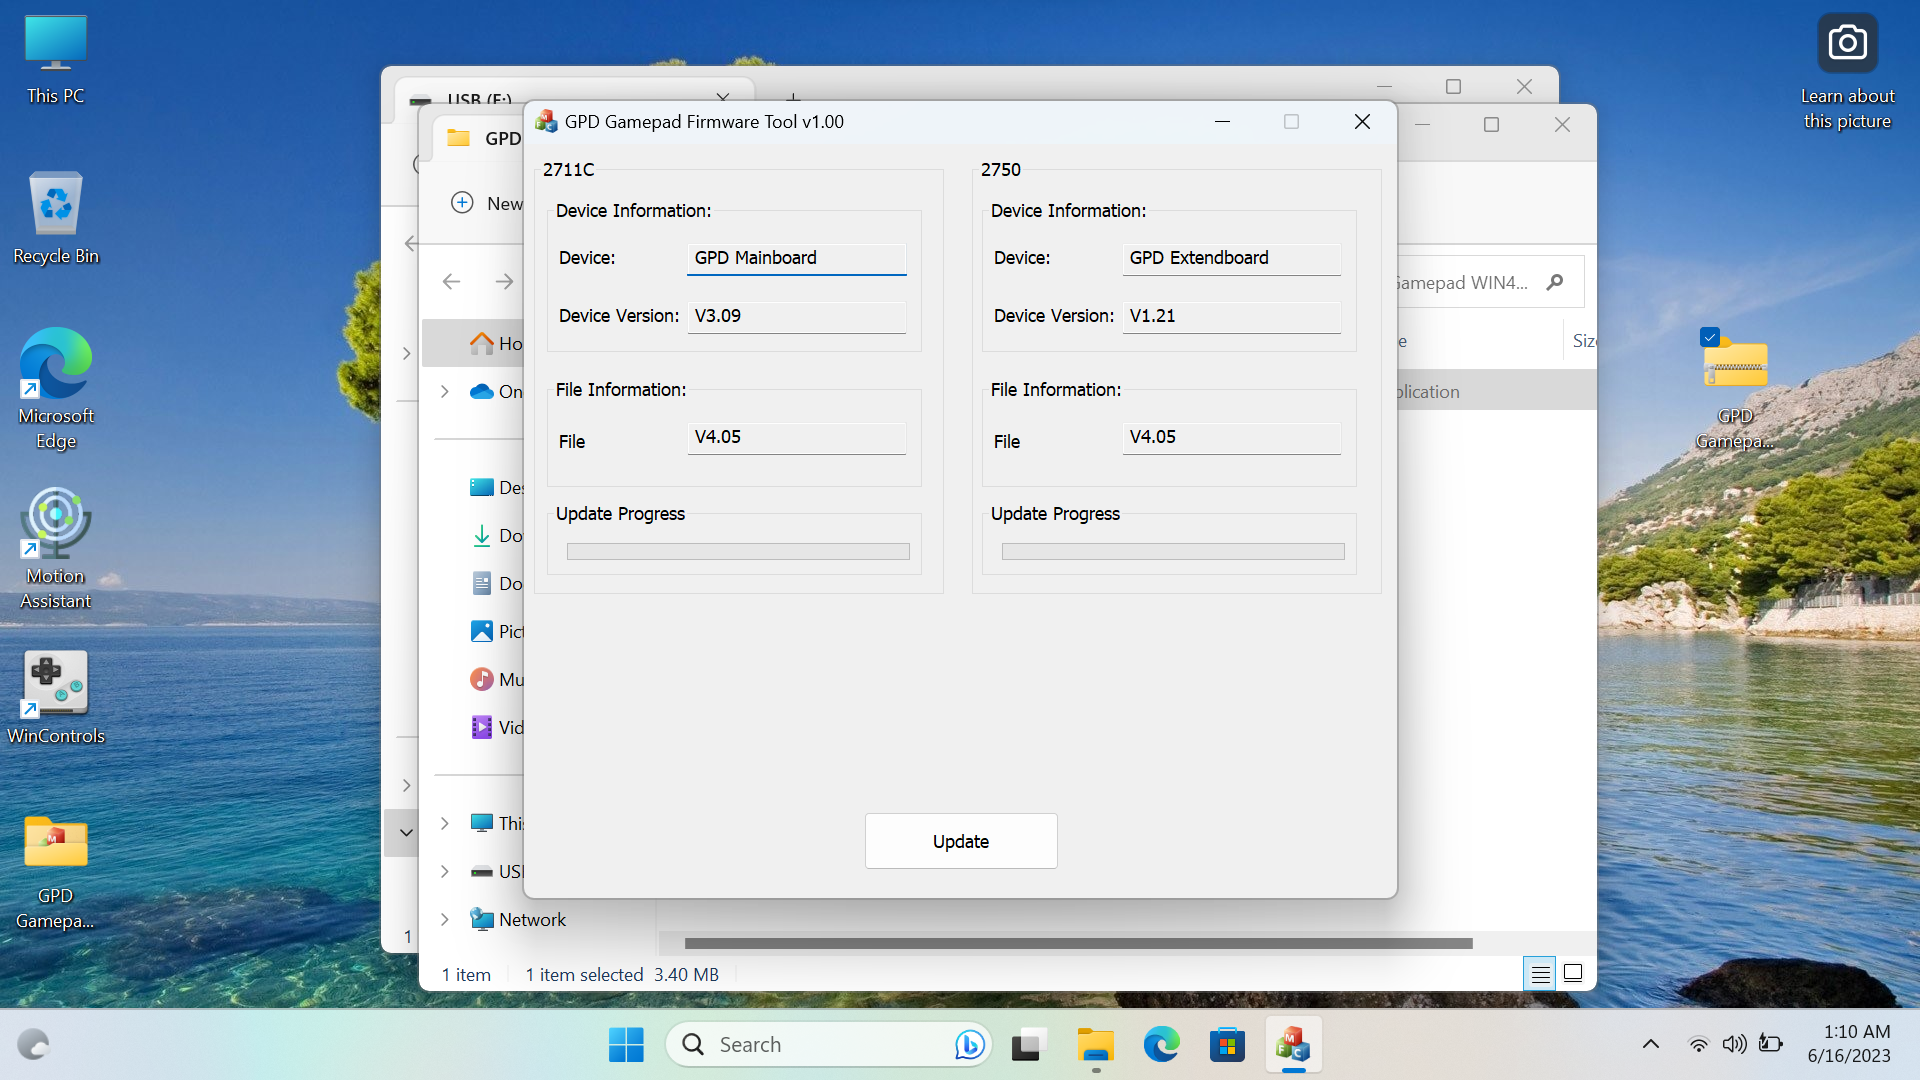
If your version (Device Version) is lower than the program’s version (File Information) then click ‘Update’ and it will install. If not, then you don’t need to as you already have the latest or newer version.
When you click update the two firmwares will install and you will get a success message.
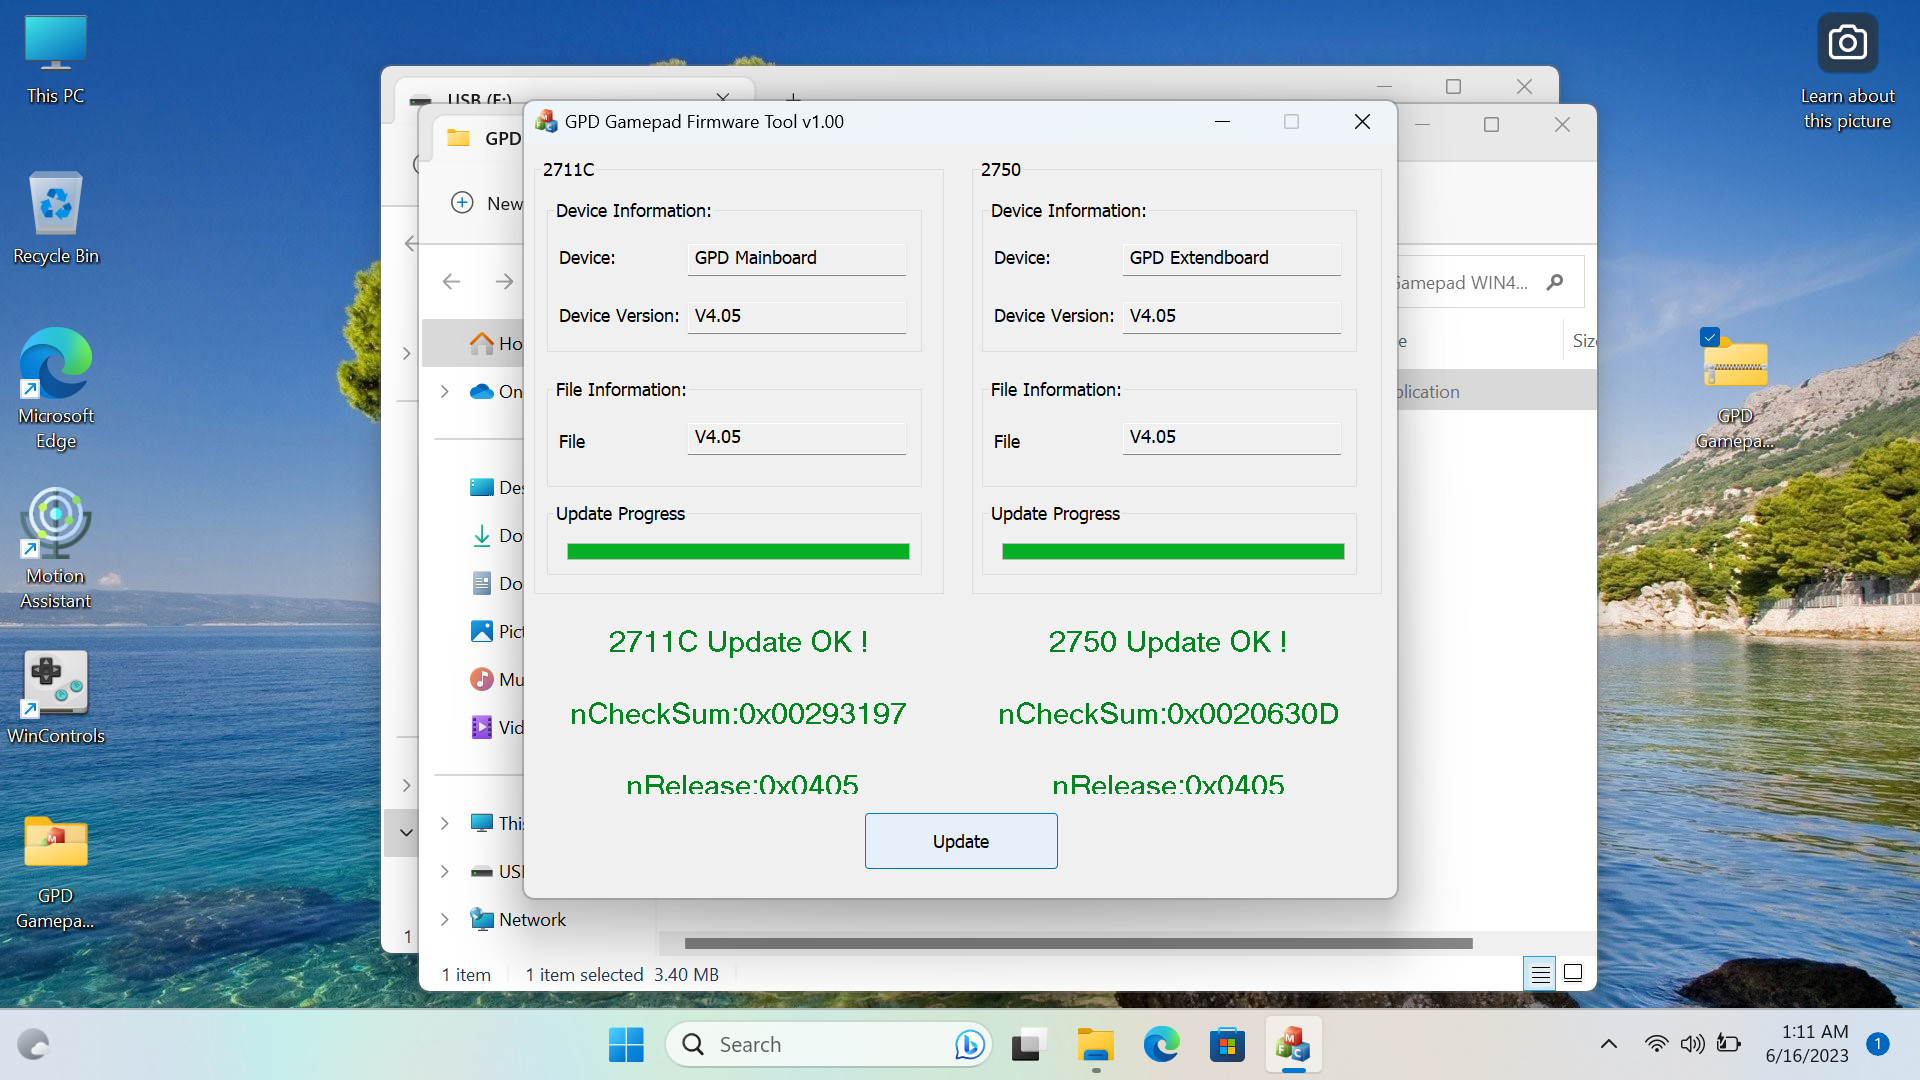
Once you see this, you are done and have installed v4.05 Gamepad Firmware on your GPD WIN 4.
GPD WIN 4 LCD Firmware Update Stuttering Fix – No more 60Hz Refresh Bug
Below is the step by step guide to installing the fix for the 60Hz stutter issue on the GPD WIN 4 6800U model ONLY.
The files needed for the GPD WIN 4 stuttering fix can be downloaded below.
If that link doesn’t work please reach out to DroiX Customer Support.
For this guide you will need:
- GPD WIN 4
- USB Drive
- Charger
This guide will be split into two parts, the first is to check whether or not you need to update the BIOS on your device, and the second to install the fix.
Check Your BIOS
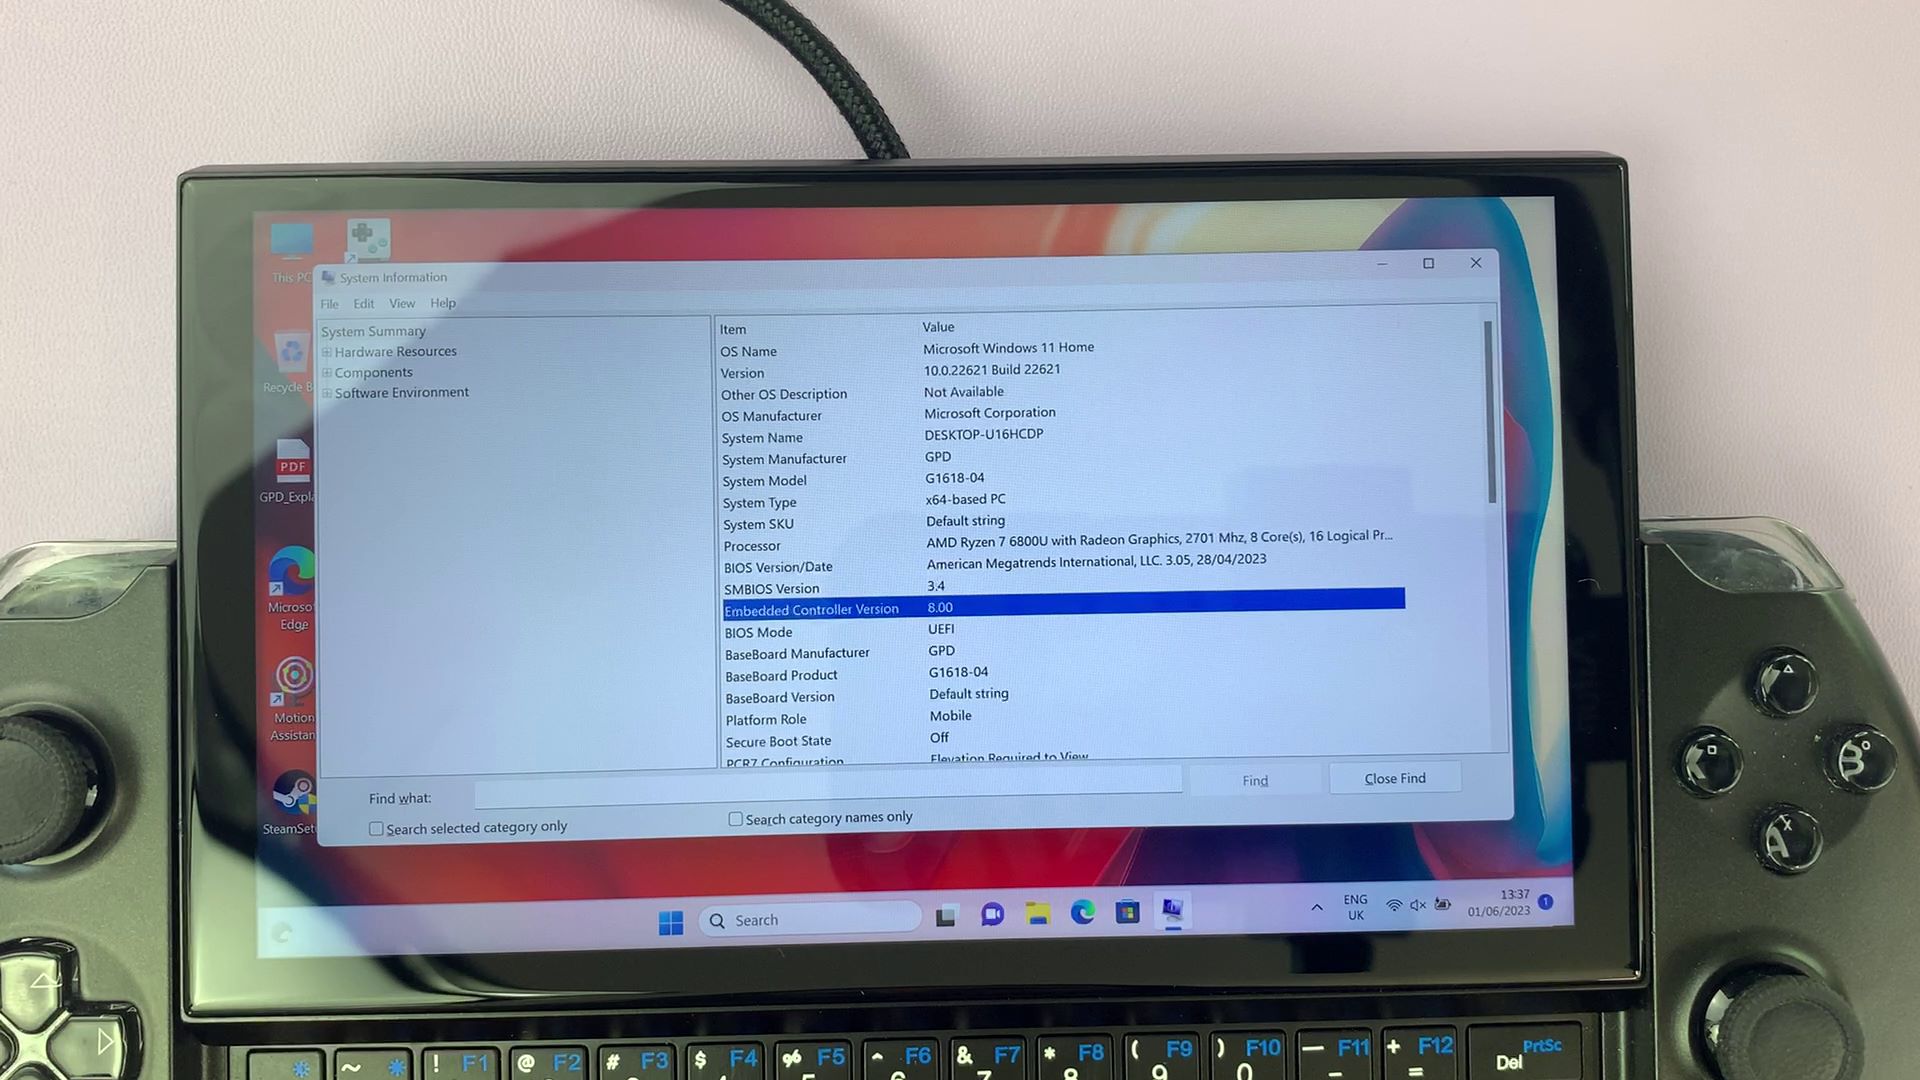
In order to check click Win+R to open Run and type in ‘msinfo32’.
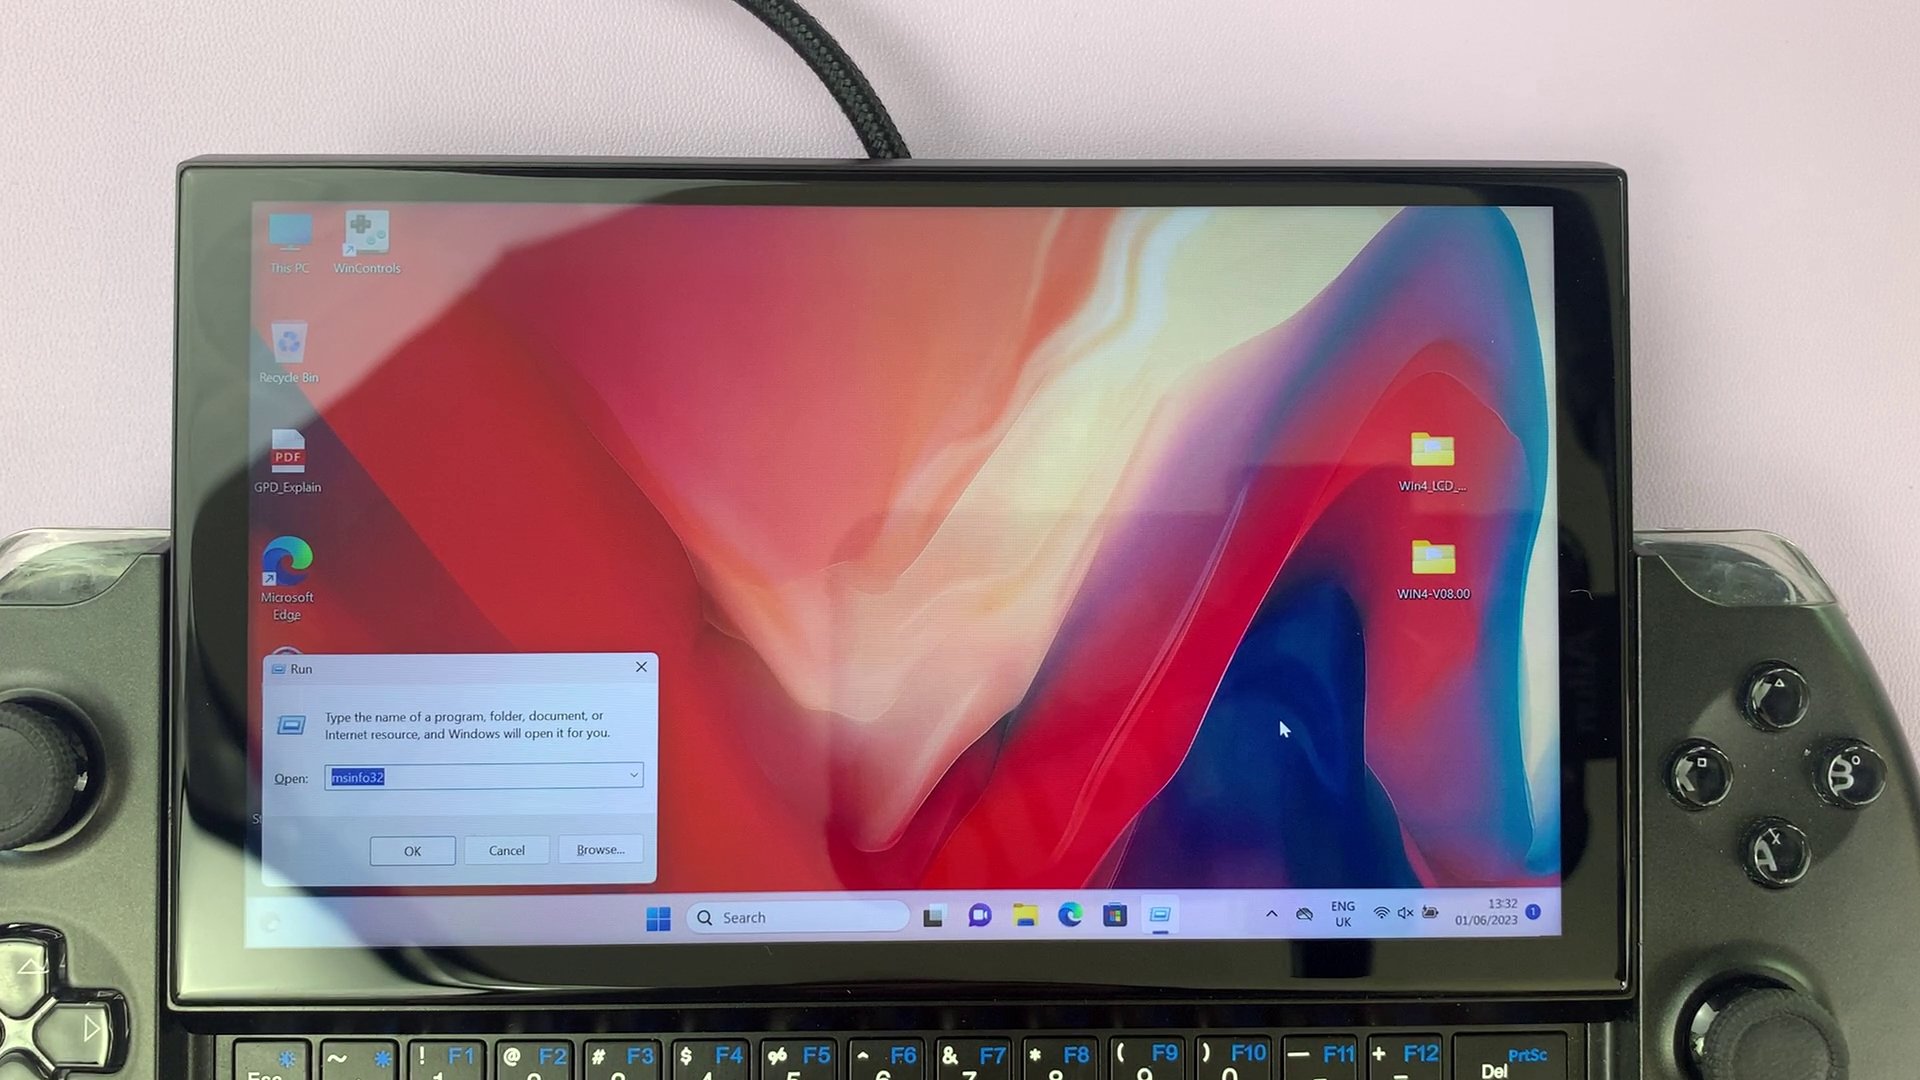
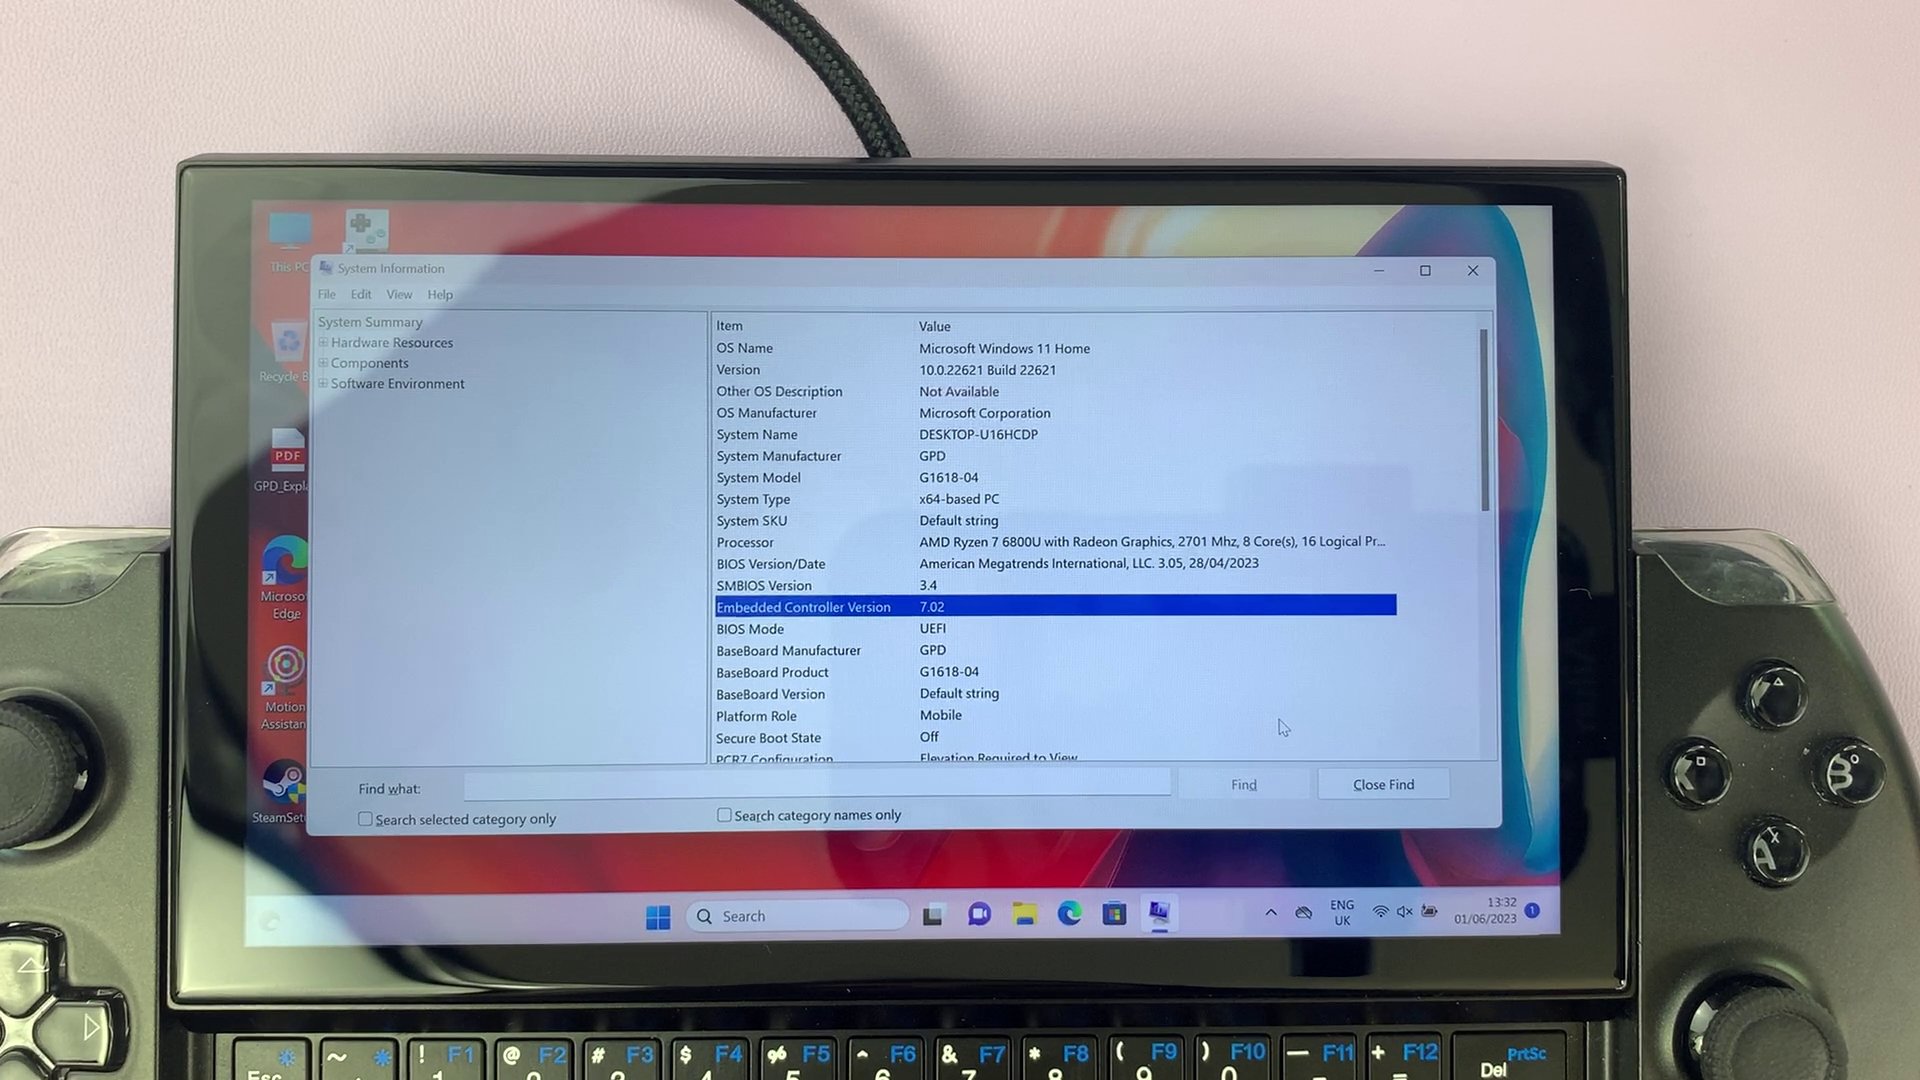
Once you’re into msinfo check to see the Enabled Controller Version. If it is v8.0 and above. If it is then you can skip to here. If not, and it is v7 and below you will need to update your BIOS, the instructions for which are below.
Upgrading Your BIOS
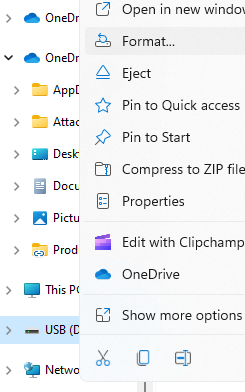
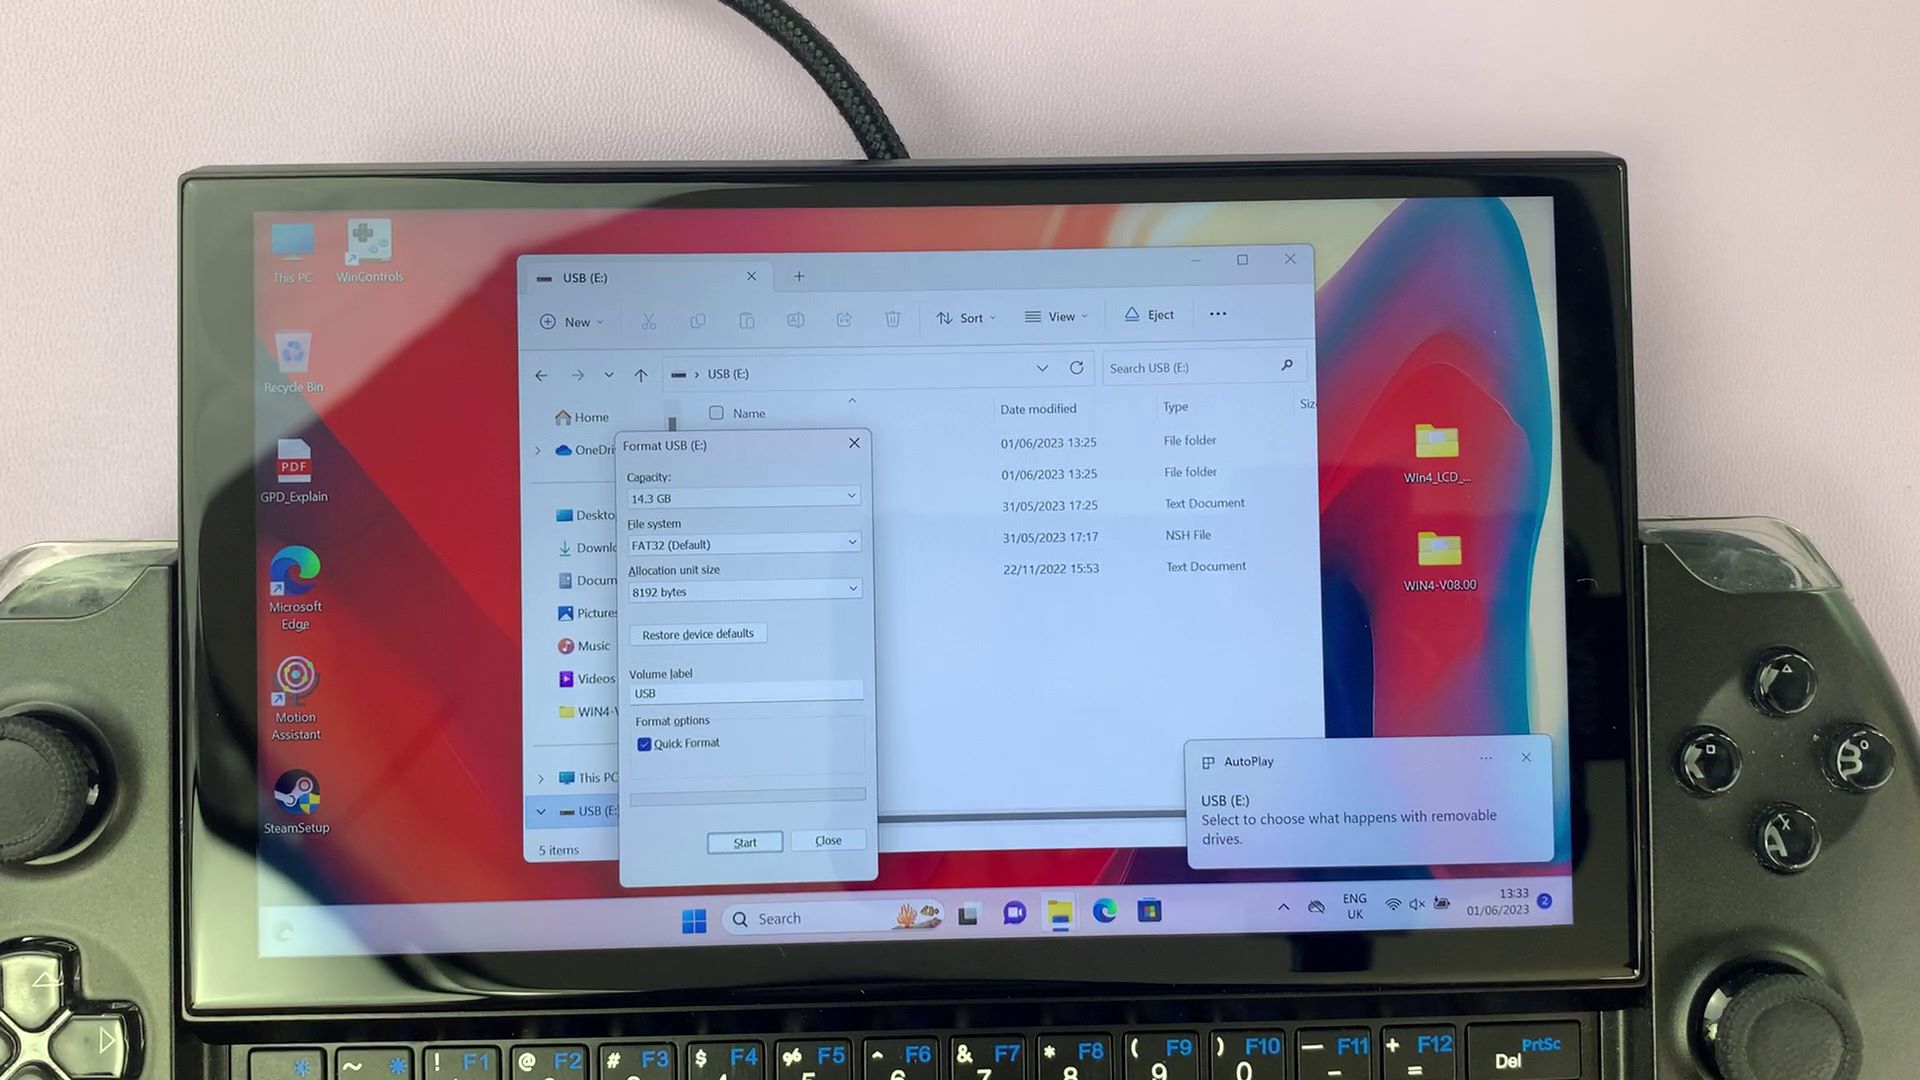
Once your USB Drive is plugged in and seen, right click on it within This PC and click on ‘Format’. Formatting the drive will erase its contents so back up anything you wish to keep. Ensure that ‘FAT32’ file type is selected and when you’re ready, format the drive.
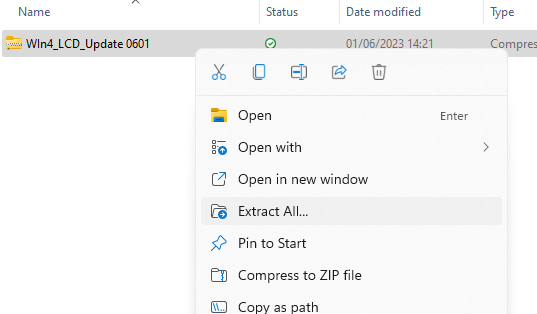
The link will download one ZIP file called ‘WIN4_LCD_Update 0601.zip’.
Download the ZIP file and extract it’s contents. Within you will find a folder called WIN4_LCD_Update.
Within this folder you will have another ZIP file called WIN4-V08.00.zip.
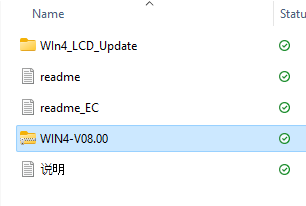
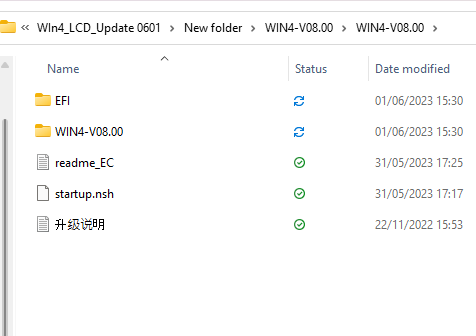
Move this ZIP file to another location and extract it’s contents. Within you will find a folder called ‘WIN4-V08.00’.
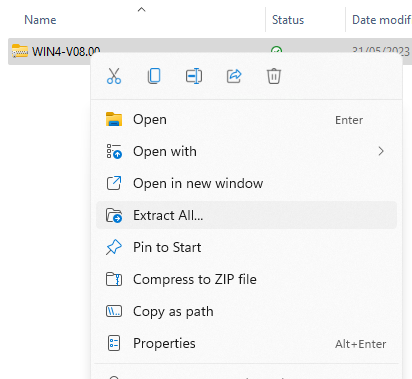
Inside of that folder are the BIOS update files. Copy over the CONTENTS of the folder to the USB drive, not the folder itself.
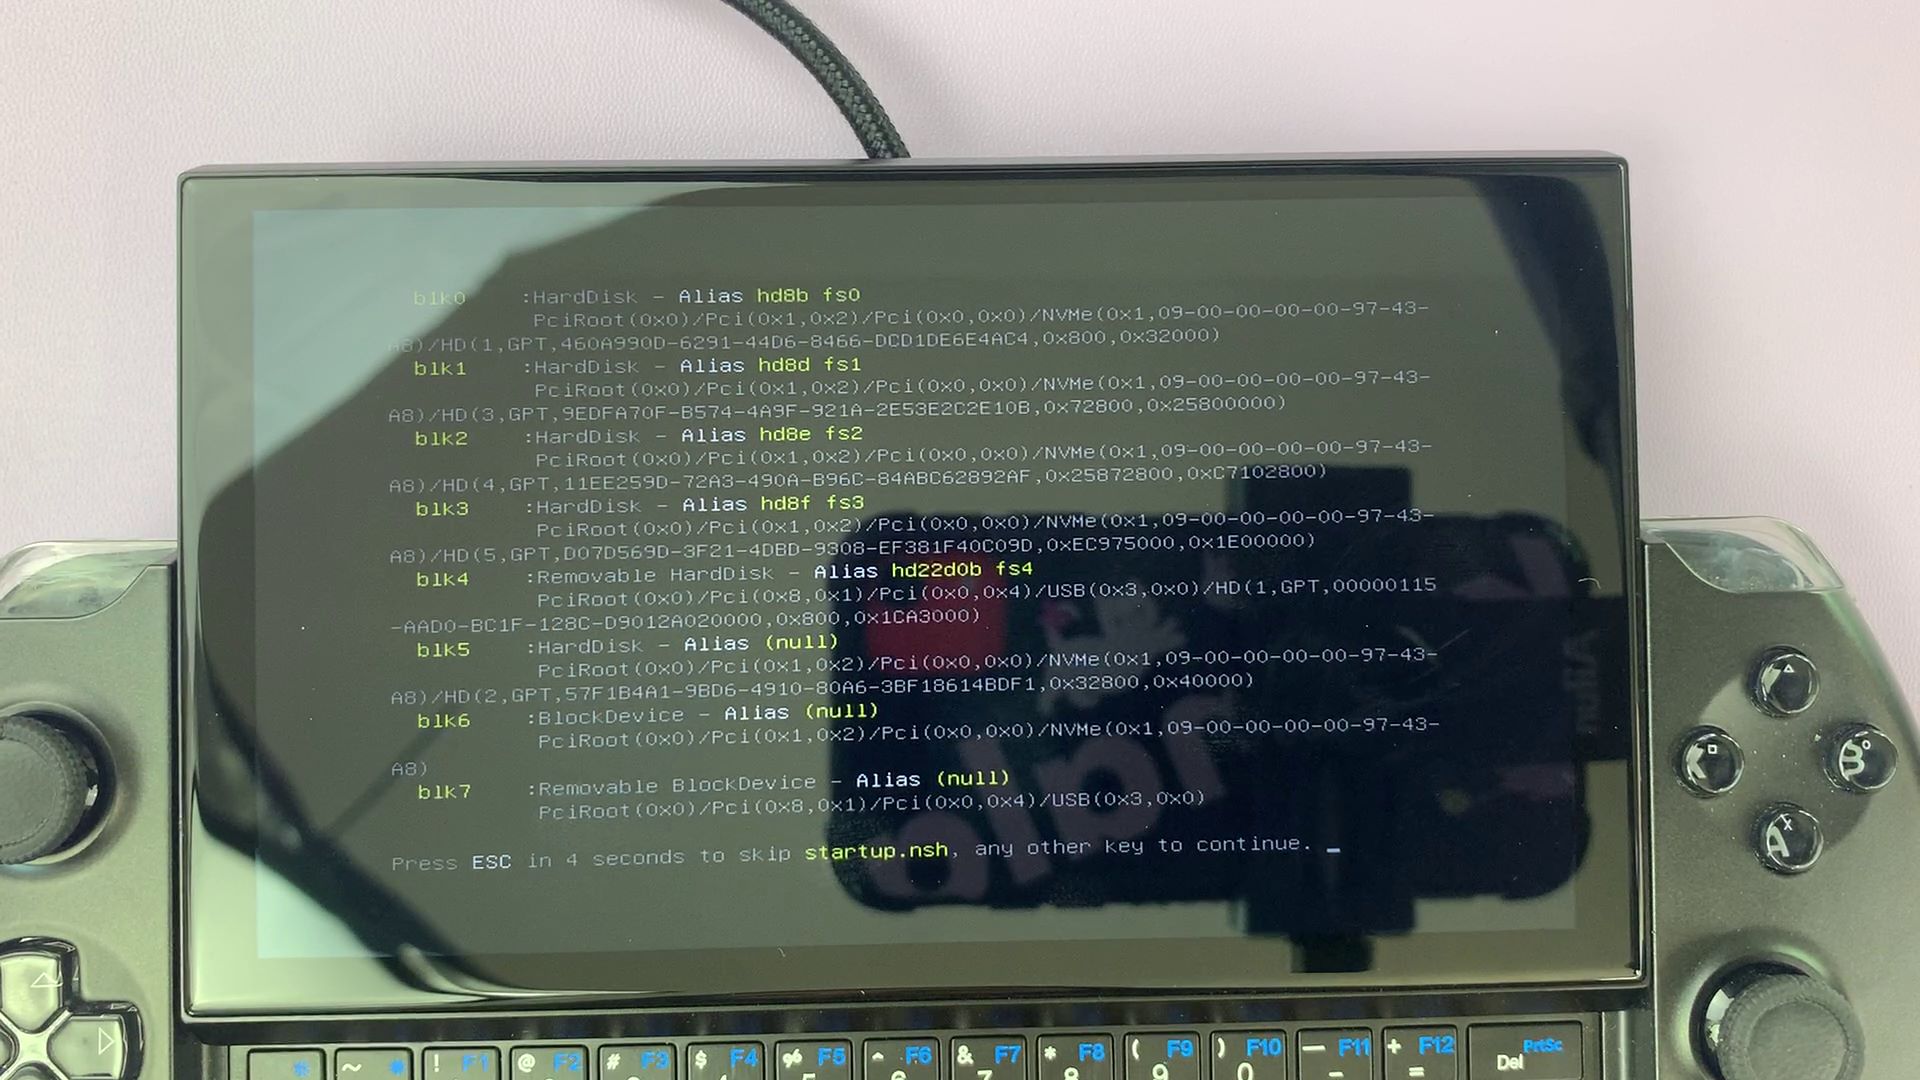
Next restart your device, and as soon as it starts booting repeatedly press Fn+7(F7) to enter the boot menu. Boot into the USB Drive and let the script to update the bios run.

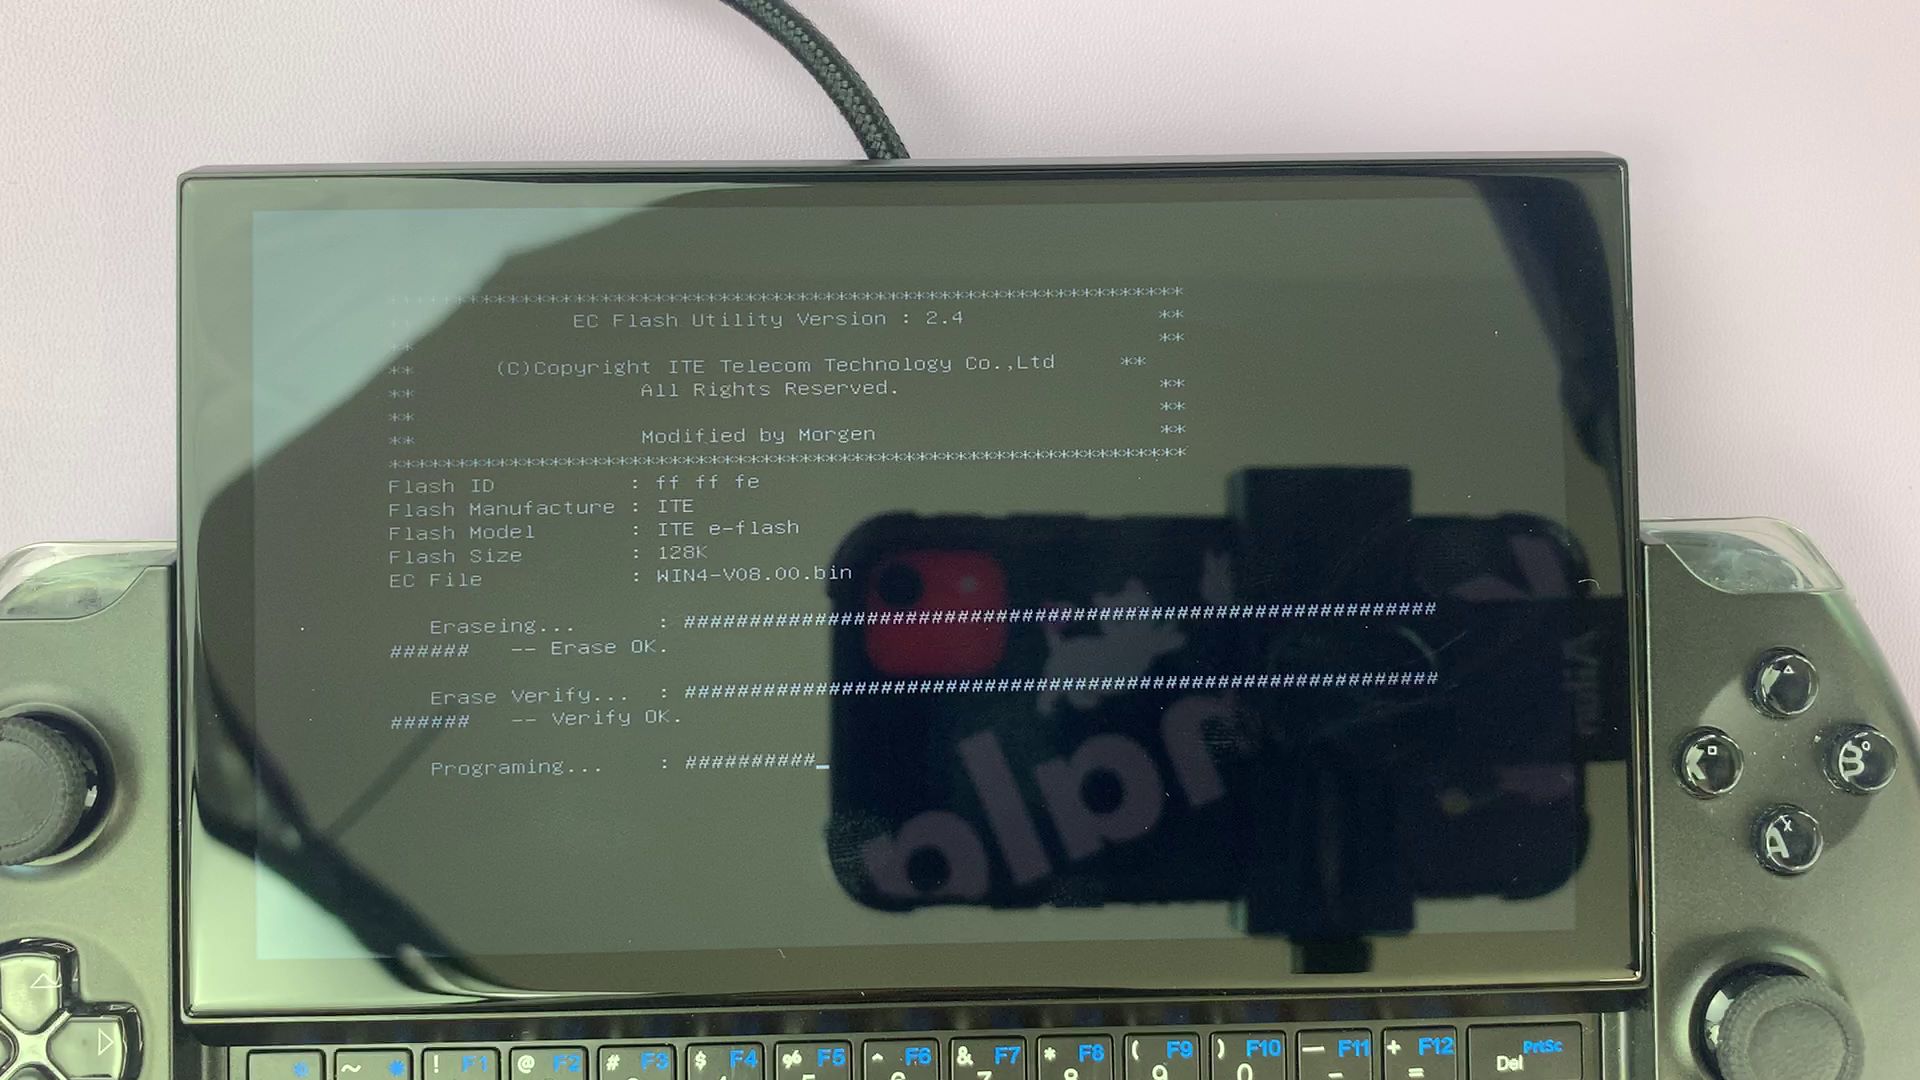
Press any key when it asks you to to begin
Let the install run, this will take roughly a minute.
Once it has been installed, the device will power off. After a few moments press the power button to turn it on. When you’re in Windows again, go back to MSInfo32 and check the Enabled Controller Version. If it reads 8.0 then you are free to continue, if it doesn’t then go through the steps again.
Installing The Fix
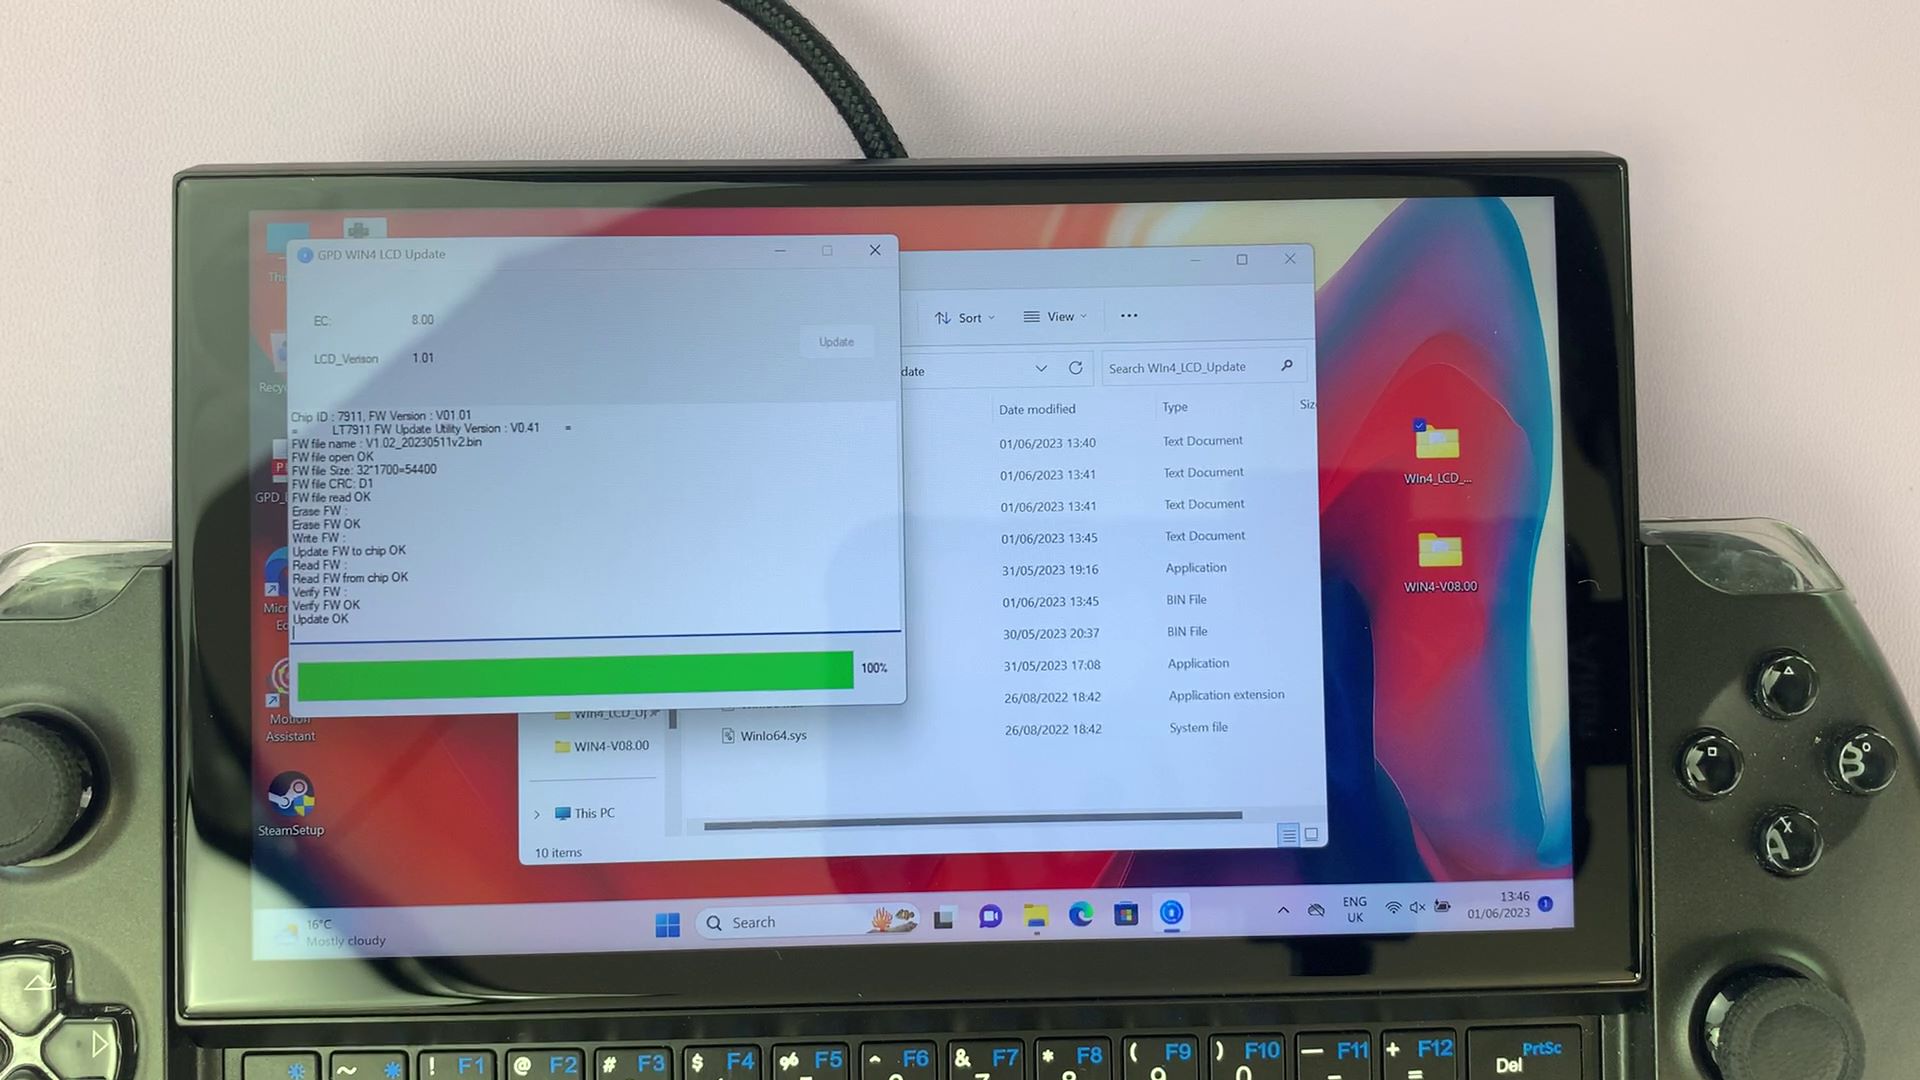
Before proceeding, please ensure that Motion Assist software is not loaded. If it is, close it otherwise the LCD firmware update will not work.
Once your BIOS is updated you can go into the contents of the original WIN4_LCD_Update folder, and inside you will find an application called WIN4_LCD_Update.
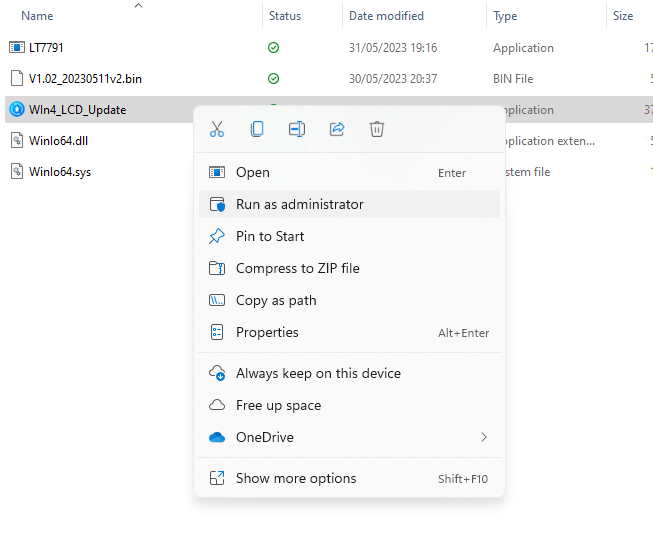
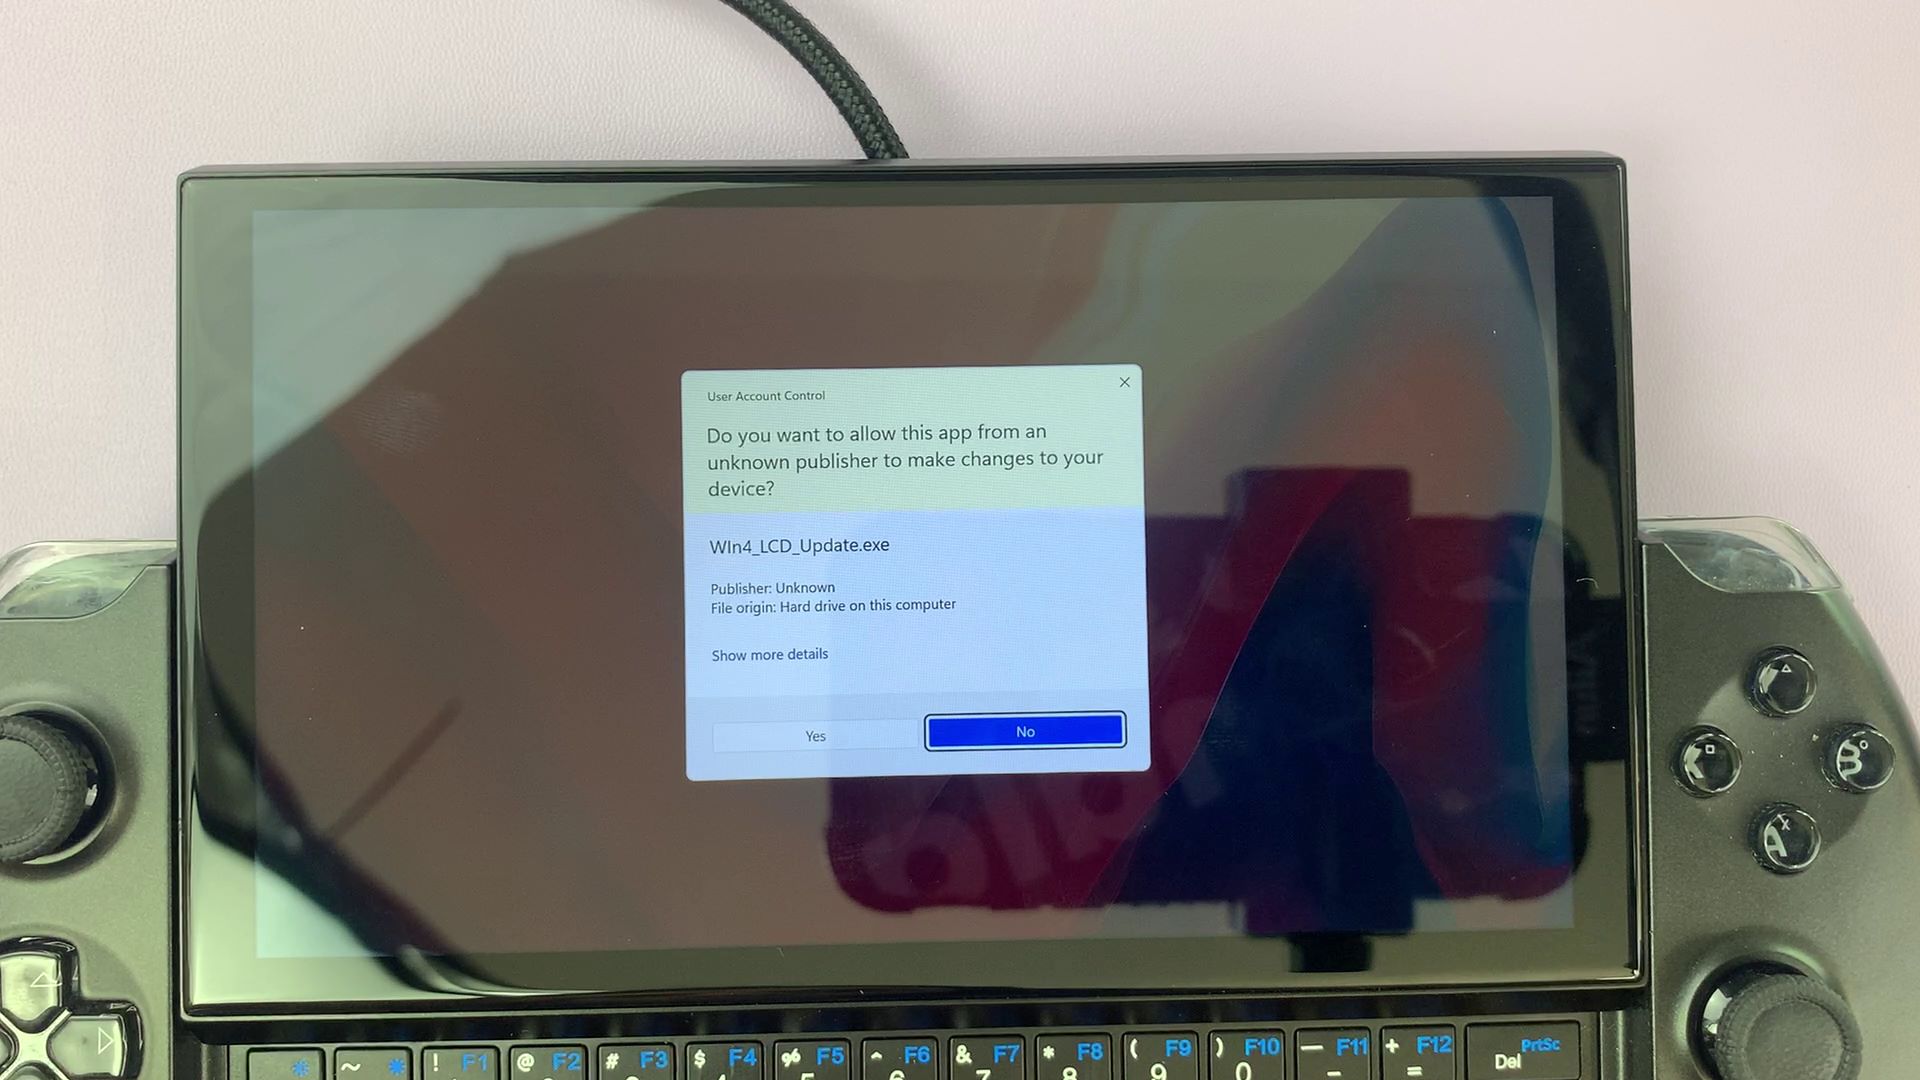
Right click on the application and press ‘Run as Administrator’. Enter your administrator details, if you do not know them then ask the administrator of your device to enter them, and click yes.
The program will open. Click on the ‘Update’ button and the install will begin.
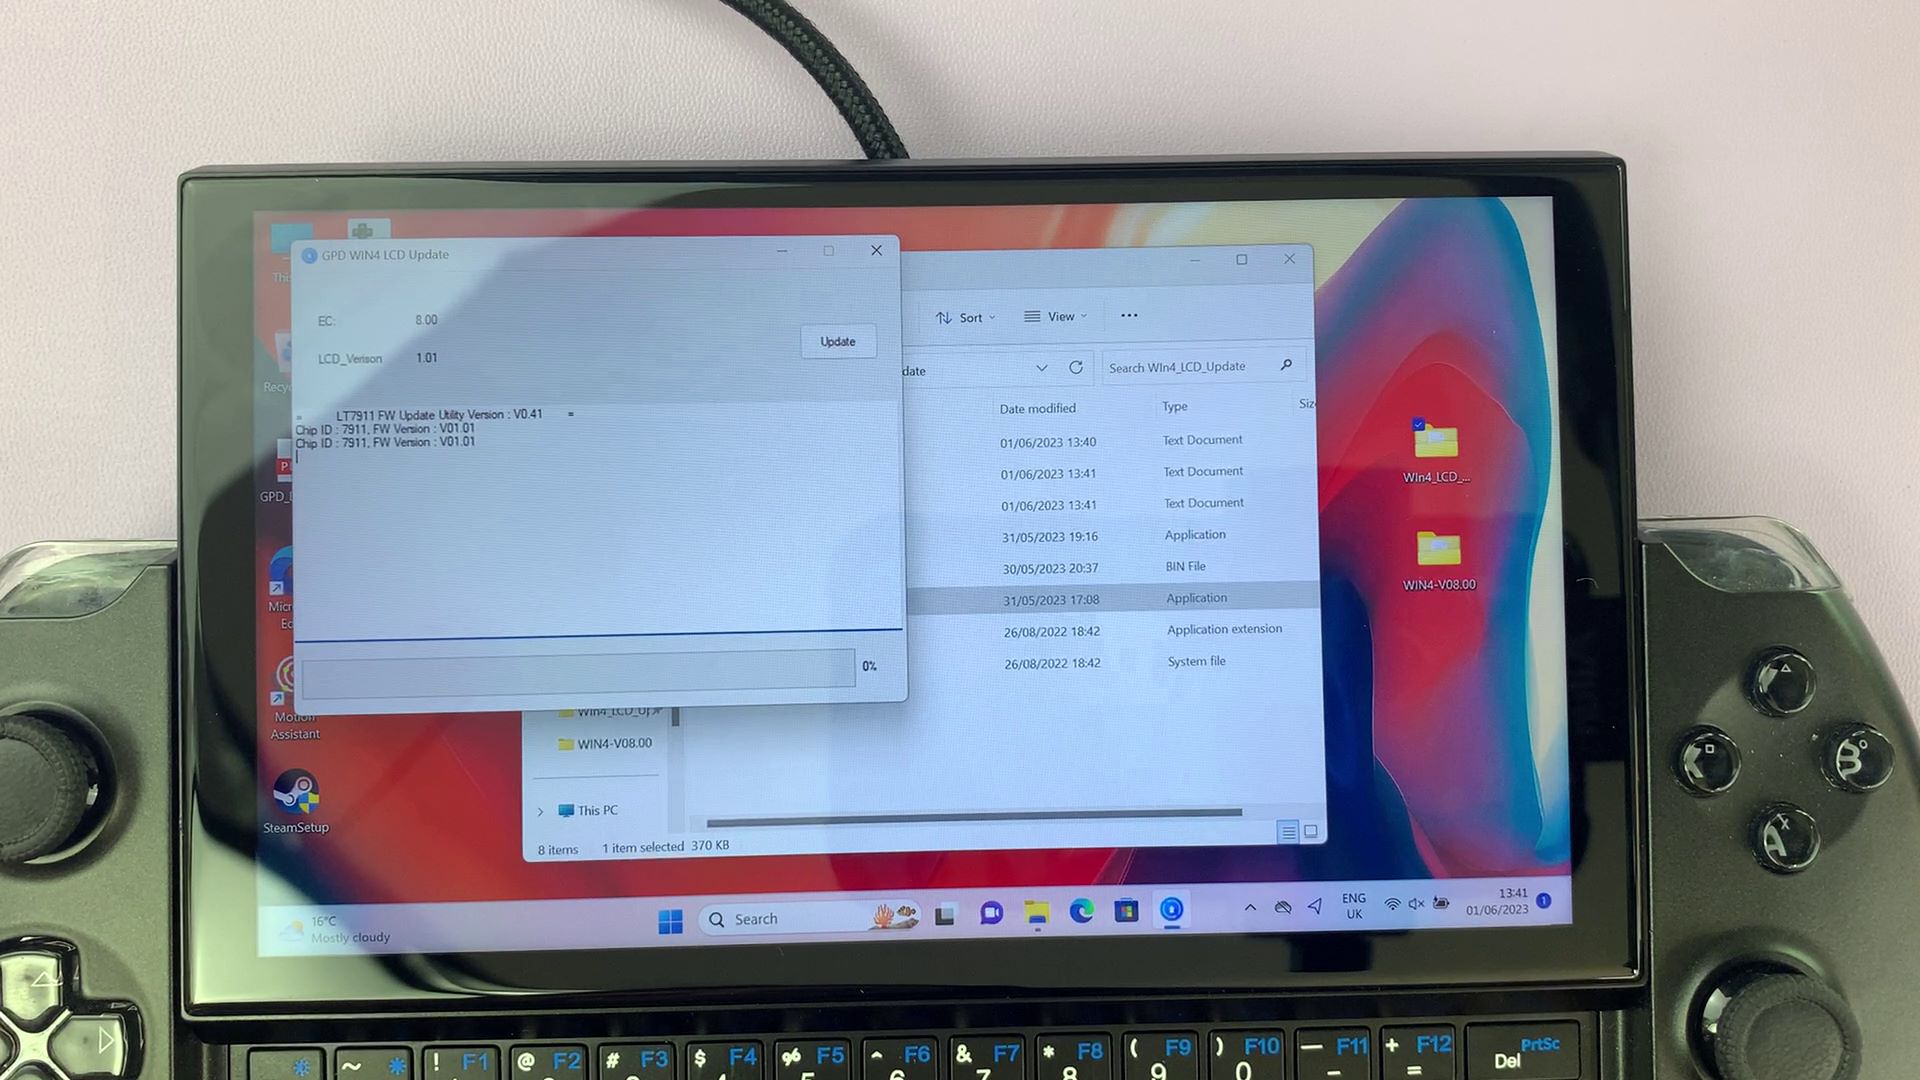
Allow it to progress, this will take several minutes. When it is done reboot your device and the process is complete and the fix has been installed.
How to install the GPD WIN 4 BIOS update
We will update this page as newer BIOS releases are made for the GPD WIN 4. The process below shows how to prepare and update the GPD WIN 4 to the latest firmware.
GPD WIN 4 BIOS Update Video
Download and Extract the BIOS update
For the GPD WIN 4 Stuttering fix, please see our guide here for how to update and install the fix.
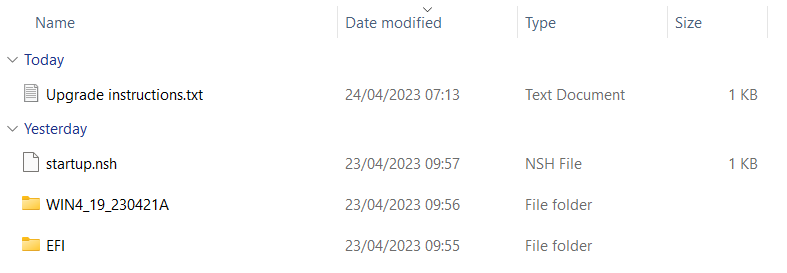
You can download the BIOS update file for the GPD WIN 4 (6800U) here. Once you have downloaded it, extract the contents of it to your PC. There should be a Upgrade_instructions.txt and startup.nsh files, and two folders; EFI and WIN4_18_0428, or similar named depending on firmware version).
You can now copy the files and folders to your FAT32 formatted USB stick.
You can now safely eject the USB stick and plug it into your GPD Win 4. Connect the power supply to the GPD WIN 4.
Installing the BIOS Update
Power on the GPD WIN 4 and immediately press and hold FN key, and tap the F7 key during the startup. You may need to tap the F7 key a few times to get the boot menu. Once the menu appears, select the USB drive as the boot device.
The BIOS update will now proceed and take a few moments. During this time, do not remove the USB stick or switch off the GPD WIN 4.
Once the update has completed, the GPD WIN 4 will shut down.
First boot will take a little longer than usual
You can now switch on the GPD WIN 4 when you are ready to use it.
Please note that due to the BIOS update effectively resetting the BIOS, the first boot may take a few minutes and show a black screen while it is updating. Do not switch it off during the process. Subsequent boots will be at the normal fast speed you are used to.
How to Calibrate GPD Joysticks
Occasionally the joysticks on devices such as controllers or handheld PC’s can lose their calibration and have incorrect or inaccurate input. This guide will walk you through step by step on how to install the necessary software and how to calibrate your GPD WIN 4 and all other GPD handhelds, as well as get the latest firmware. Although first we need to install some software that we’ll need along the way.
This guide will work with:
- GPD WIN 4 2022
- GPD WIN Max 2 2023
- GPD WIN 3
- GPD WIN Max
- All other GPD Handheld consoles
Downloading Calibration Tool + WinRAR
We need to start by downloading WinRAR, software which can compress and de-compress files, specifically RAR files. You can download it from the link here. Don’t worry about paying for it, just download the free version.
Once that’s all installed we can download the Calibration software from GPD. You can download it directly from them, although we have found their website to be a tad unreliable at times so we’ve included our own download link, you can find them both below. As of writing this article they both contain the latest version of the software, we do recommend trying the GPD version first and will have instructions on how to do so as well.
- GPD: www.gpd.hk/filedownload/89292
- DroiX: Products – GamePad+Test+Calibration+Tool+V1.02.rar – All Documents (sharepoint.com)
To download the calibration software from GPD, when you follow the link it will take you to a verification page where you are asked to input the numbers shown. It will look like this:
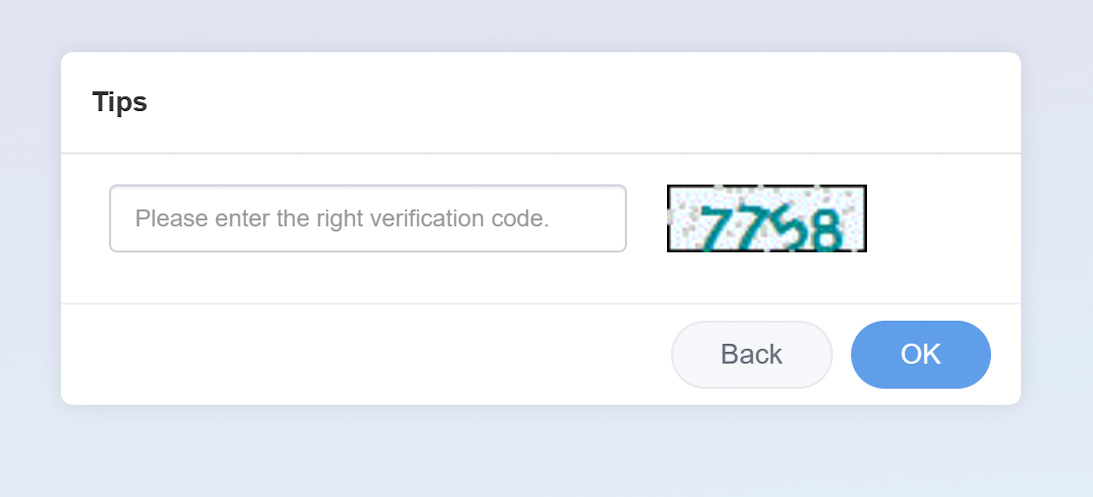
Once you press ‘OK’ it will take you to a page which automatically downloads the file. Some browsers wrongly flag the file as dangerous. When asked, continue the download. This is different for every browser, we used Edge.


Once the file has been downloaded, whether from GPD or DroiX, find where you downloaded it and double-click to open it in WinRAR. You will find the calibration software within the file, double click that to run.
GPD Calibration
Two windows will open, and they will look like this.
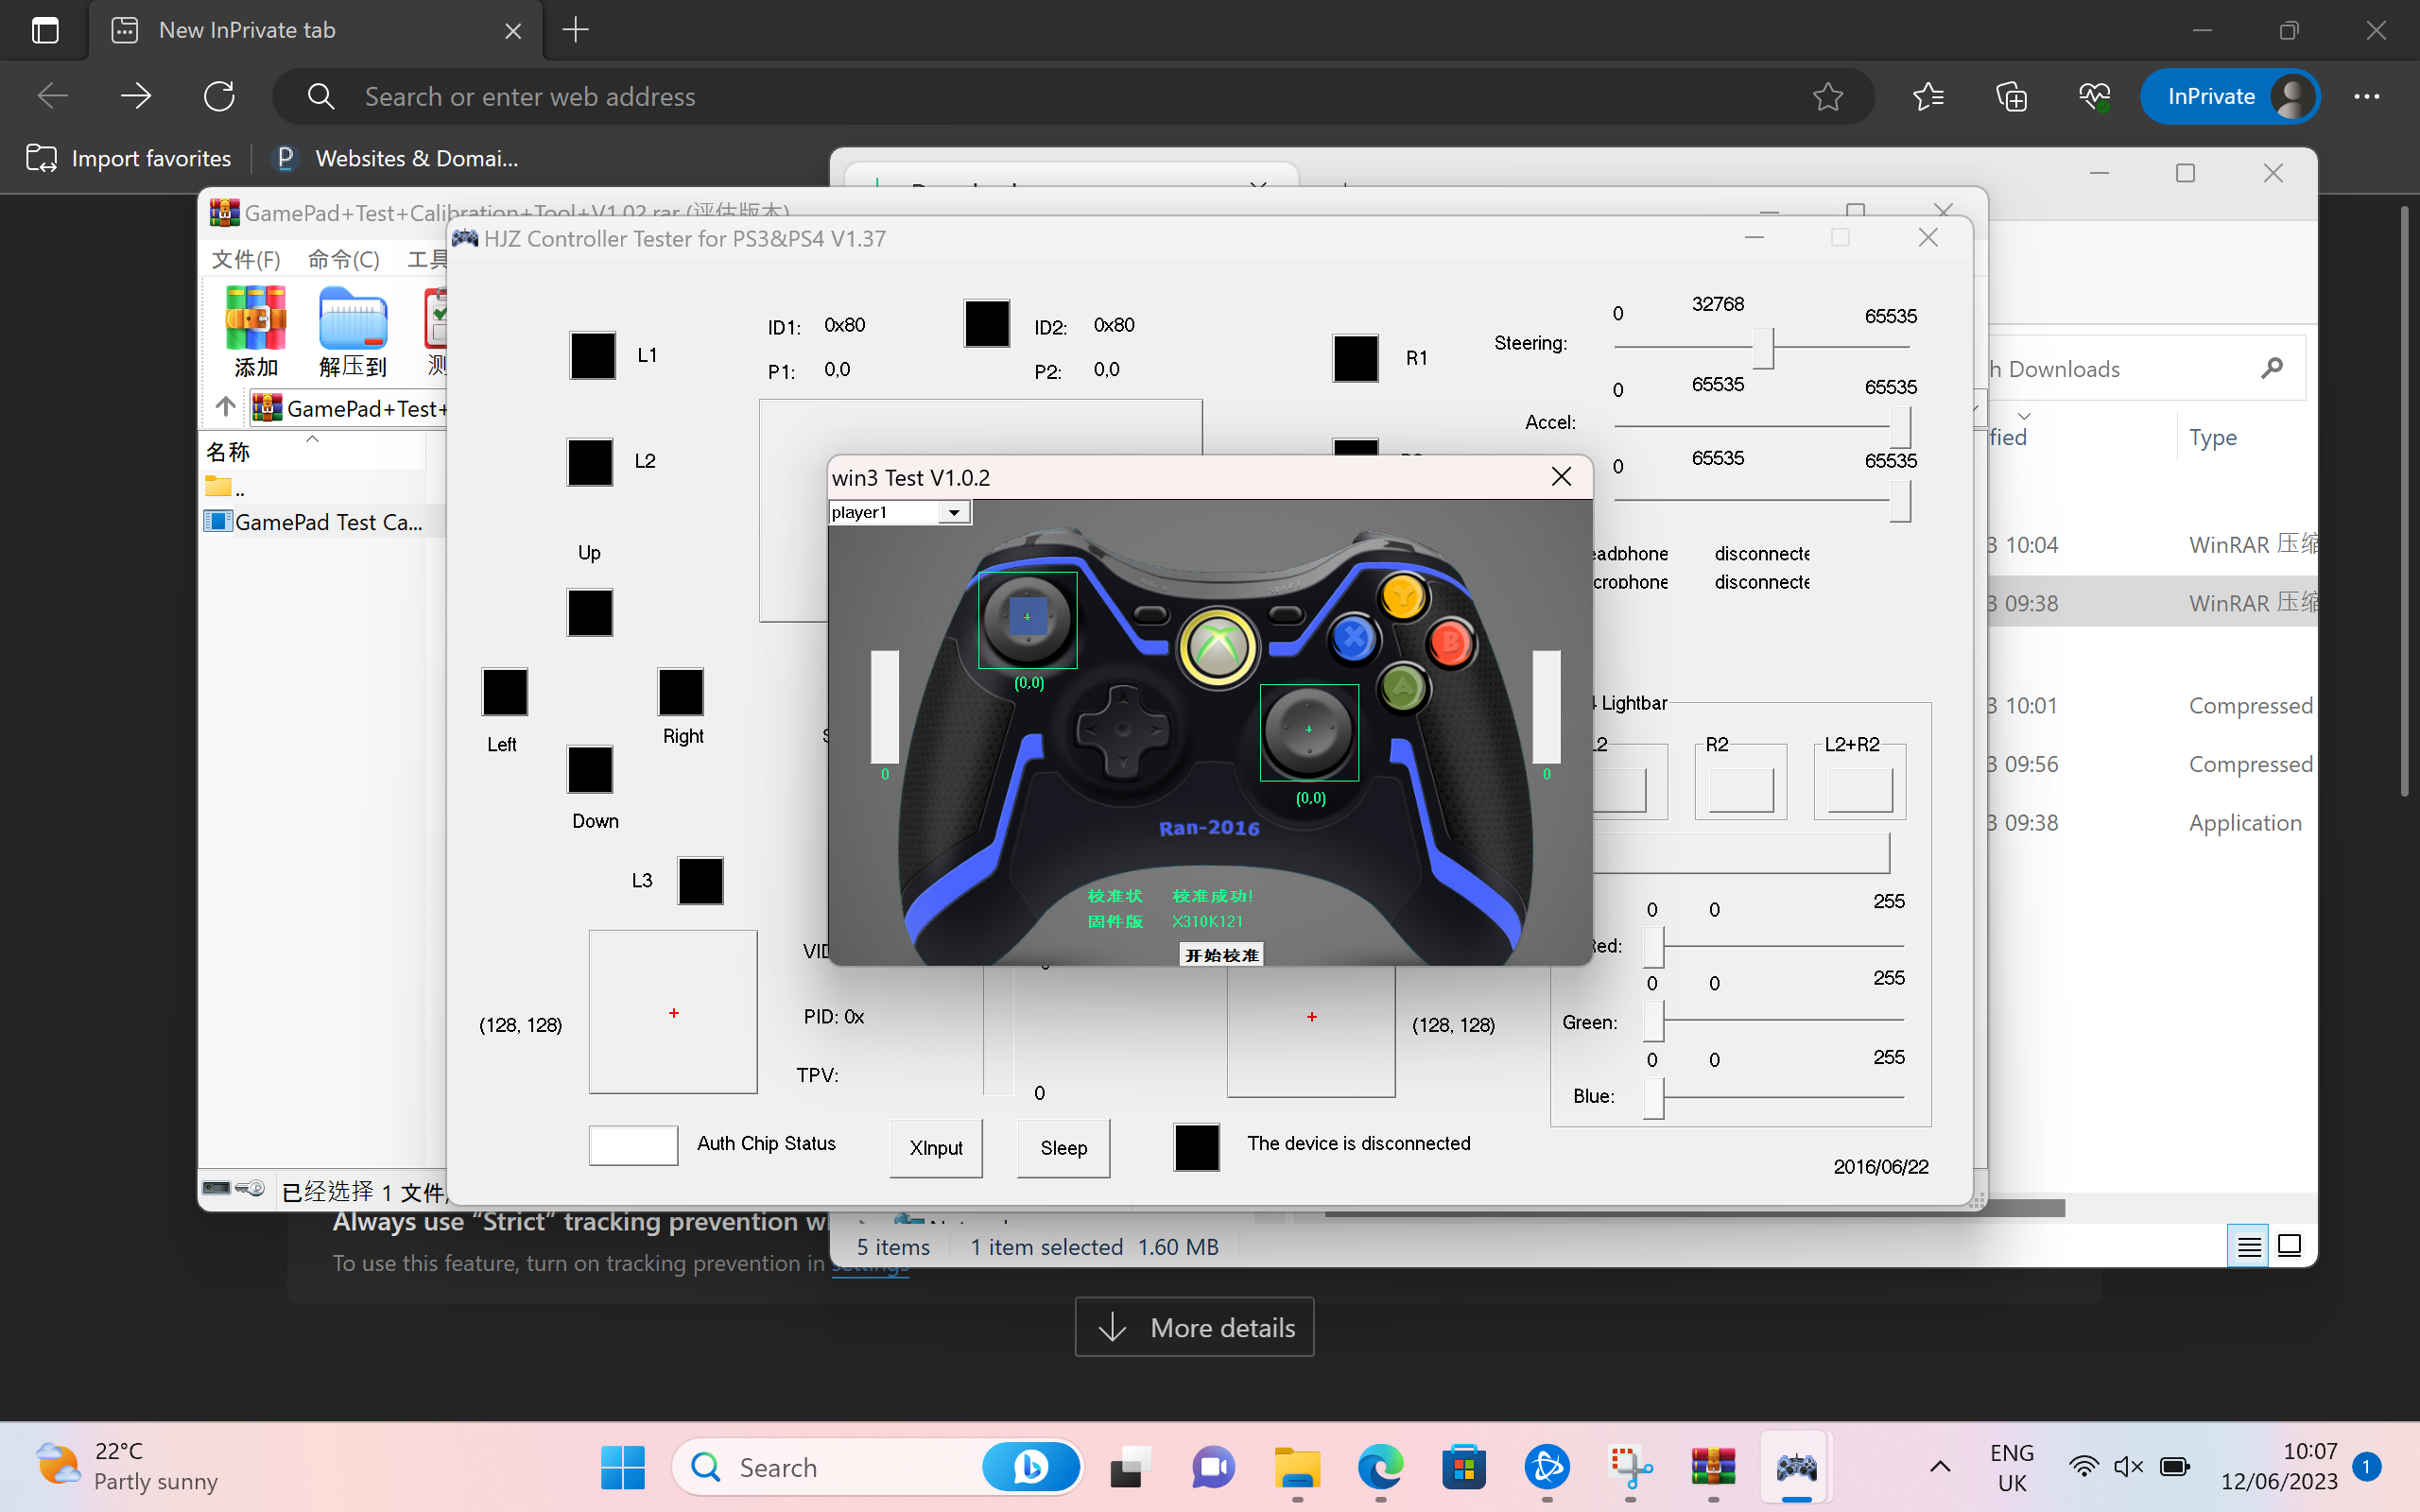
The software is in Chinese. We have translated the screenshots below detailing the two-step process. The app will open like this:
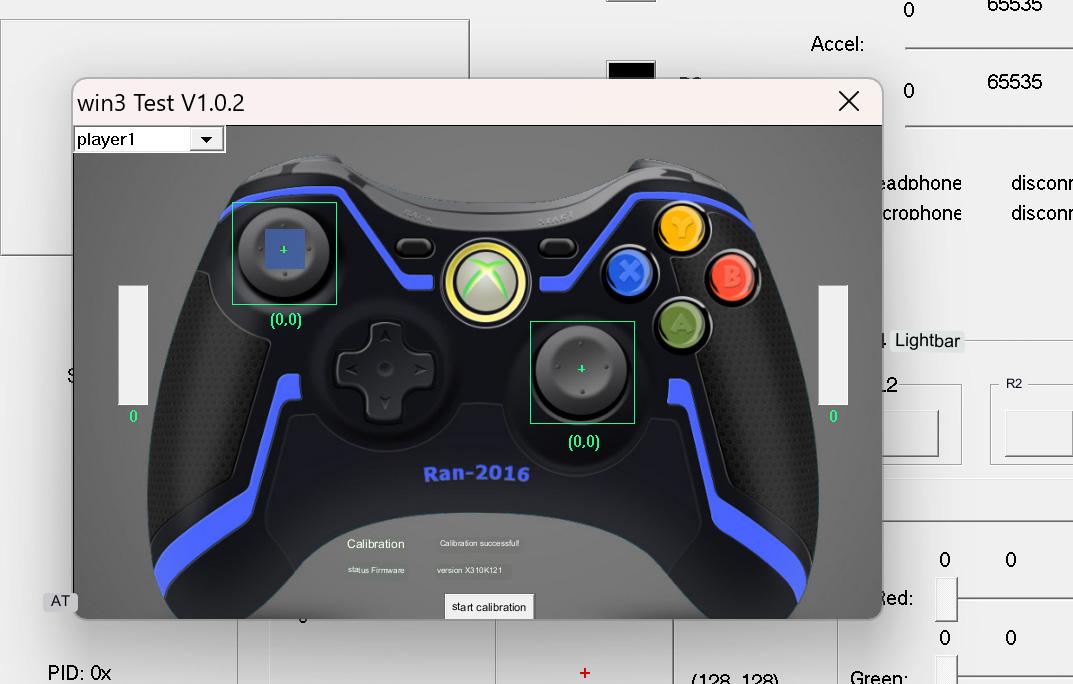
Press the white button at the bottom to start the calibration.
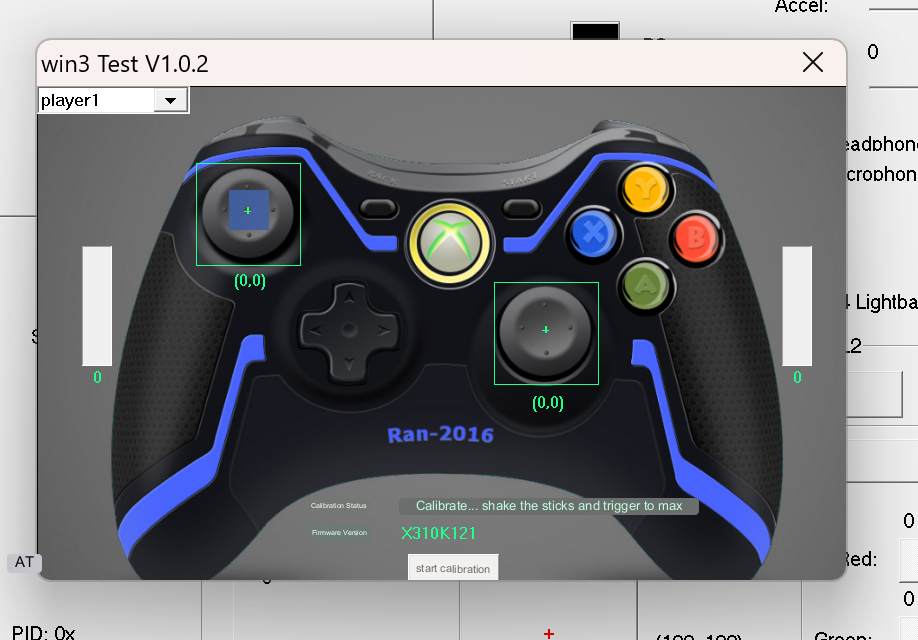
When the Calibration Status text changes, it will instruct you to push the joysticks to the edge and spin them constantly, while pressing and un-pressing the two triggers on the back. When you push the triggers the device may vibrate. All actions will be reflected on the screen.
Keep doing this until the message changes. It will read as it was before.

Now you have successfully calibrated your controller and are free to get gaming!
Windows Calibration
If the above method doesn’t work, there is a calibration method built into Windows which is detailed below.
To calibrate within Windows we need to first open up Windows Run, if you have a keyboard attached this can be done be pressing Windows+R, if not open the start menu and search for ‘Run’.

Once open type in joy.cpl and click ‘OK’.

It will open this window, Windows will see your controller as an XBOX 360 controller, and that’s okay.

Click on ‘Properties’. It will open up this screen.

You can use this to test your controller.
- Z Axis is the Trigger buttons
- X Rotation is the Right Joysticks horizontal movement
- Y Rotation is the Right Joysticks vertical movement
- X-Axis / Y-Axis is the Left Joysticks movement
- The point of Video Hat is the D-Pad
- Buttons are all the buttons on your device: A, B, X, Y, LB, RB, LS, RS, LC and RC. They will light up when pressed.
If they all work fine then chances are you don’t need to calibrate your device. But if you do, click over to ‘Settings’ and you’ll see this screen.

Click on ‘Calibrate’ to be taken through the calibration process.

Go through the process following the instructions to calibrate your controller. Once you’re done, you’ll be taken back to the Settings page, you can go over to the Test page to see how your work panned out. If you’re unhappy go back to Settings and click ‘Restore Default’. If you are then you can carry on and use your newly calibrated controller.
Gamepad-Tester.com
Gamepad Tester is a well-known website in the community, it offers an easy and accessible way to test your gamepad controllers. It even offers additional and more in-depth information than Windows. Head over to the site. You’ll be greeted with this screen.

Press any button to begin, and the testing interface will load.
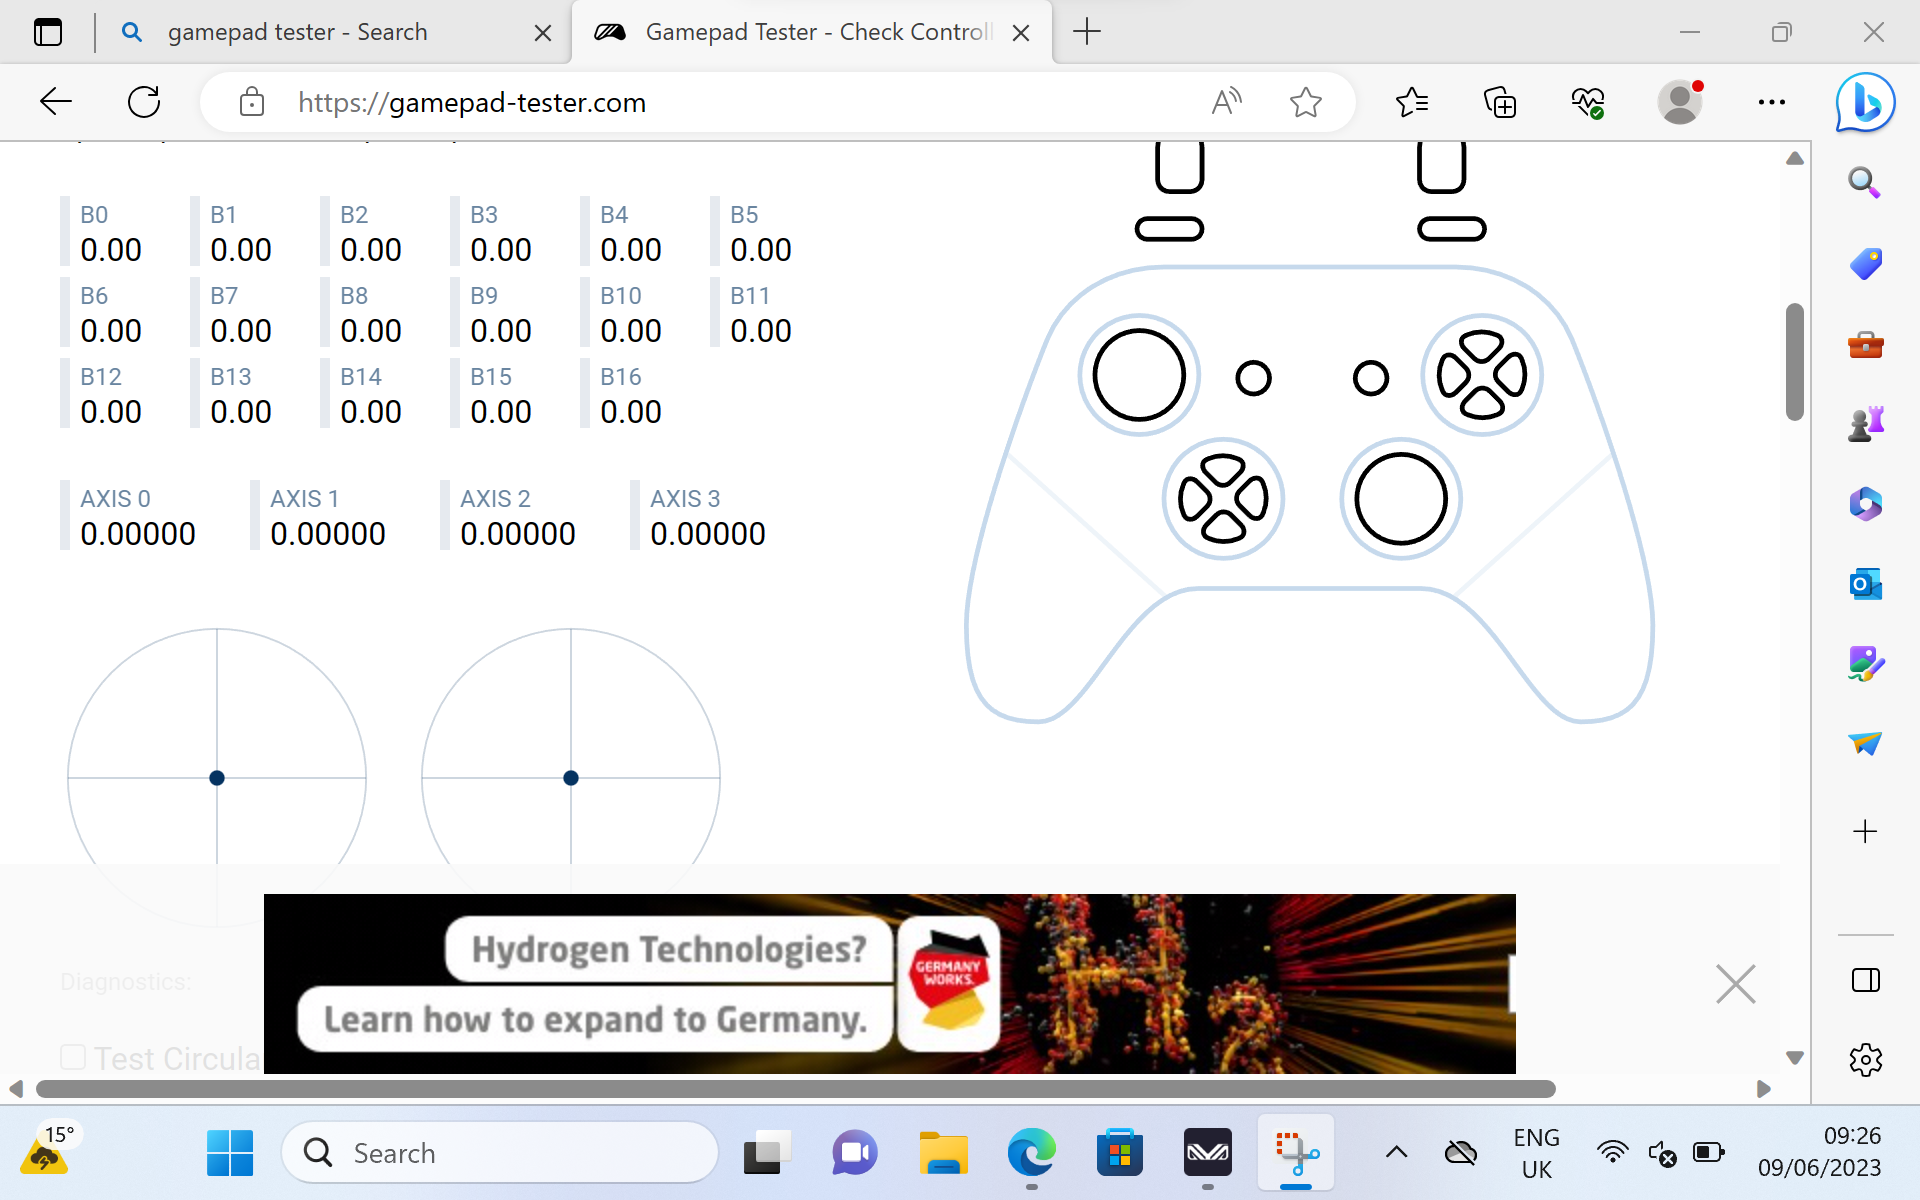
From here you can see precisely the angle and force that the joysticks, triggers and buttons that are registered. With this information, you can find faults and properly calibrate your device.
Update Firmware Tool
To update your GPD Firmware download this firmware update tool here. It may register as unsafe but it’s okay, continue with the download and once it’s done open the .exe file.
Once open your device may vibrate as it checks your firmware and pulls the latest one from the server. You’ll see a screen like this:
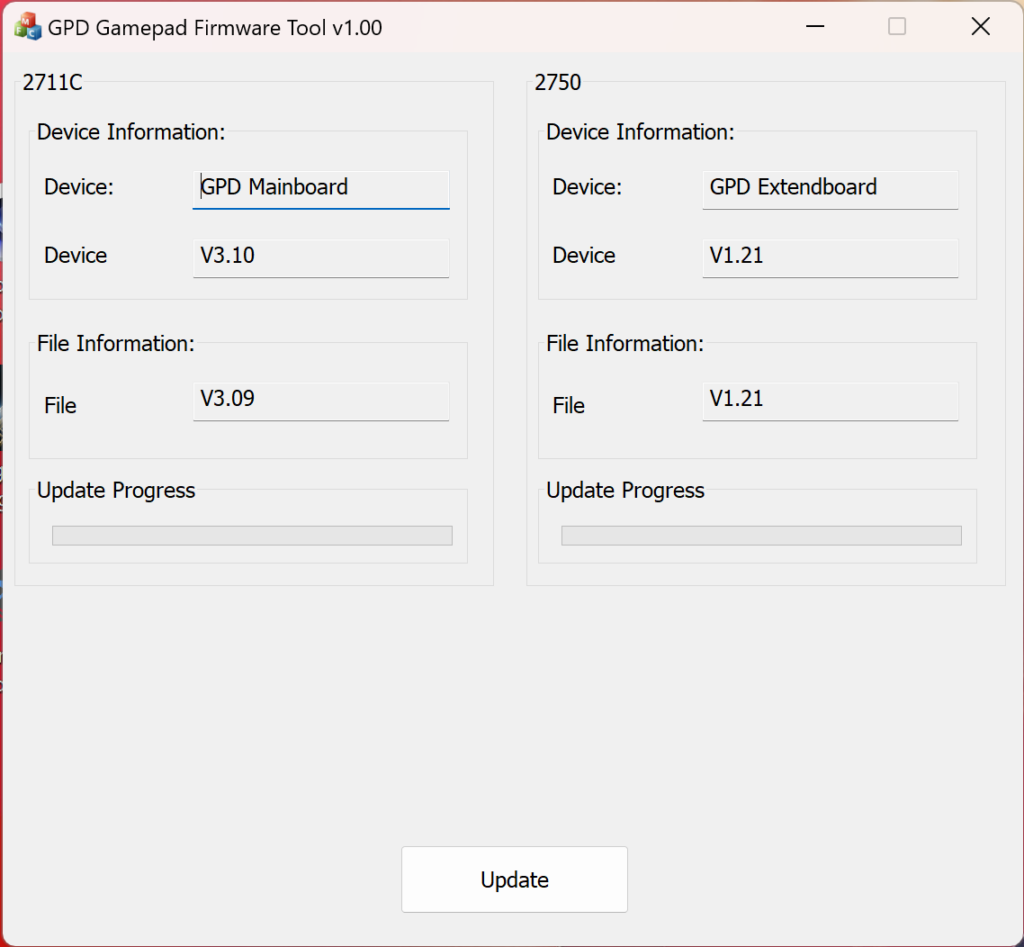
If the firmware under ‘File Information’ is higher than the one under ‘Device Information’ click on Update to update. If not, you likely don’t need to as you already have the latest version. It’s really that easy.
To learn more about your GPD handhelds check our site here.
To learn more about our other offerings and products take a look at other Knowledge Base articles here
How to Reinstall Windows on GPD WIN Devices
Reinstalling your operating system can be done for several reasons. Whether something has gone wrong or you just want to give your PC or GPD WIN a little refresh, this guide will show you how get a clean install going.
This guide can be used for all GPD devices from DroiX. For this demonstration, we will be using the GPD Win 4.
You will require:
- 16GB USB Stick or larger
- Separate PC, if you cannot access your GPD Device
- Charger
Setting up your USB Stick
The first step is the trickiest so be sure to follow along and double-check what you do. This can be done on your GPD Device, however, if you’re not able to you will need to use another computer. This can be done on macOS or Linux, but we will be using Windows 11.
Format your USB Stick
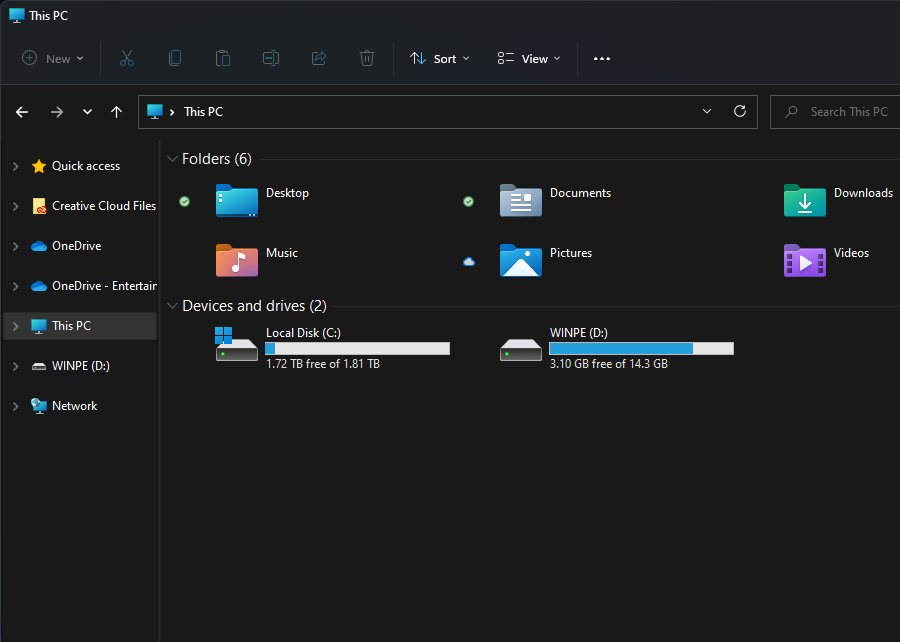
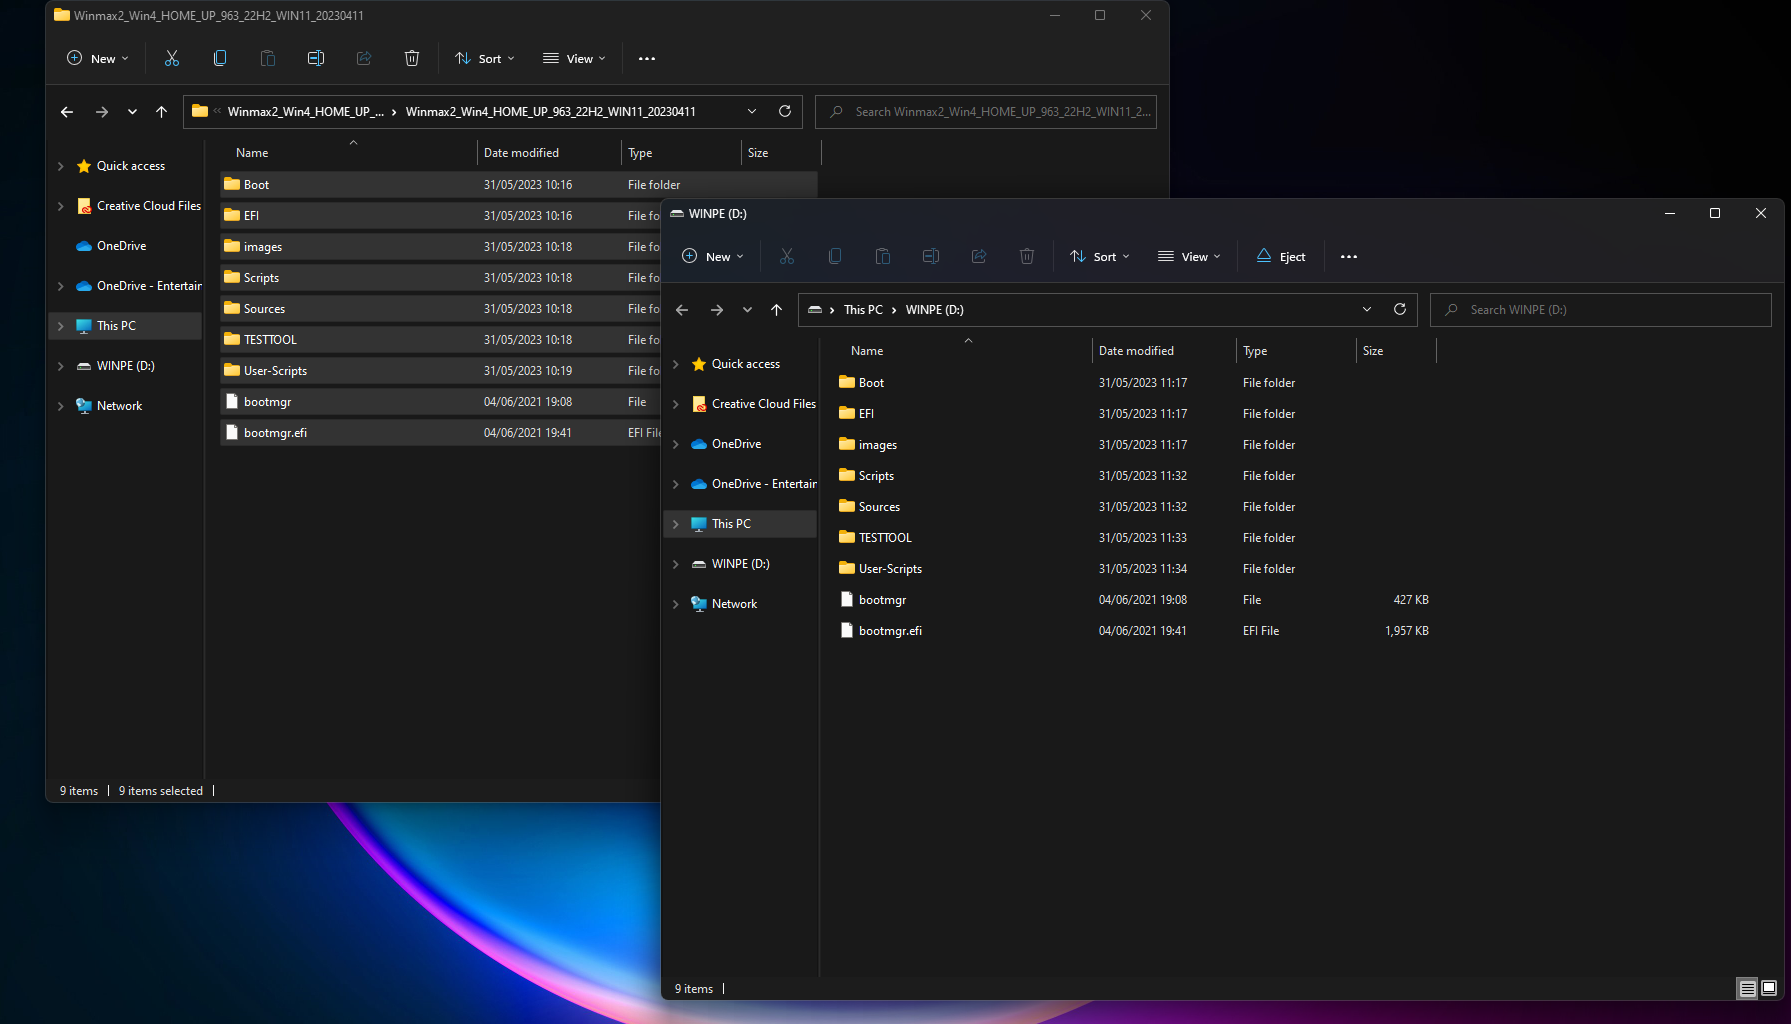
The first thing we need to do is format the USB stick, this will erase the entire drive so make sure to back up anything you wish to keep. You can find the USB stick under ‘This PC’ as shown above.
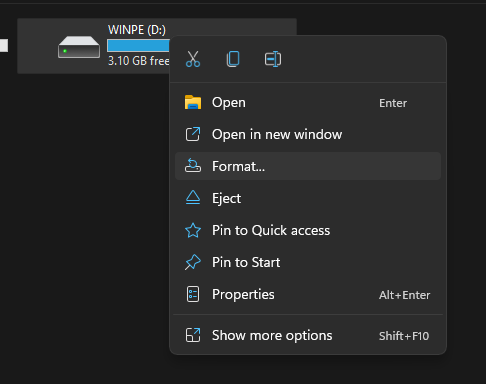
When you’re ready, right-click on the USB Stick and click ‘Format’. This will open up a new window.
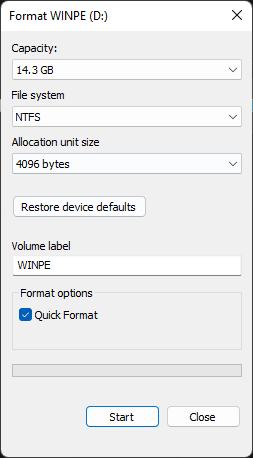
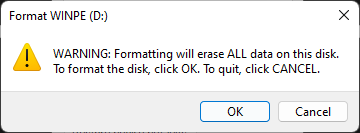
From here you can format your USB Stick. The capacity and allocation unit size can be left as it is. Ensure that the File System is set to ‘NTFS’ and the Volume Label is ‘WINPE’. A quick format will do here. When you click ‘Start’ a warning will popup, click ‘OK’.
Once it has completed the format, a window will popup telling you so.

Prepare your installation files
Now that your USB is ready, we can download and set up the files needed for the Windows installation. You can download the installation files for your device from GPD using the link below.
GPD Win 4:
GPD WIN 4 Firmware & Driver & BIOS – Shenzhen GPD Technology Co., Ltd._01051328_827
GPD Win Max 2:
GPD WIN Max 2 2023 Firmware & Driver & BIOS – Shenzhen GPD Technology Co., Ltd.
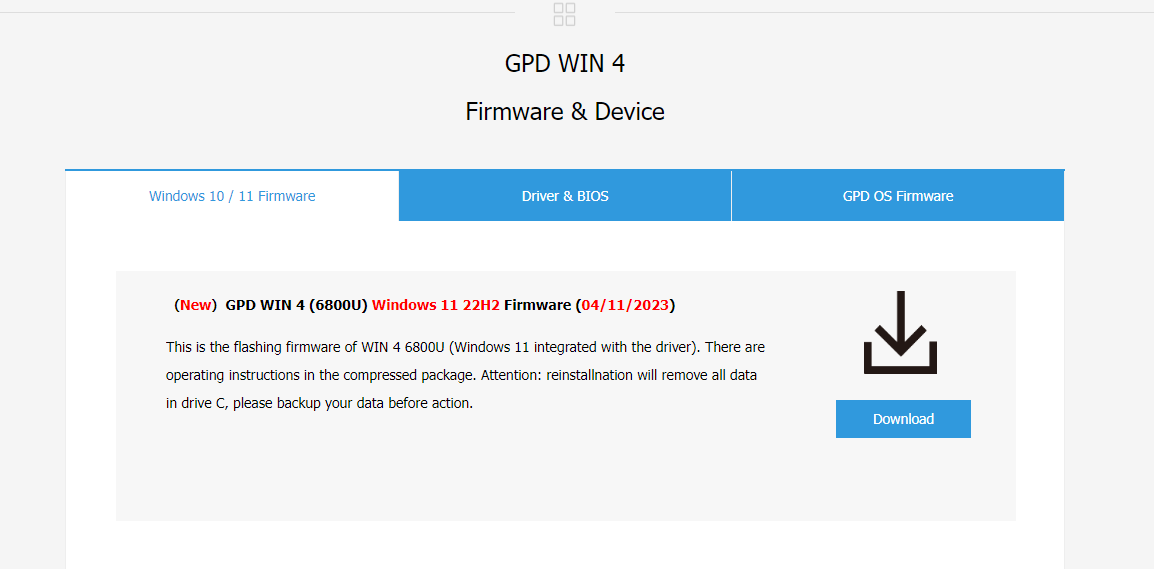
When you’ve found the installation for your device click on ‘Download’. You will be taken to the download page on Google Drive.

Click on ‘Download’ again, and you will be taken to a page to confirm.
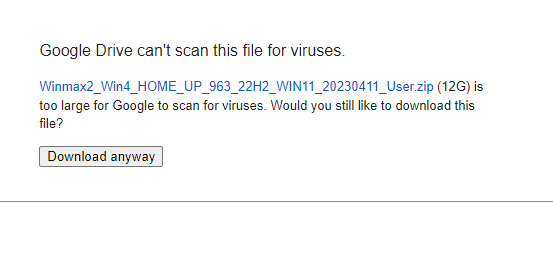
Click on ‘Download anyway’ to download the file. It will download a ZIP to your computer.
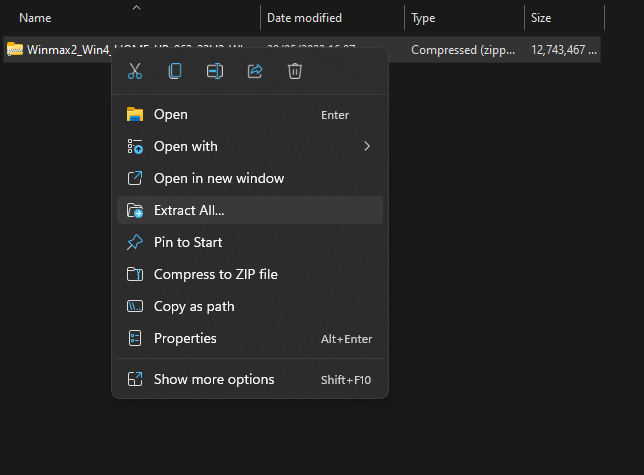
Locate the ZIP file that was downloaded, right click and select ‘Extract All…’. This will open a new window.
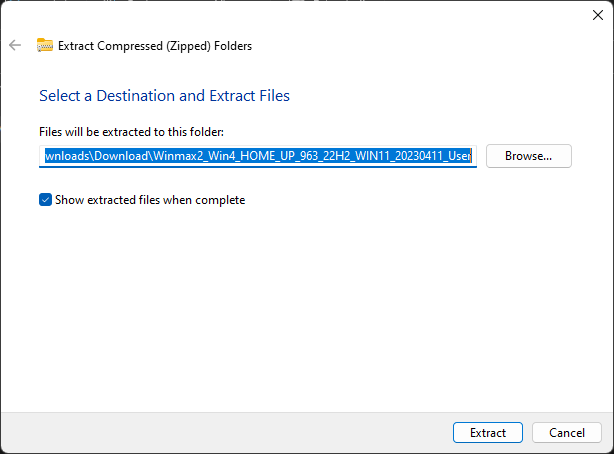
Once the Extraction window opens up click on ‘Extract’. A progress bar detailing how long it will take will pop up.
Once the files have been extracted, open up the new folder as well as the contained folder until you find the installation files, as can be seen in the photo below. Select all of the files and copy them over the newly formatted USB stick. This can be done by opening the USB stick in a new window. Clicking Ctrl+A to select all of the files and dragging them over to the USB stick. Another progress window will pop up to show you how long the copying will take.

Once all of the files have been copied over, if you’re using a separate computer, you’re free to eject the USB Stick by right-clicking on it and clicking ‘Eject’.
Installing Windows on your GPD Win Device
You are now ready to install Windows onto your GPD device.
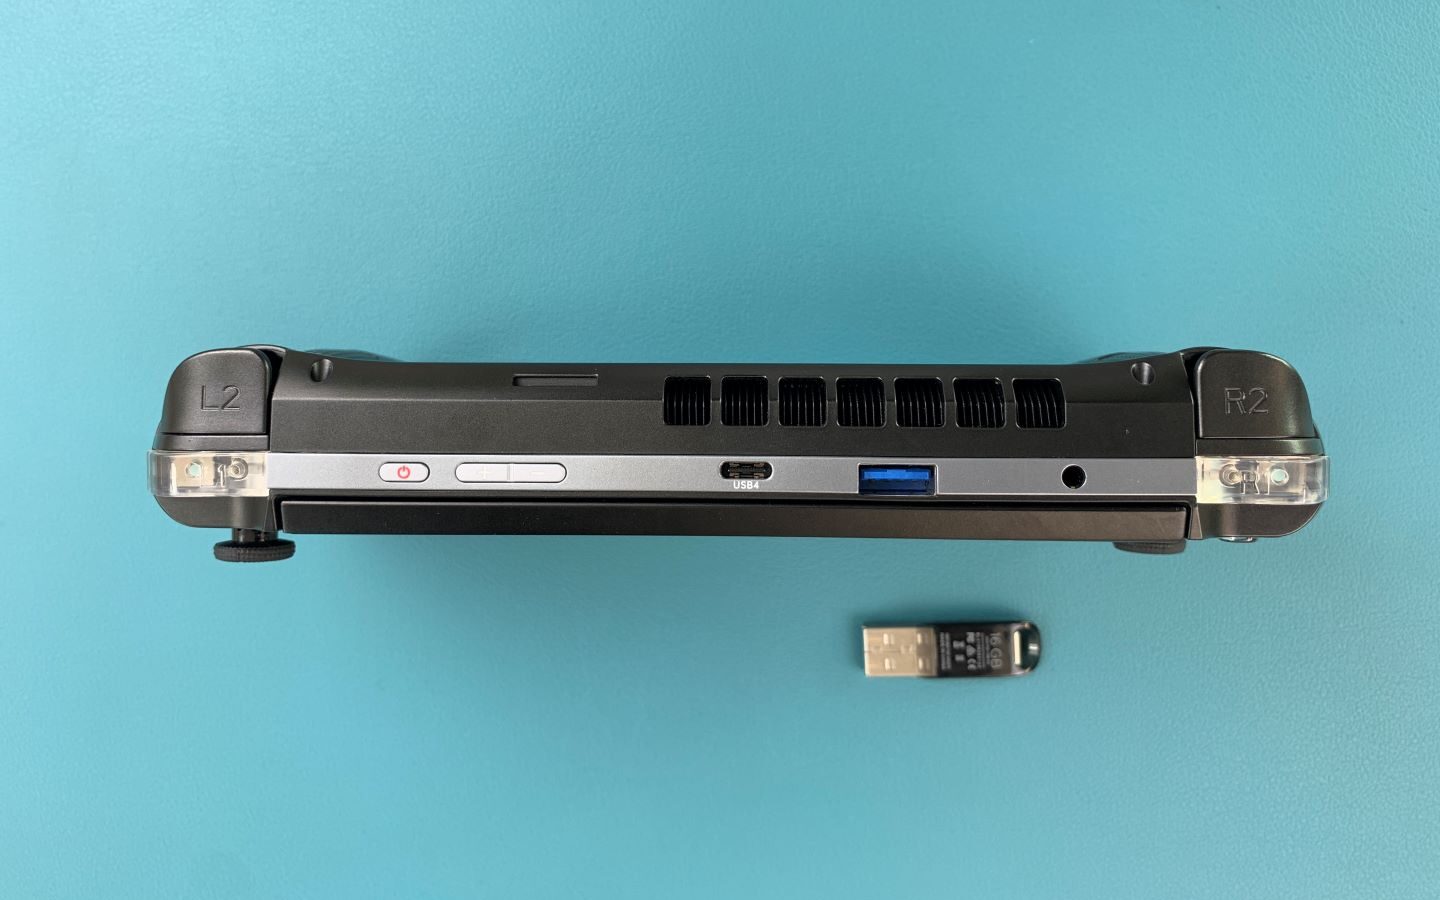
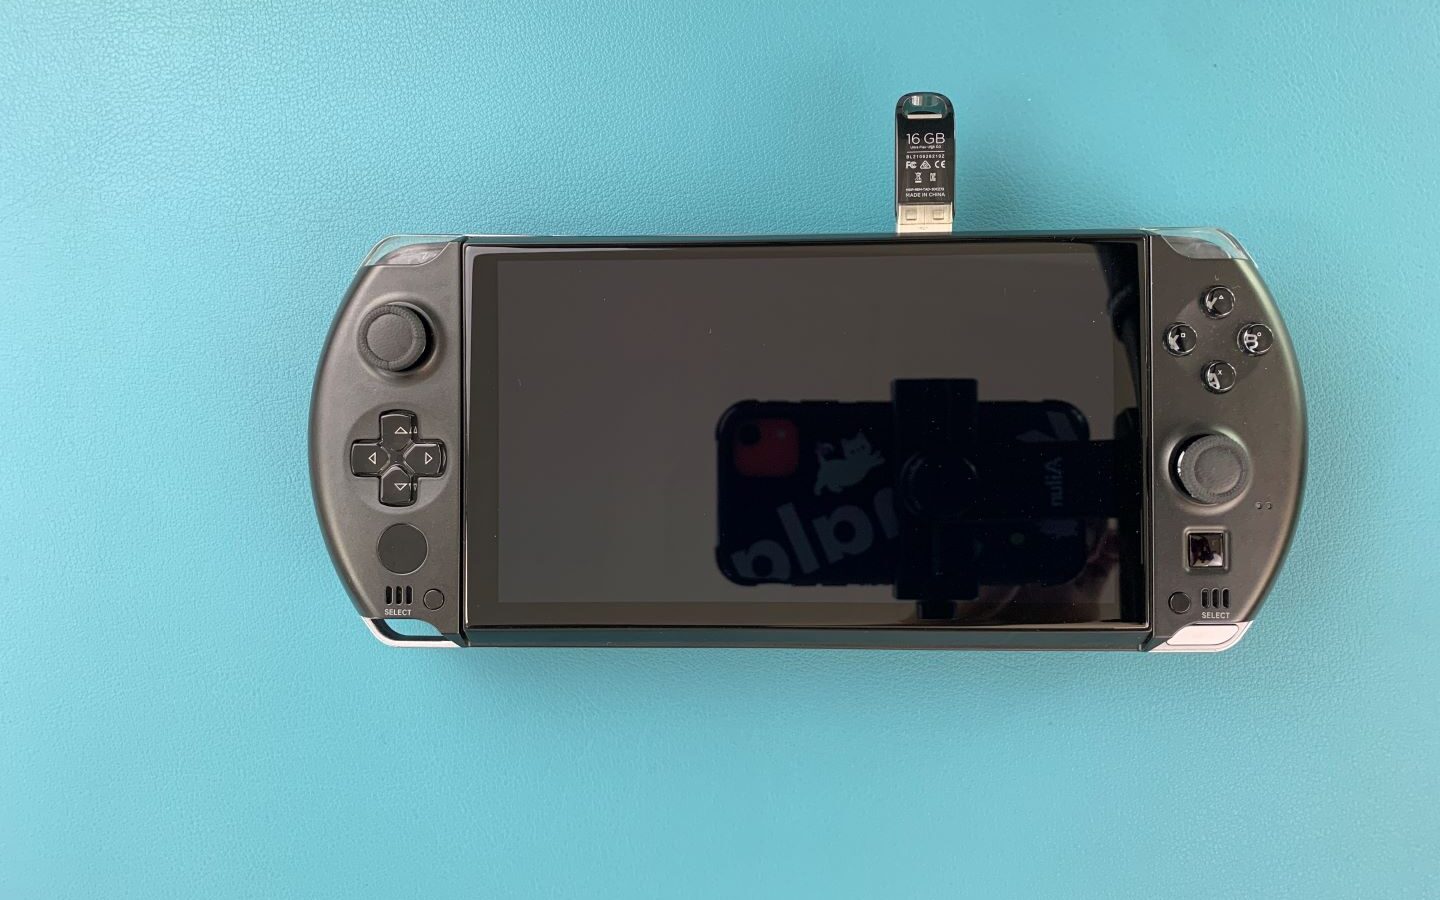
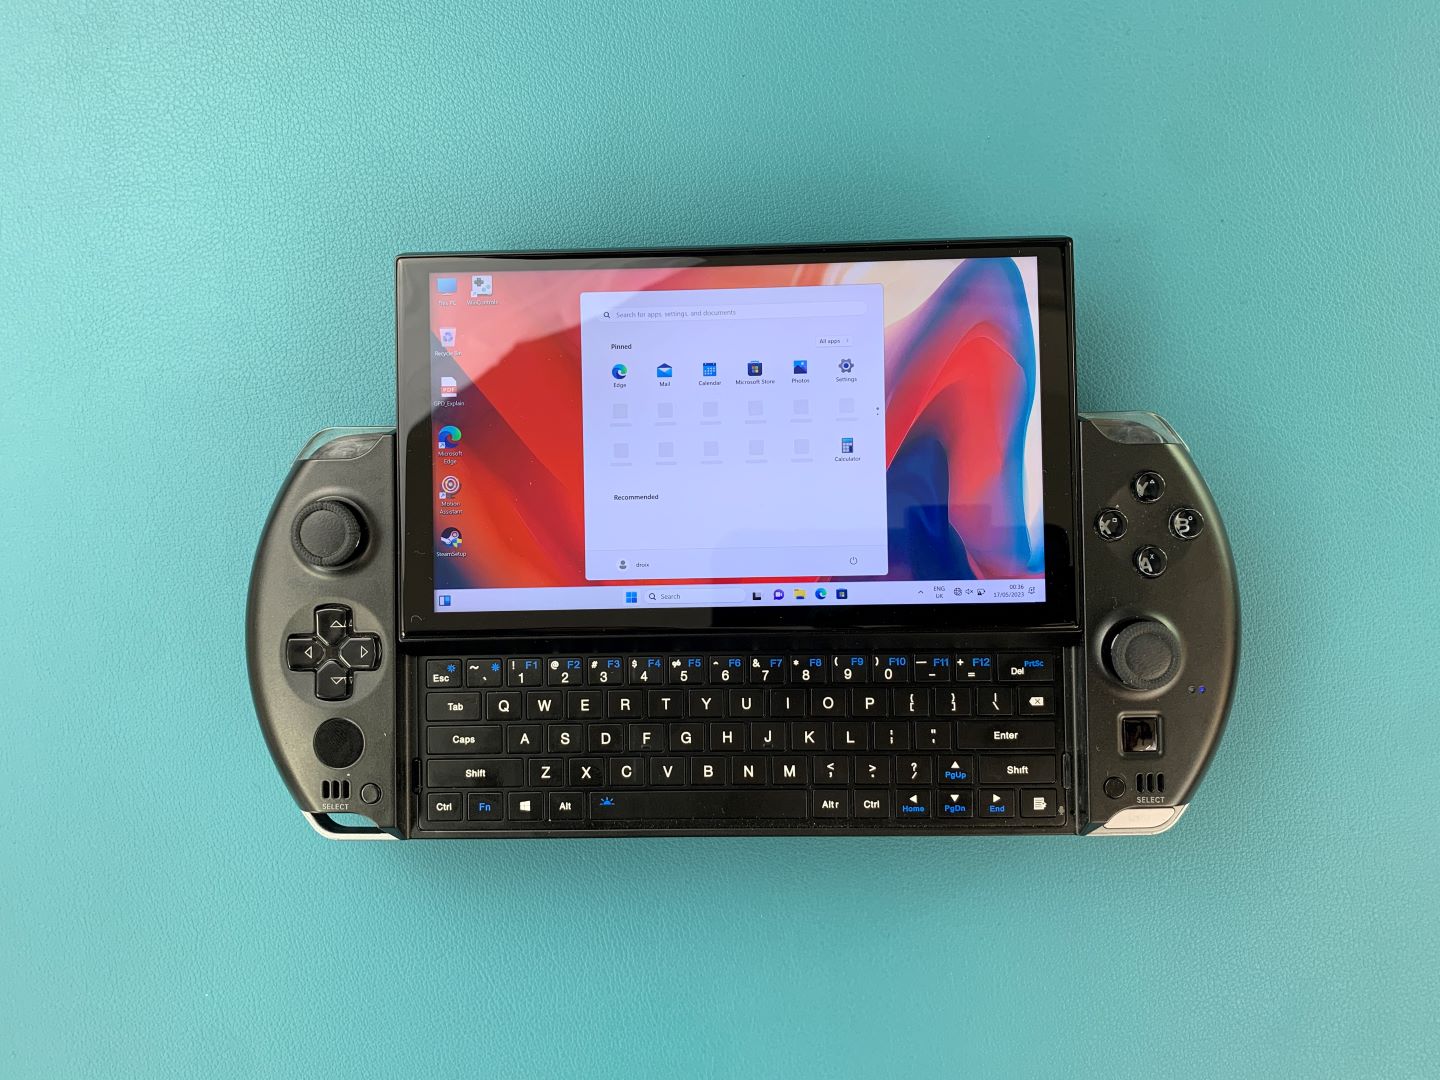
Make sure your USB Stick is plugged into the USB Port at the top of the device. You can then press the power button on the top of the device. You will need the keyboard for the next section, slide the screen up.

Hold down Fn and the 7(F7) key until you get to the boot menu, as seen above. Click on the Down Arrow key to highlight the USB Stick and click Enter to select and boot from it.
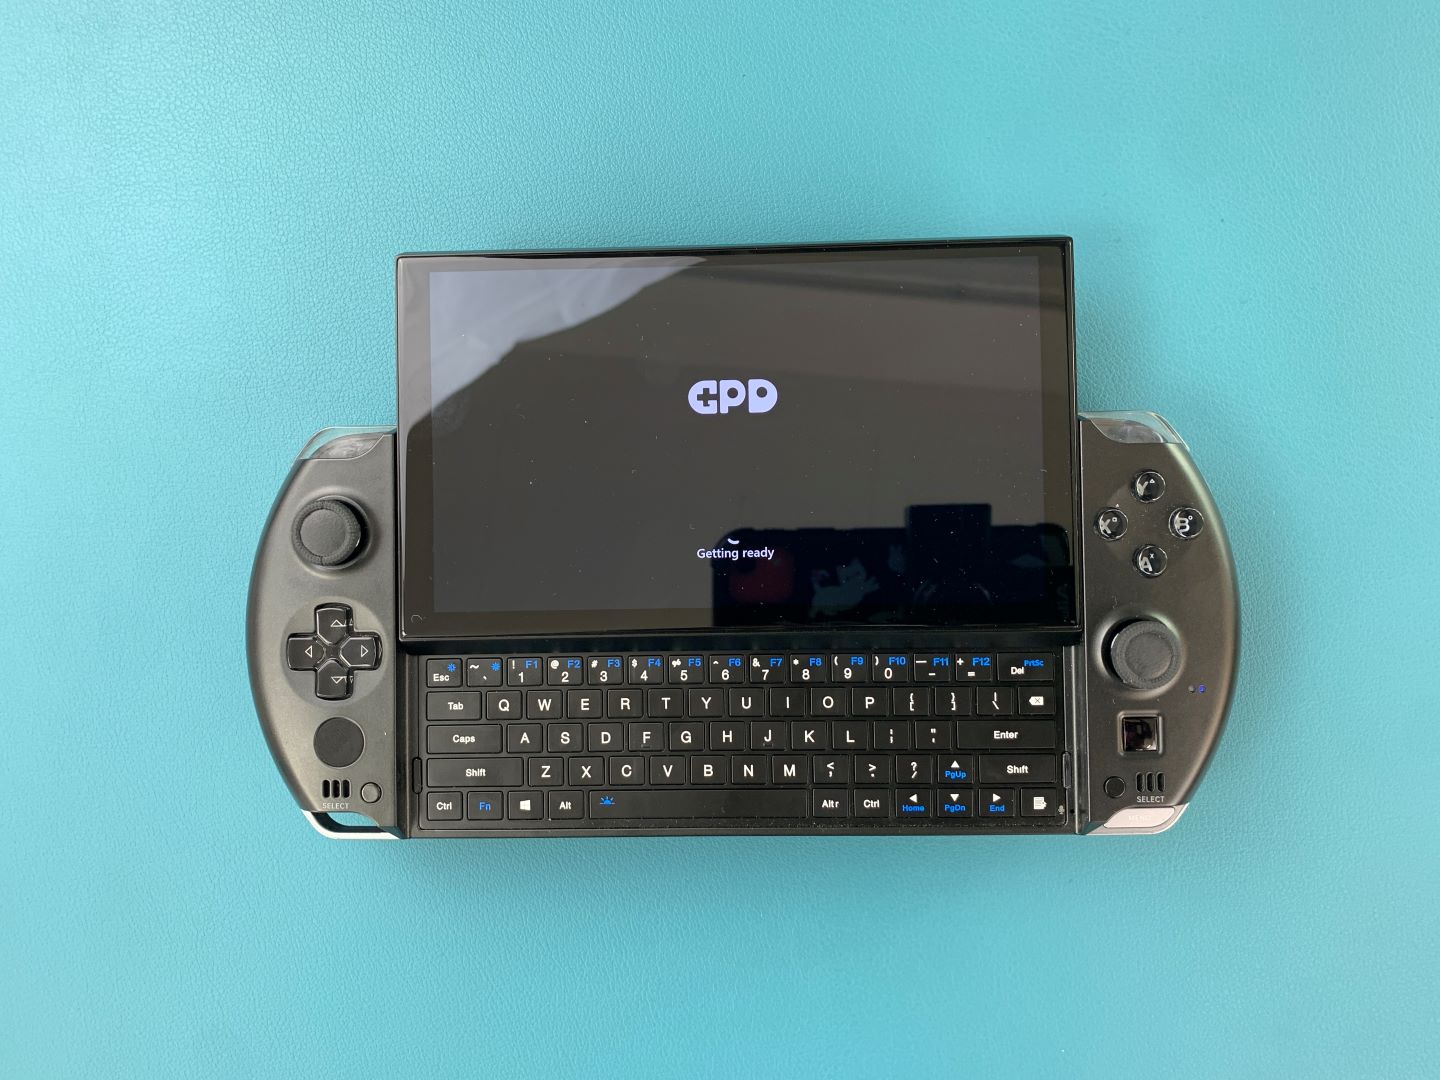
You will be greeted with a GPD loading screen as the device gets ready.
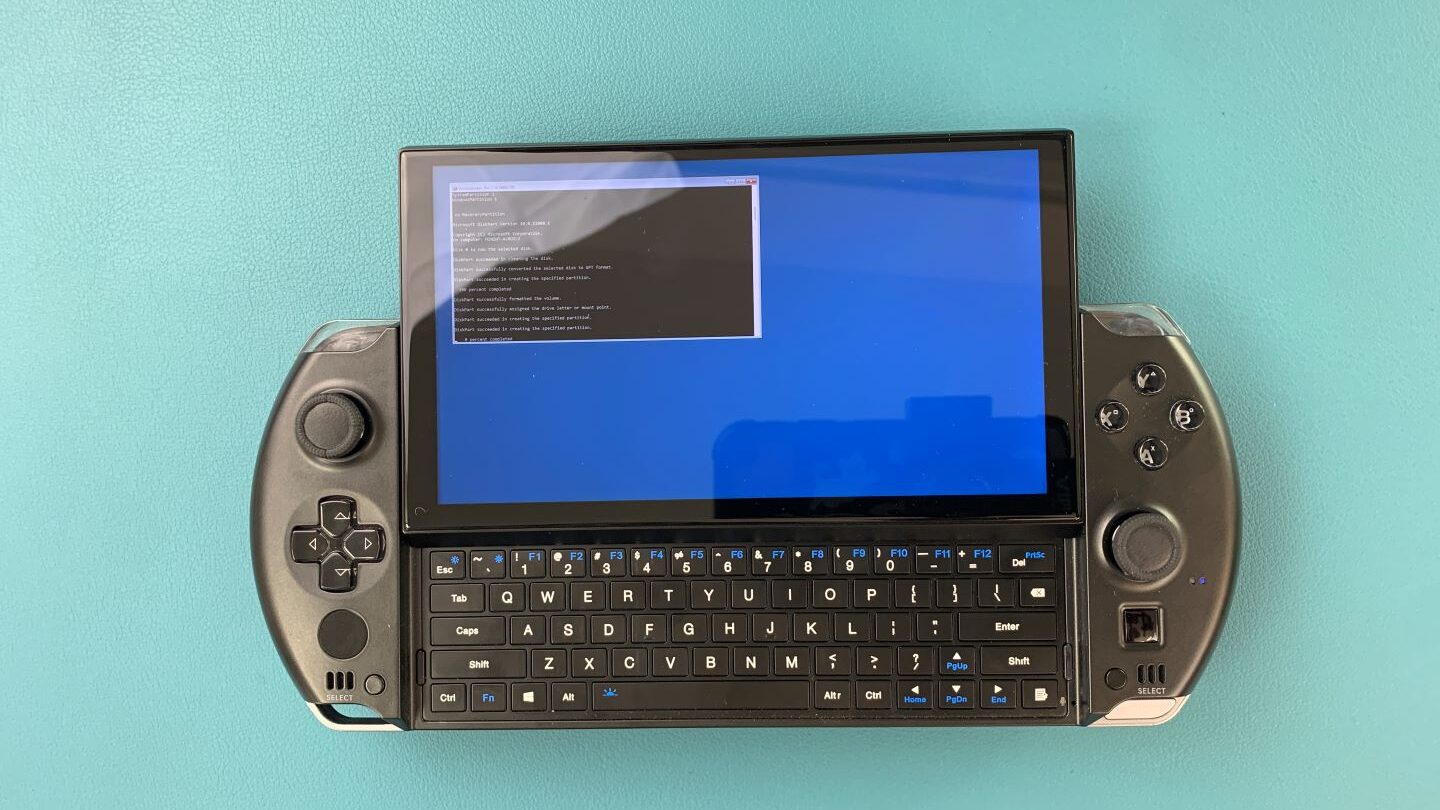
The device will boot from the USB Drive and automatically load and run a script to install a fresh copy on Windows. Simply let it run when this is happening.
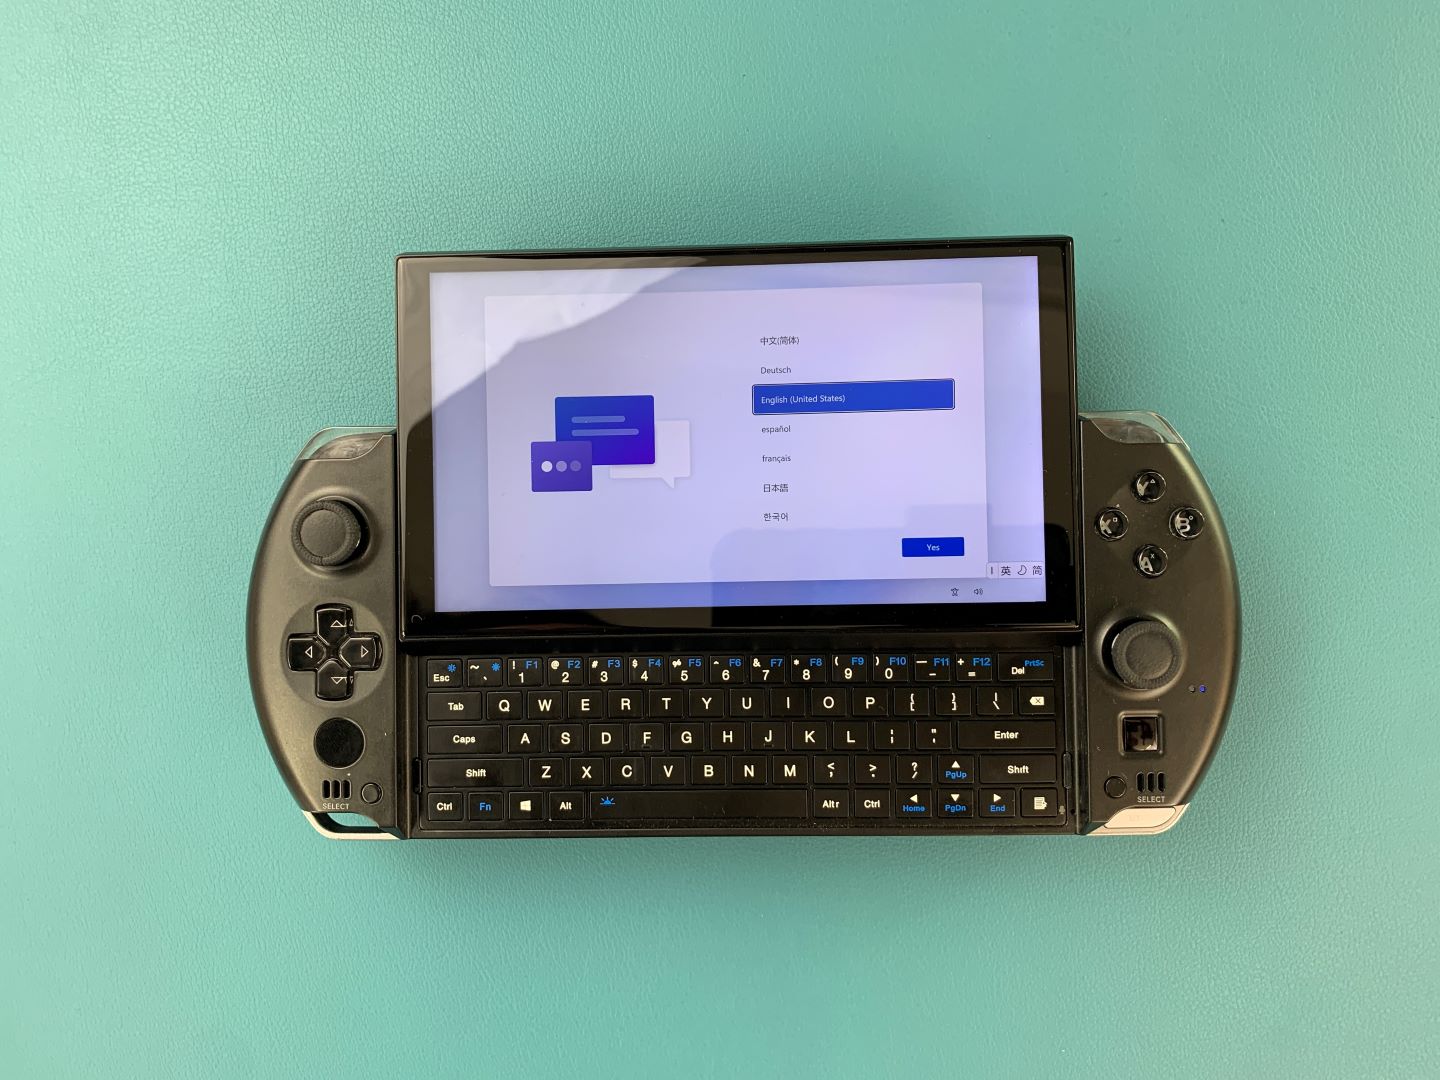
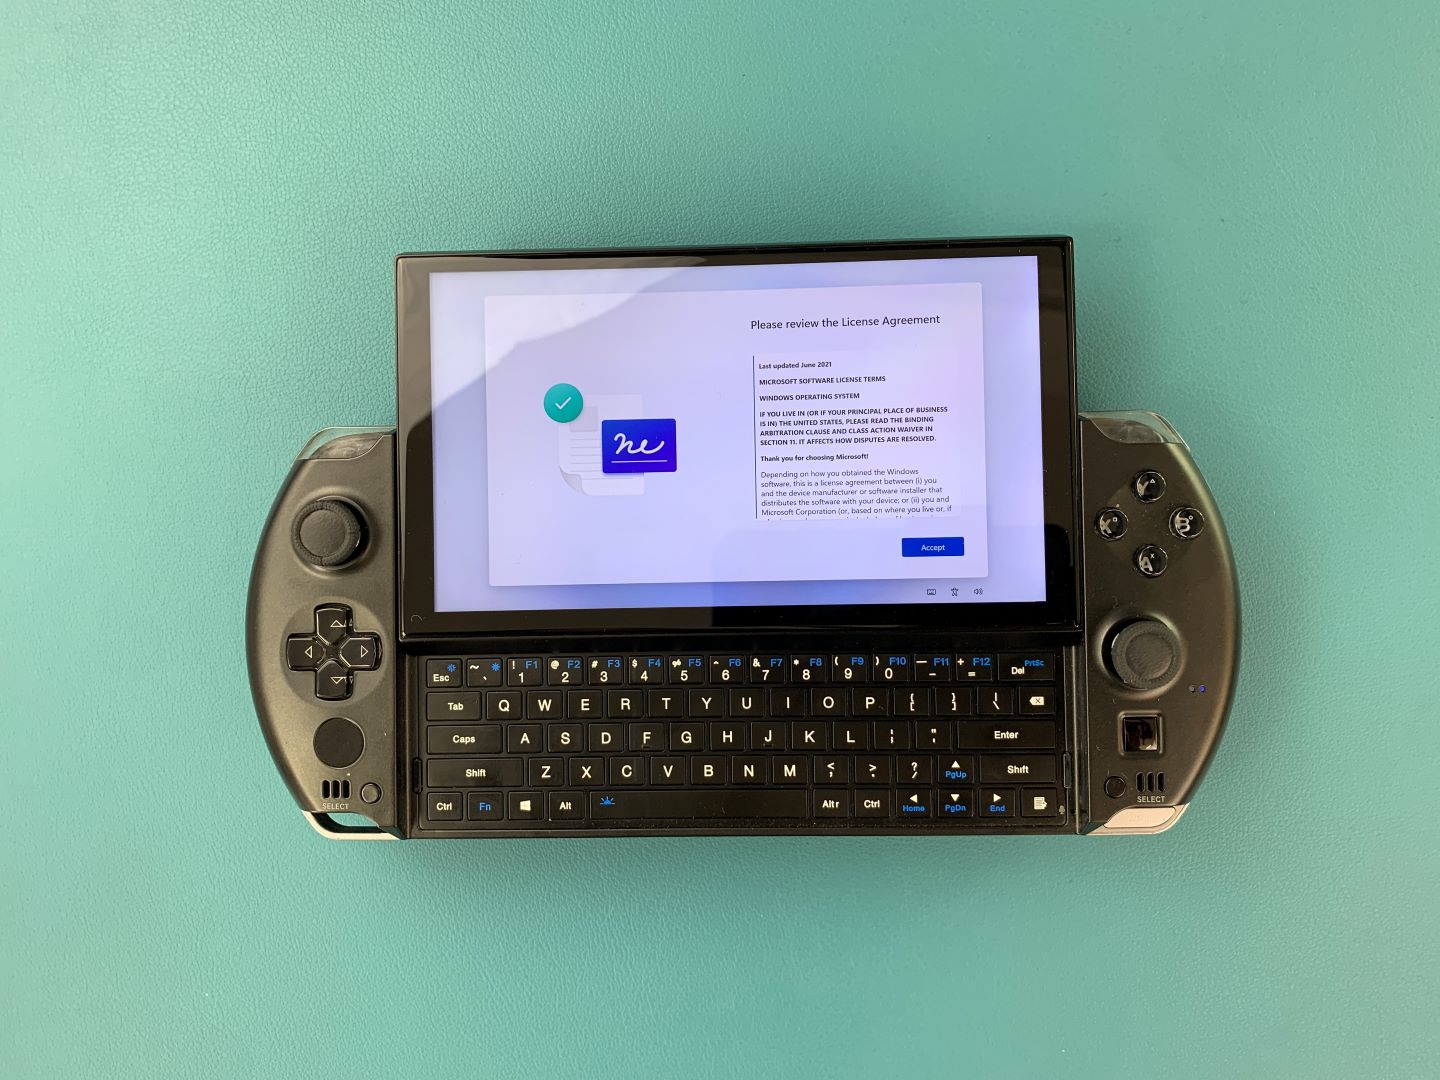
Once it is completed you will taken to the Windows setup process. Go through it with your preferred settings as you would any PC.
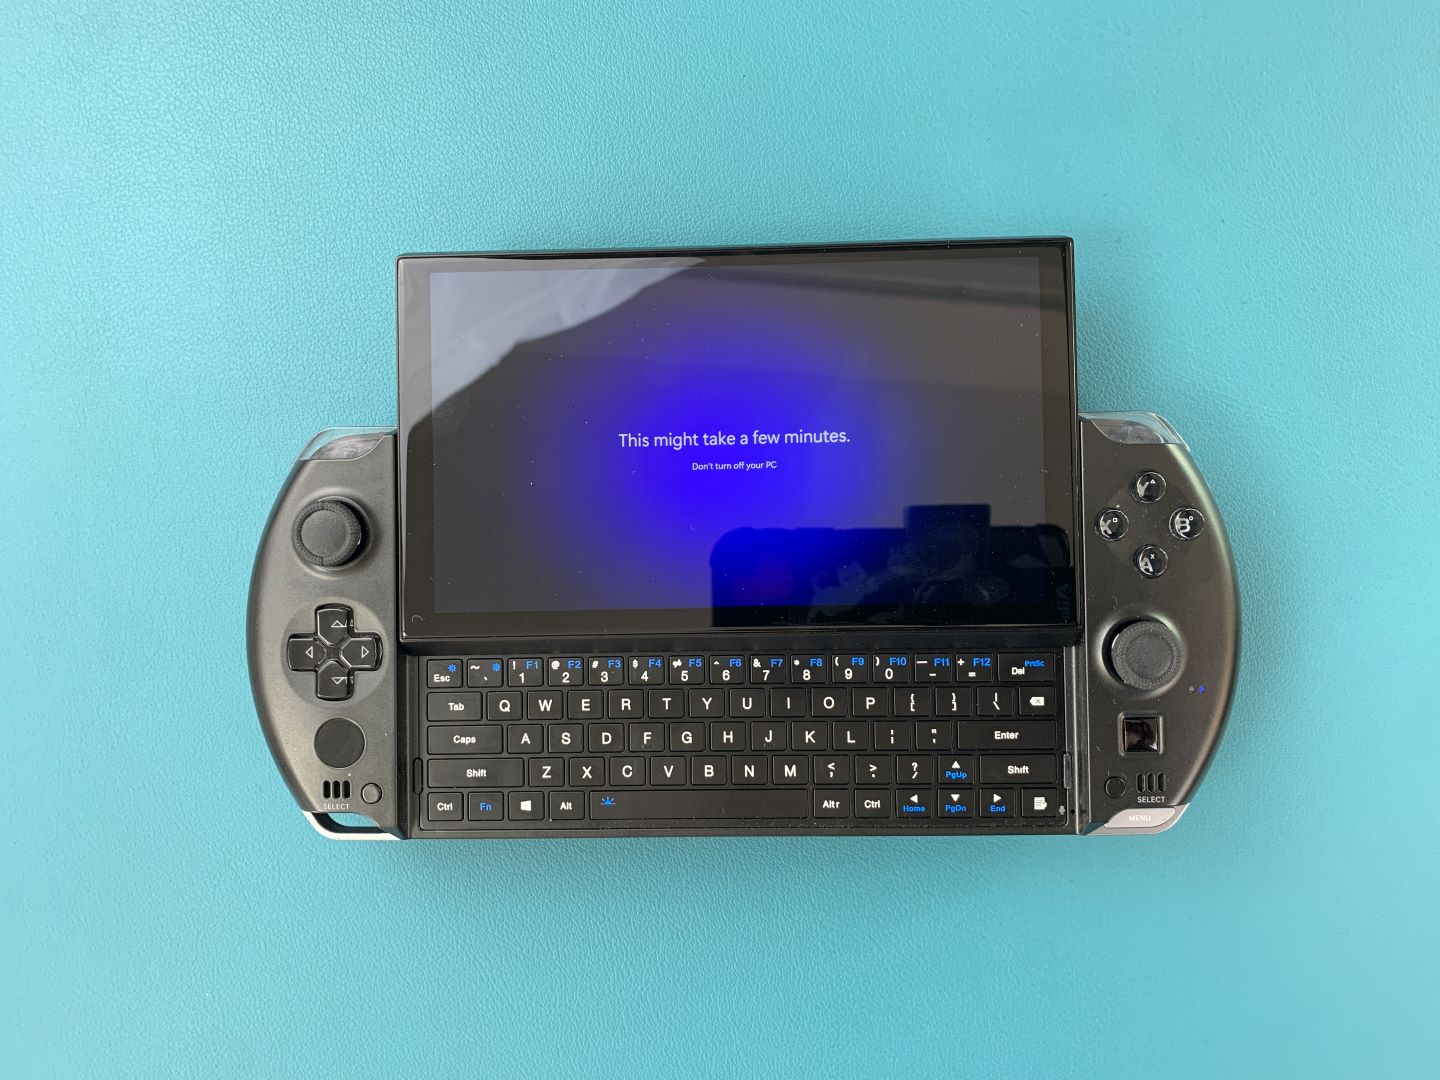
Please wait patiently as the installation process is finalising, it may take a few minutes.
You will be taken to the Windows home screen. Congratulations, you have successfully reinstalled Windows on your GPD Device. You are free to remove the USB Stick and get to gaming!
To learn more about your device check out the product page here.
To learn more about our other offerings and products take a look at other Knowledge Base articles here
