Welcome to our guide on what we believe to be the best RG350 custom firmware available currently. In it, we’ll go what you need to do to get this installed on your system. Want to revitalize your old retro handheld? Read on to find out…
Why is Adam the best RG350 custom firmware?
A common issue that people experienced with the second generation of ANBERNIC handhelds is the barebones nature of the interface. While not complex, the overall layout intimidated less-experienced users, and was found to be somewhat clunky to use for even experienced users.
The ADAM Image is an attempt to bring the convenient design of the EmulationStation-based image on the RG351 family, to an older series of devices. This includes a more graphical interface, and even cover art through the SimpleMenu GUI.
In addition, this image has a huge number of pre-installed emulators that weren’t present on the stock firmware, including, the often-asked about Sega AMIGA.
Disclaimer: This image does not come with any games or additional BIOS files pre-loaded. While we at DroiX are strong advocates for game preservation and emulation, we do not condone nor advise the illicit sharing of copyrighted content.
You will need:
- A handheld, of course! The Adam image is compatible with the following devices:
- The ADAM Firmware Image. This will be an .img.xz image that you can download from the official github repository.
- We have also downloaded and mirrored the download for version 1.3 here.
- Image writing software. We prefer either Win32 Disk Imager or Rufus. For this guide, we’ll use Rufus.
- A small microSD card for the OS (we’d recommend at LEAST 4GB)
- A larger SD card for all your games
Step 1 – Wipe your microSD card
Before proceeding, it is highly advised that you completely wipe your SD card. The best way to do this is to format it.
For an outline on how to format a microSD card so that it’s ready for use, check this section of our ANBERNIC reinstall guide.
Now you’ve formatted the card, or if it was already blank, we can move onto the next section.
Step 2 – Write the image
To write the image to the microSD card, you will need to use flashing software such as Rufus or Win32 Disk Imager.
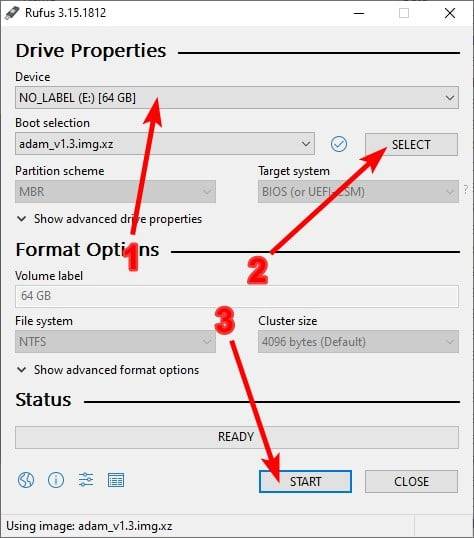
Assuming you have already downloaded and installed Rufus, and you have already downloaded the ADAM image file. Double click the Rufus executable, and you’ll see a window like the image on the right.
First, under the «Device» section, ensure that the microSD card you’re flashing is selected.
Second, click the «SELECT» button, and navigate to the Adam, image you have downloaded. Select it.
Finally, once all is ready, click the START button. The flashing will proceed automatically. Do not disconnect the microSD card or close Rufus until this is complete.
You should now have a microSD card with two partitions. One FAT32, and one Ext4. If the FAT32 partition has not been assigned a drive letter automatically, you will need to assign a letter to the partition.
Step 3 – Run the Batch File
Now that you’ve flashed the microSD card, there is one more step necessary before you can put the device into your system.
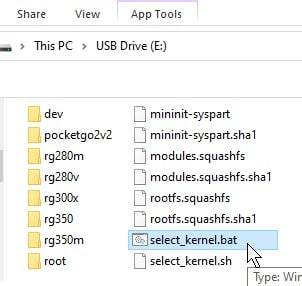
Navigate to the fat32 partition of the card. There will be a batch file present called «select_kernel.bat». Double click it to run it.
Once you run it, you’ll see a command prompt asking you to confirm which device the Adam image is going to be used in. Type in the number corresponding to the model, and then press the ENTER key.
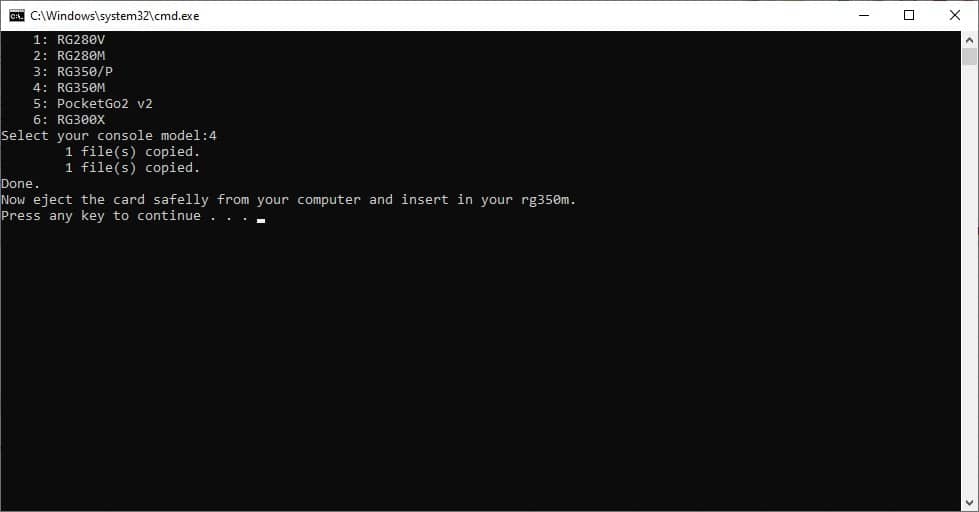
The batch file will then carry out some operations, before finishing and prompting you to close it/eject the card.
Now your Adam microSD card is ready for use in your device. Simply insert it, and you’re good to go!
After a while, we’re sure you’ll see too why this is the best RG350 custom firmware available at the time of writing.
For a more comprehensive coverage of Adam’s features, or if you’d like to contribute to its development, check out the github page!
FAQ
Where are the games?
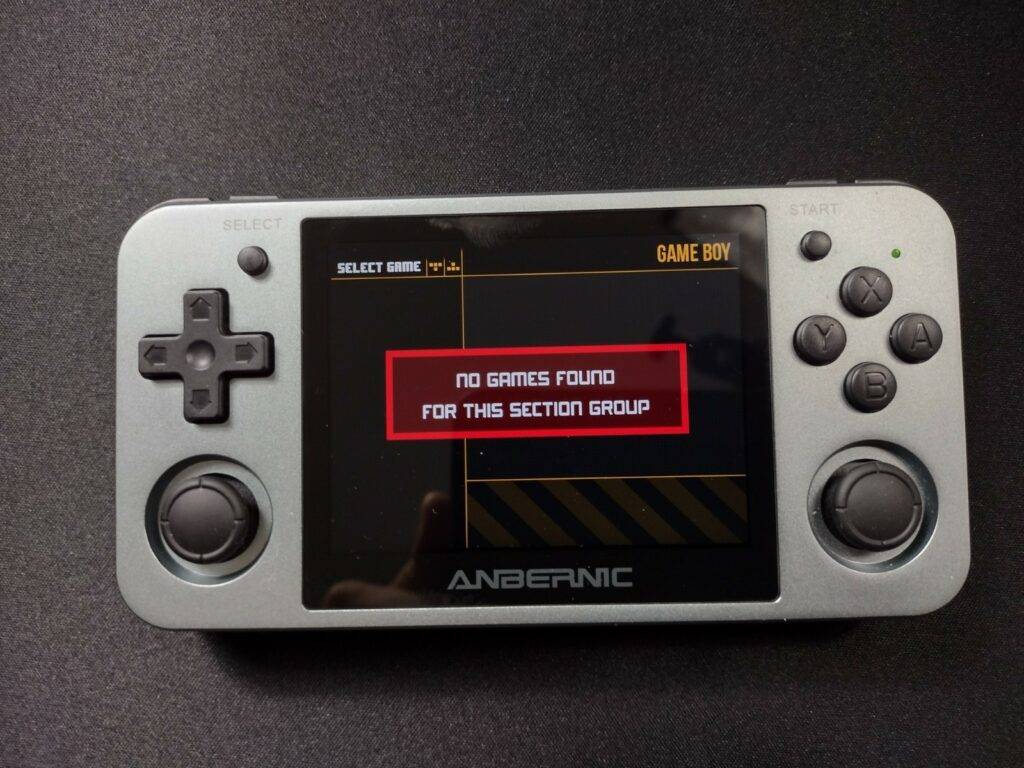
When you boot the system for the first time, you’ll probably not see any games. This is most likely because your external microSD card does not have the required layout.
Adam will look for games on the external SD card, provided the folder structure is as follows:
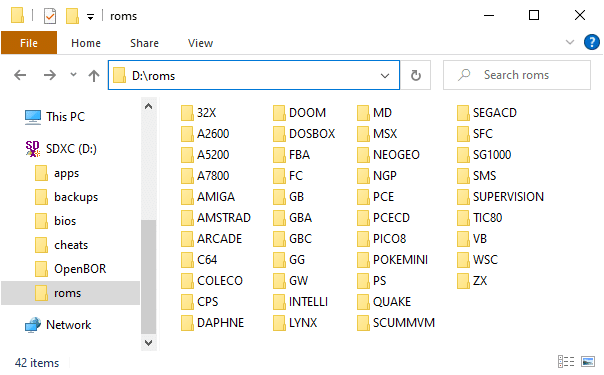
The different folders correspond to different platforms. i.e., «COLECO» is the folder where all your Colecovision games should go.
How do I get cover art?
Assuming your card is laid out correctly, under each specific platform, there should be a folder called «.previews». If there is not, you can make one.
In this folder, place a .png file with the same filename (minus the extension) as the game you wish for it to apply to.
So for example, if you have a Game Boy game called «MyGame», located like so:
roms/GB/MyGame.rom
Adam will assume the preview image is located like so:
roms/GB/.previews/MyGame.png
If successful, your preview will now appear in the menu.
Why is my game not booting?
This could be due to any number of reasons, but it is most likely that you do not have the required BIOS. Not every emulator requires a BIOS (some have reverse-engineered/standalone solutions), but a good chunk of them do.
For a list of what BIOS files are required, check out the github page.
