Congratulations on your new AYN Odin 2, crowned the King of Android gaming handhelds, we’re here to welcome you to an entirely new level of retro gaming! Unlocking a universe of classic gaming nostalgia combined with modern technology. This device isn’t just about reliving old favourites; it’s about experiencing modern-day gaming with great performance. Our Getting Started guide is tailored to help you unlock the full potential of your retro gaming console.
At DroiX, we celebrate and support the spirit of retro gaming. We also stand by the principle of empowering our users. So, if you find any issues and feel confident enough to handle them, we fully support your Right to repair them! With no effect on your device warranty! But remember, DroiX Customer Support is always happy to help with any questions or assistance you might need. We are here to ensure your queries are answered and issues are resolved as quickly as possible.
Ayn Odin 2 Setup
Let’s kick off the setup of your AYN Odin 2. We’re diving into the intricacies of its hardware, ensuring seamless connections, and offering you the know-how for an amazing retro or modern-day gaming experience.
What’s Inside the Box?
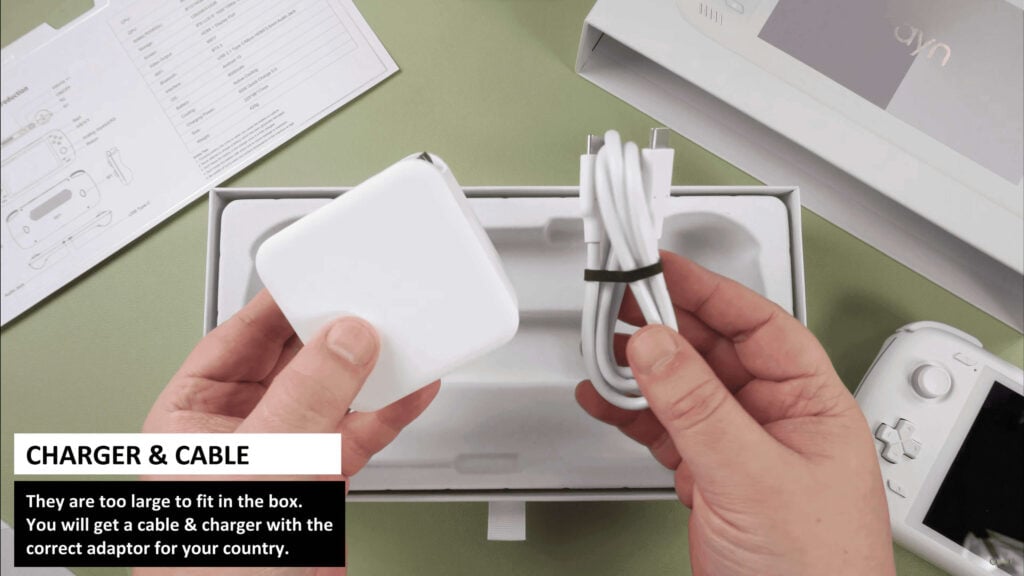
When setting up your AYN device, it’s important to ensure you have all the necessary components and accessories for a smooth start. Additionally, please remember to check all and underneath the compartments of the box, as listed items are often placed there. Thoroughly inspect the entire box to find all the components you need for a complete and enjoyable setup experience. With your purchase, you should find:
- 1x AYN Odin 2
- 1x Power Adapter
- 1x USB-C Cable
- 1x Screen Protector
- 1x User Manual
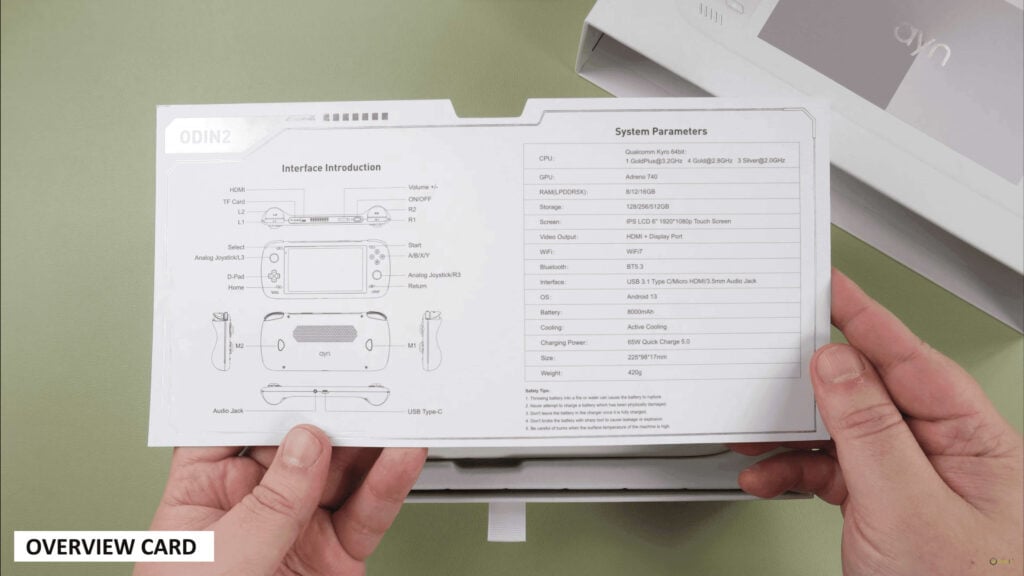


Device Overview
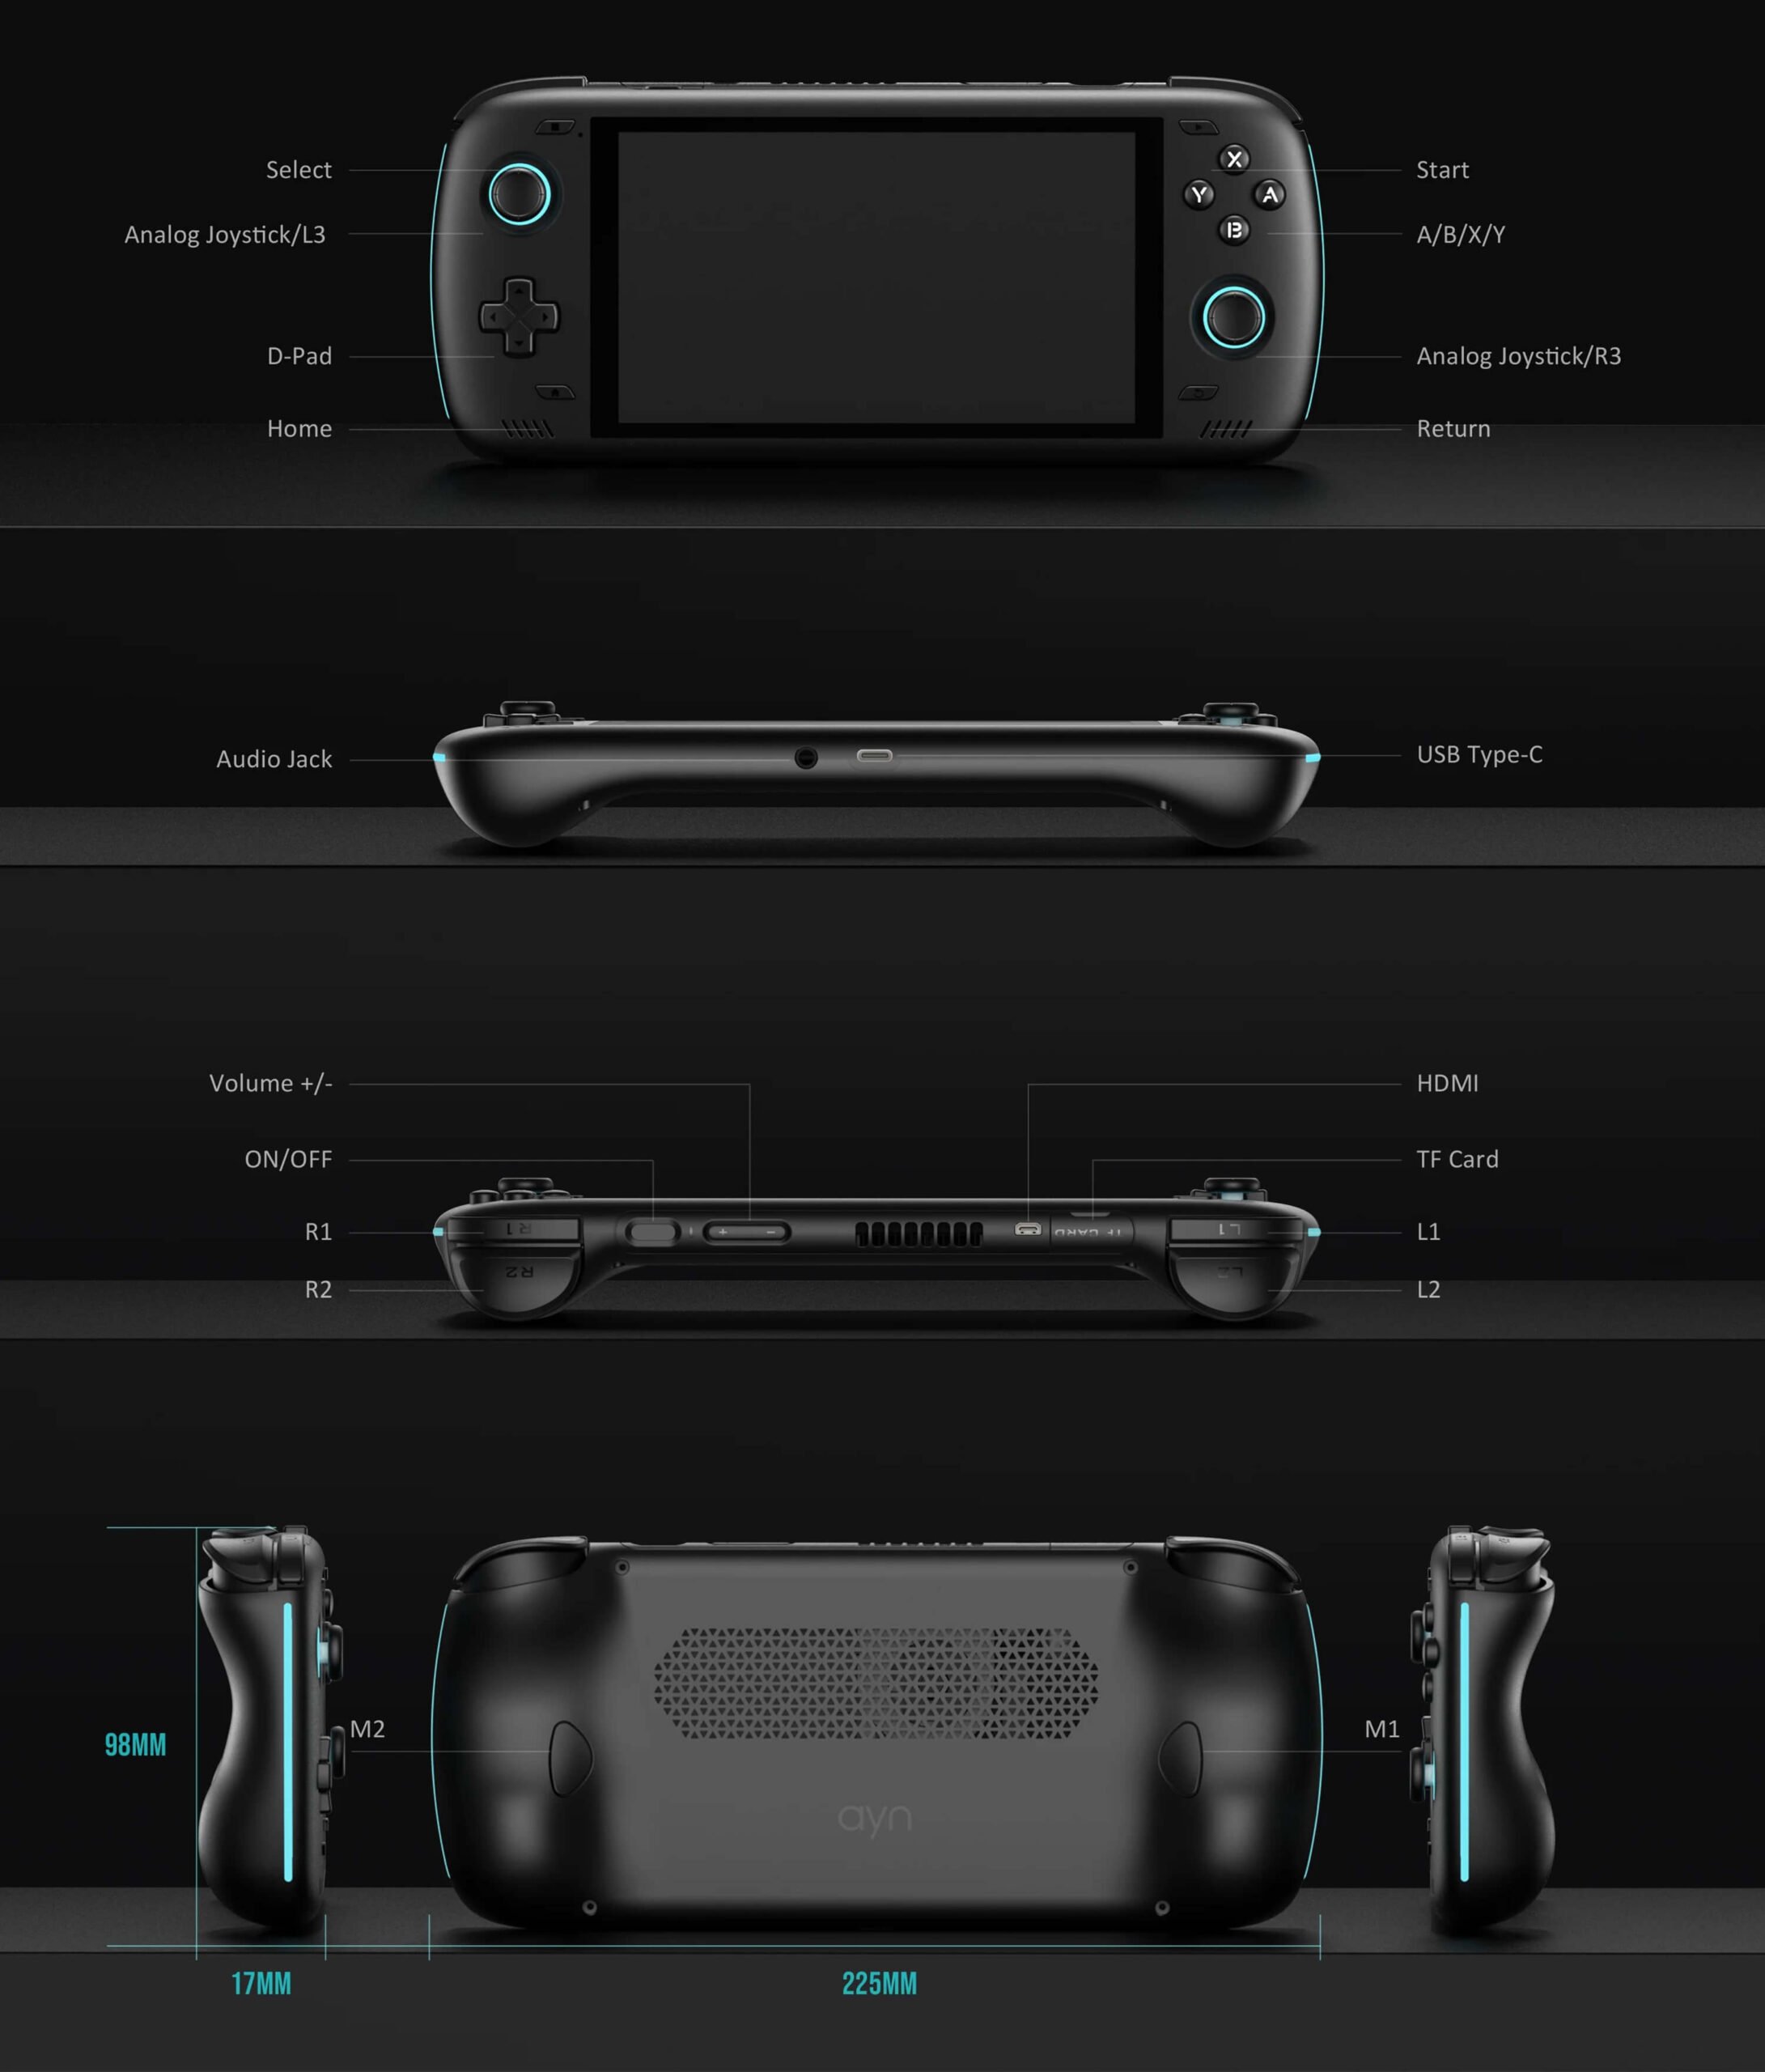
The AYN Odin 2 features many buttons and connectors, all of which are promptly labelled in the user manual. Notable ones include:
- Power Button: power on/off device.
- 1x USB-C Port: supplying power and connecting peripherals for expanded functionality.
- 1x Micro HDMI Port: display video and audio onto an external monitor or TV.
- 1x MicroSD Card Slot (TF Card): expanded storage or data transfer.
- 3.5mm Audio Jack: for wired headphone support.
What To Do
Setting up your device is the first step before you can dive into your gaming adventures. Our goal is to streamline the process, so you can get to gaming as soon as possible. By following these easy instructions, you’ll be ready to explore any gaming era in no time.
Charge Device
Let’s begin by fully charging your device. Connect your AYN Odin 2 to a power source using the USB-C cable provided. You’ll find the USB-C port conveniently located at the base of the device (refer to Device Overview above). You will notice that the device LED located at the top will go green once the device has been fully charged.
Ensuring a full charge is key to preventing any power interruptions during the setup, which may involve important steps like battery calibration. This first charge establishes the battery’s health and maintains its efficiency over time.
Insert MicroSD Card
Next, let’s prepare your device’s expanded storage. You’ll need to insert the MicroSD card into the TF slot, which is conveniently located on the top side of the device (refer to Device Overview above). This MicroSD card is where all your data will be stored, so make sure it’s properly secured. With your storage in place, your device is almost ready!
Power On Device
Now, let’s bring your Odin 2 to life! Press and hold the power button to power your device (refer to Device Overview above). Keep in mind, that the first boot might take a bit longer than usual — this is completely normal and part of the setup process. Once this initial setup is complete, subsequent boot times will be quicker, getting you into games faster. Patience is key here; your retro gaming experience is just moments away!
Android Setup
The Odin 2 runs on the Android 13 Operating System, which means you’ll not only have access to a variety of apps and functionalities, but also allow for improved performance and efficiency and much more customisation of your device, including access to the Google Play Store, sideloading capabilities, a modern UI, and multitasking capabilities. Ultimately, this makes your handheld gaming device much more functional for a modern multimedia experience.
But before you can play, you will need to configure Android on your device. Don’t worry, it’s not as hard as it sounds! Let’s walk you through it now!
Language Settings
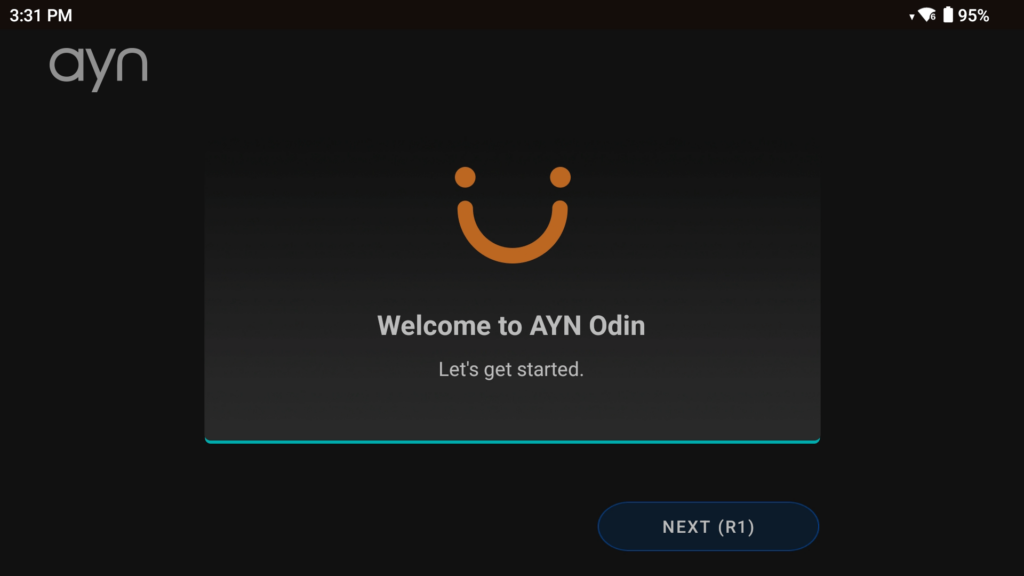
When you boot your device for the first time you will be met by a Welcome screen (refer to Image 1 below). Simply follow the onscreen instructions and you’ll be okay! First, you should press ‘Next’. This will prompt you to select the device’s language (refer to Image 2 below).

Network Settings
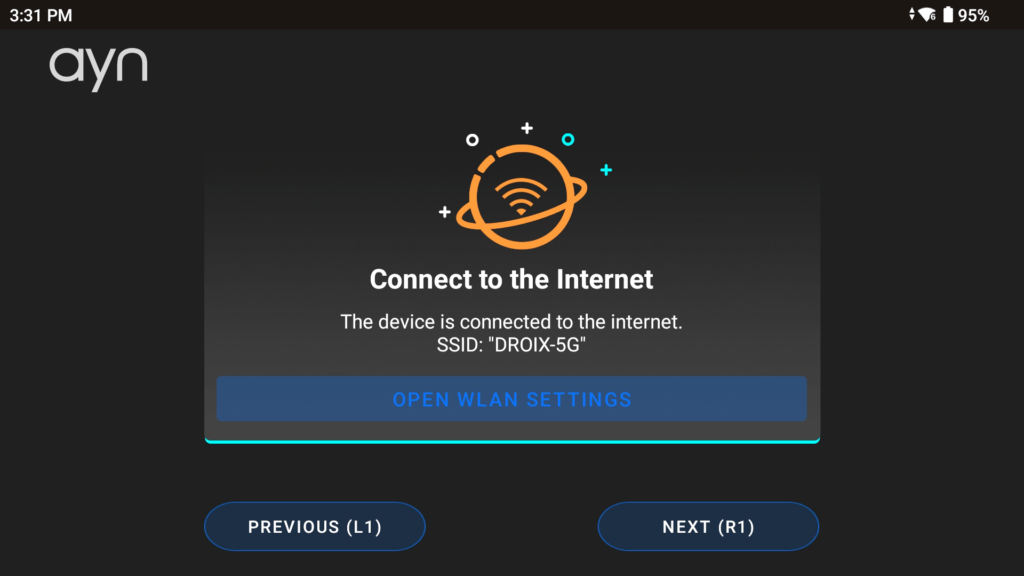
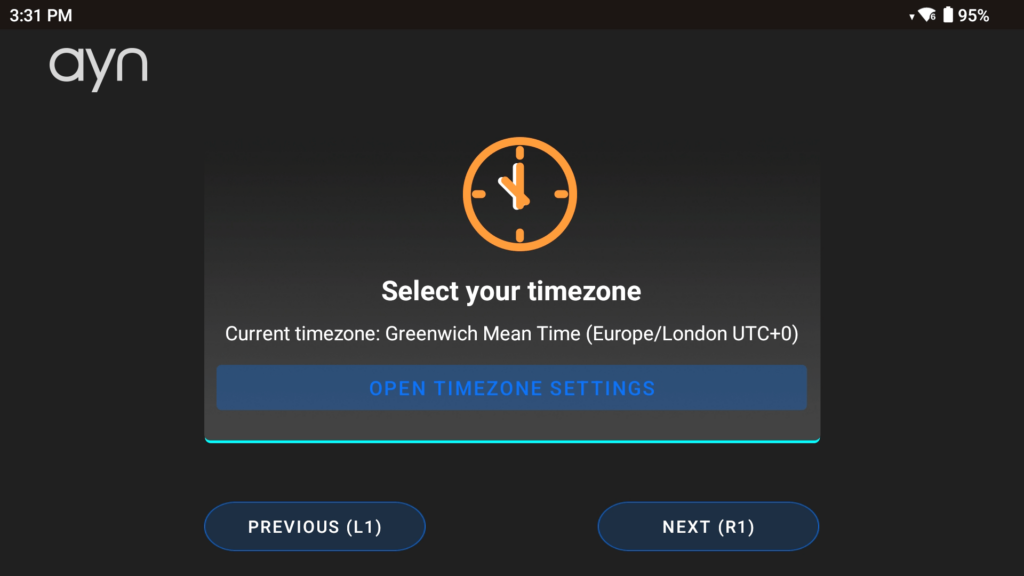
After this, you will be asked to connect to a Network (refer to Image 3 below). The Odin 2 boasts dual-band Wi-Fi 7 – meaning you get faster and more secure connections. Simply select your network and enter the password (or skip it if necessary). Then, you may need to select your time zone (refer to Image 4 below).
Android Launcher
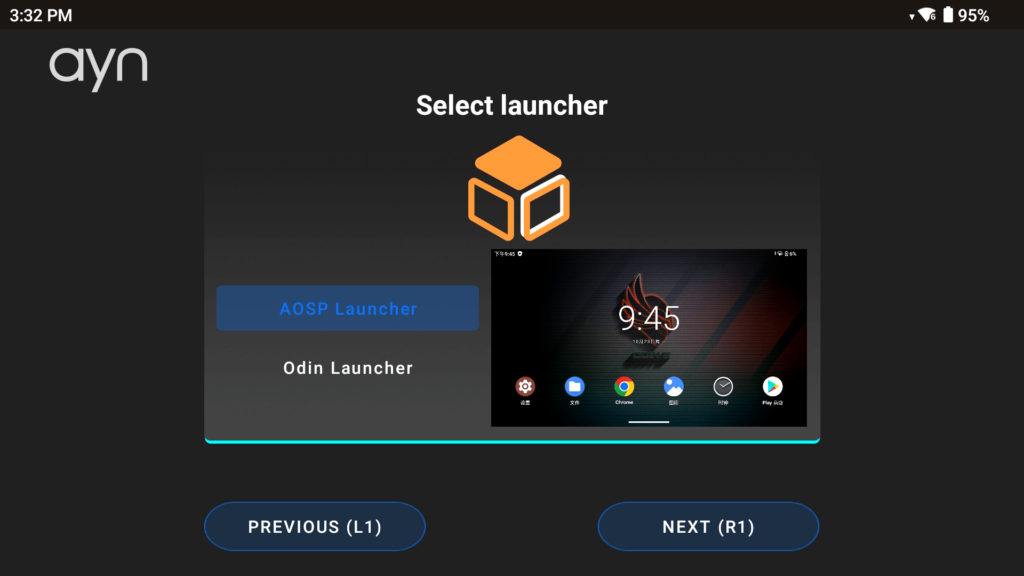
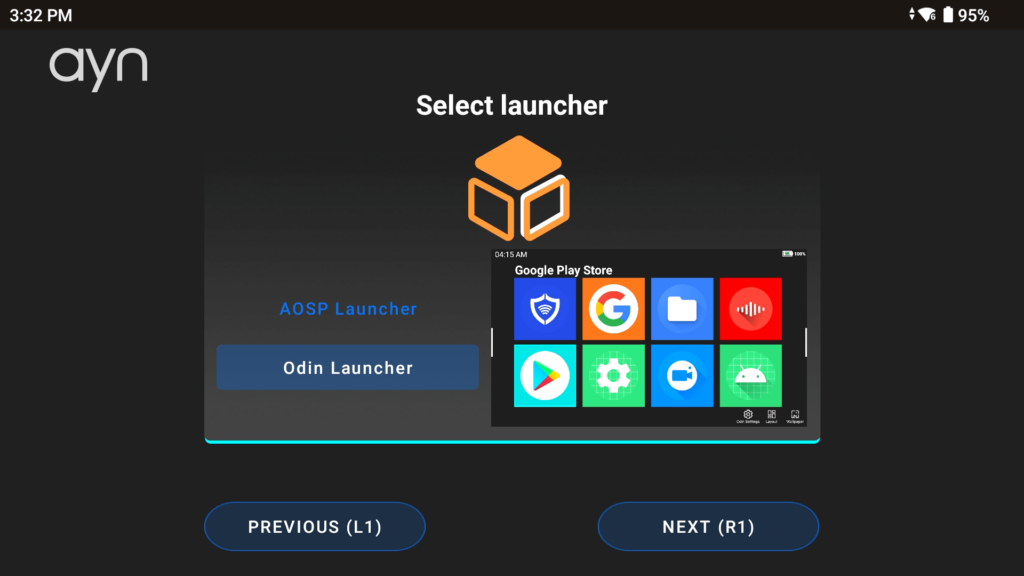
After this, you will be asked to select your Android launcher – you have the choice between the AOSP or Odin Launcher (refer to Images 5 & 6 below).
An Android launcher is essentially how the User Interface of your device will look. It’s where you will find and organize all your apps and games, allowing you to customize the look and feel of your device for easy and personalized navigation. We went with the AOSP Launcher, for more customizability but both options are really up to personal preference. Don’t worry, these options can be changed at any time without any loss of data by entering the Setup Wizard in Odin Settings.
Navigation Bar Style
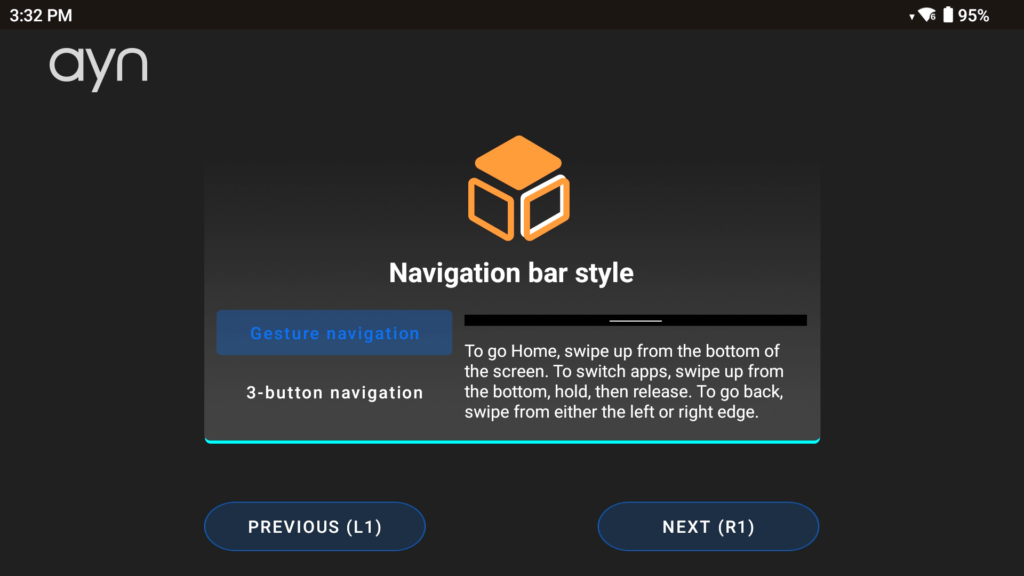
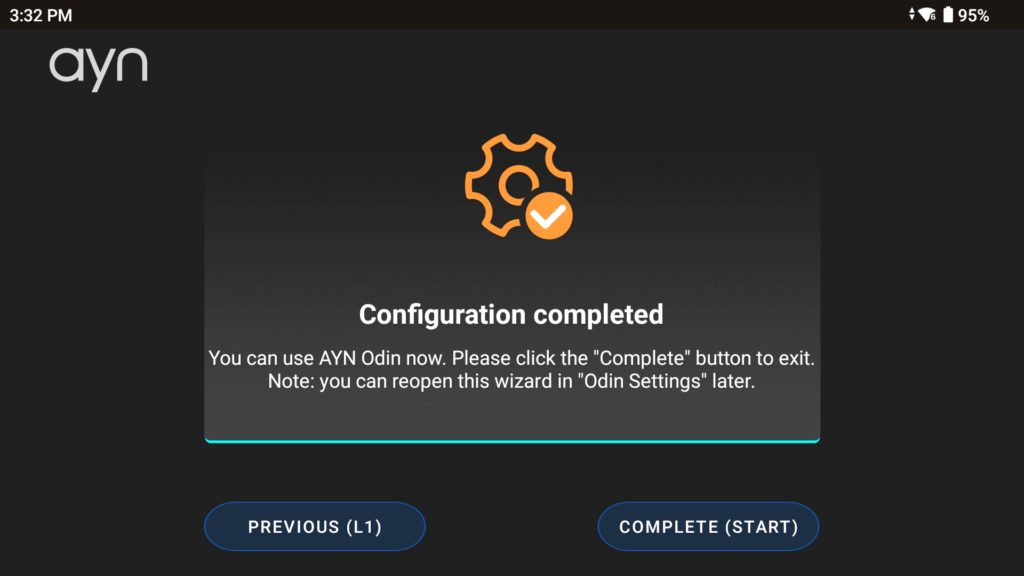
Choose your preferred navigation style which will allow you to personalise the way you navigate whilst using the touchscreen (refer to Image 7 below). Similar to the Launcher this is up to personal selection. Once configured, simply select tap on the screen or press the ‘Start’ button (refer to Image 8 below) to go to Android OS.
Android UI
Control Panel
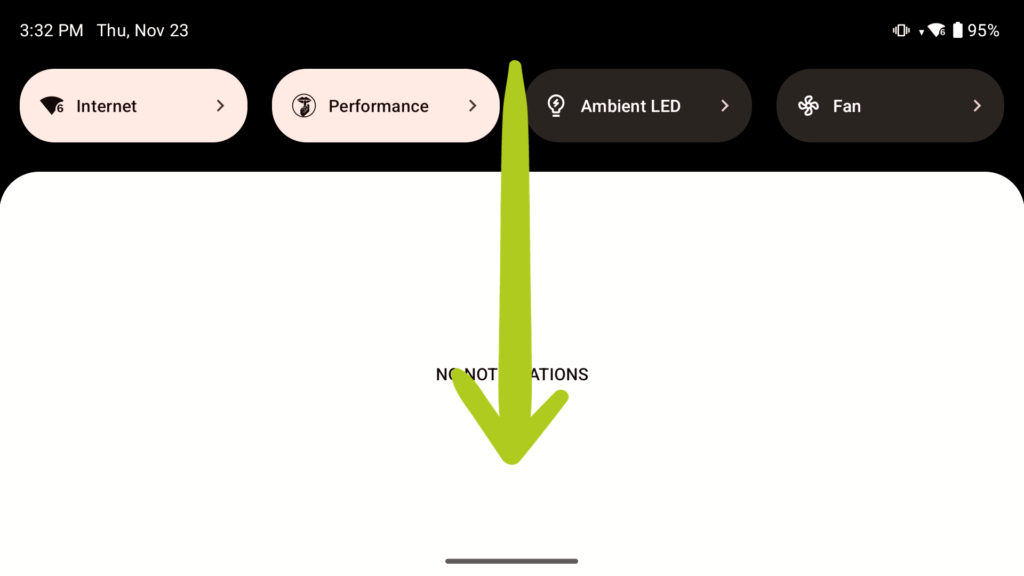
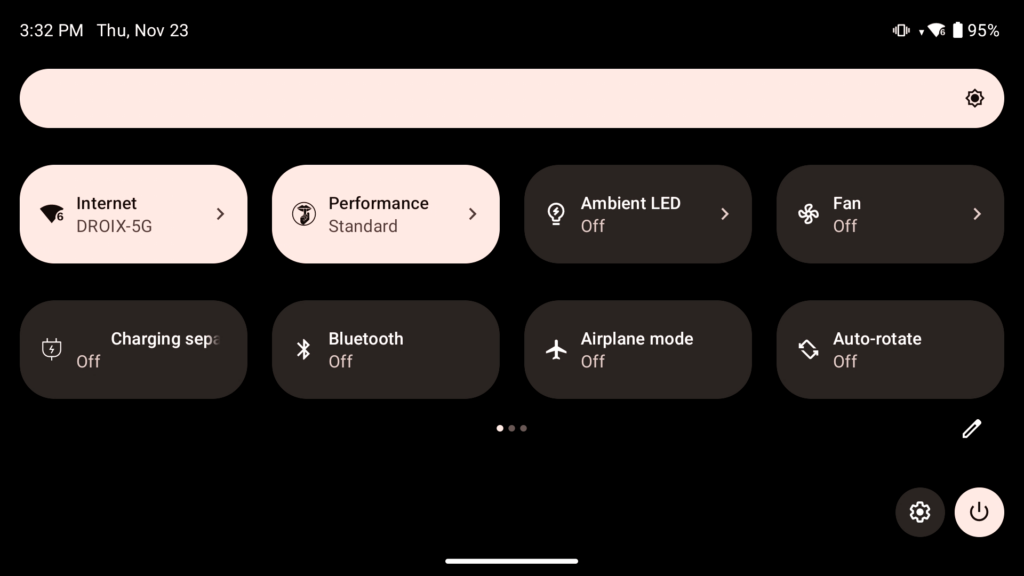
Your Android control panel (aka control centre) can be accessed by sliding down from the top of the screen, similar to how you would on a smartphone (refer to Image 1 below). Swipe down again to expand the control panel if needed (refer to Images 2 & 3 below). From here you can easily and quickly access and modify device options such as Wi-Fi, Bluetooth 5.3, Mode Control, button keymapping and more.

WiFi Settings
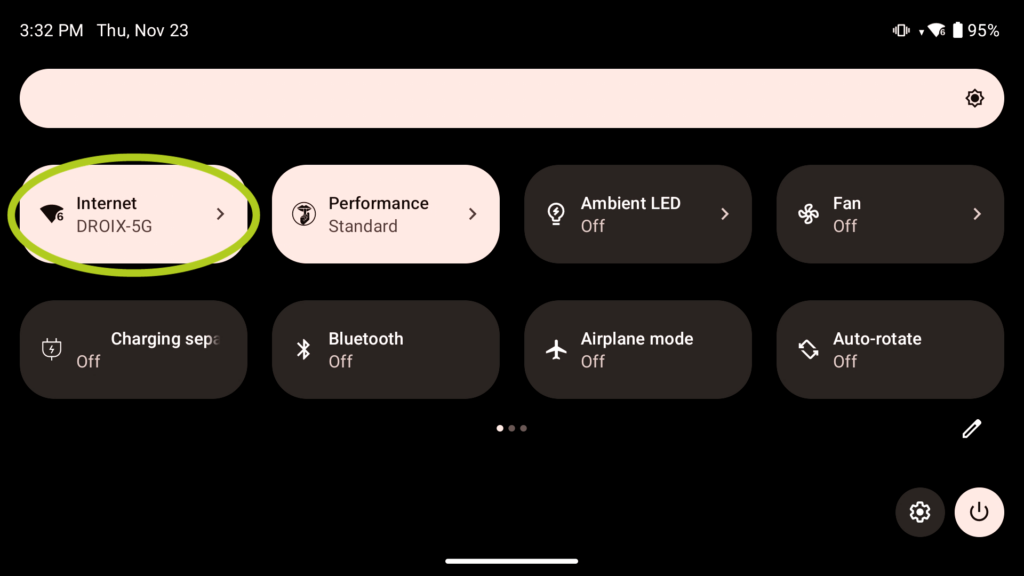
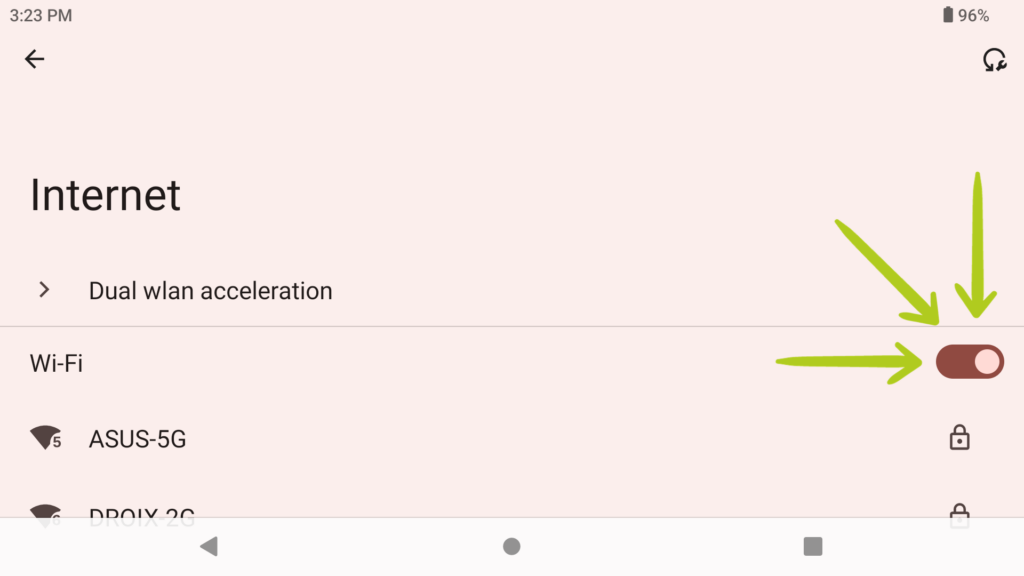
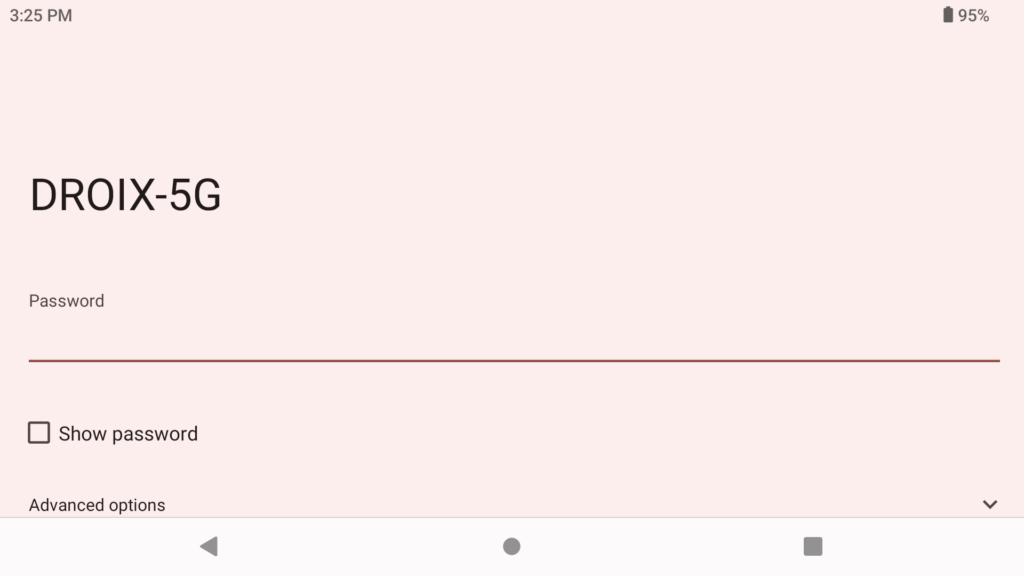
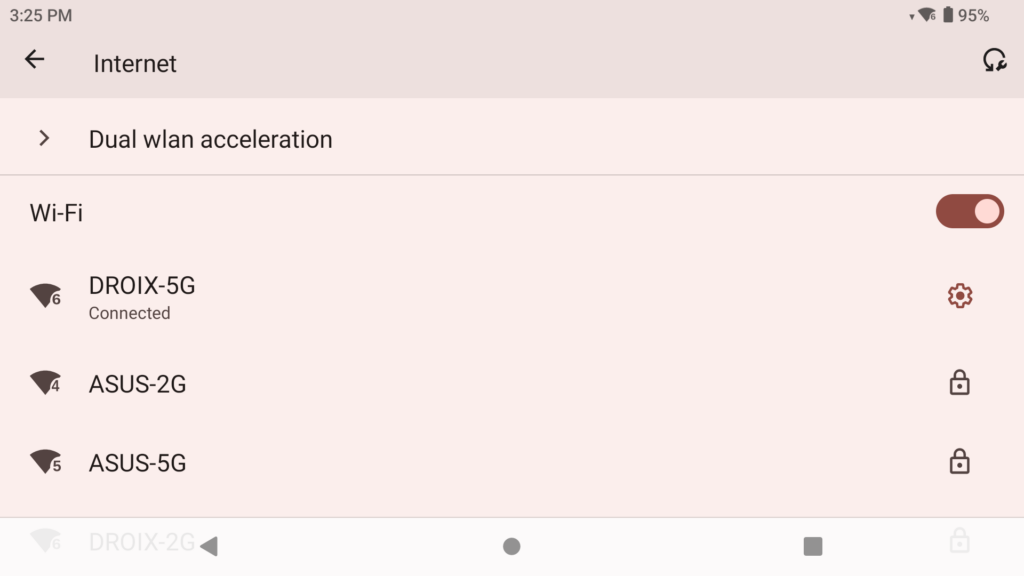
The AYN Odin 2 uses Wi-Fi 7 technology. To change your Network settings, open the control centre, then tap and hold you’re finger on the Wi-Fi option (refer to Image 1 below). This will open the Wi-Fi menu and show all the different available network connections. Simply select your desired network, and enter the password (refer to Images 2 & 3 below respectively). Once successfully connected you will see a ‘connected’ message under the respective network (refer to Image 4 below).
Odin Launcher
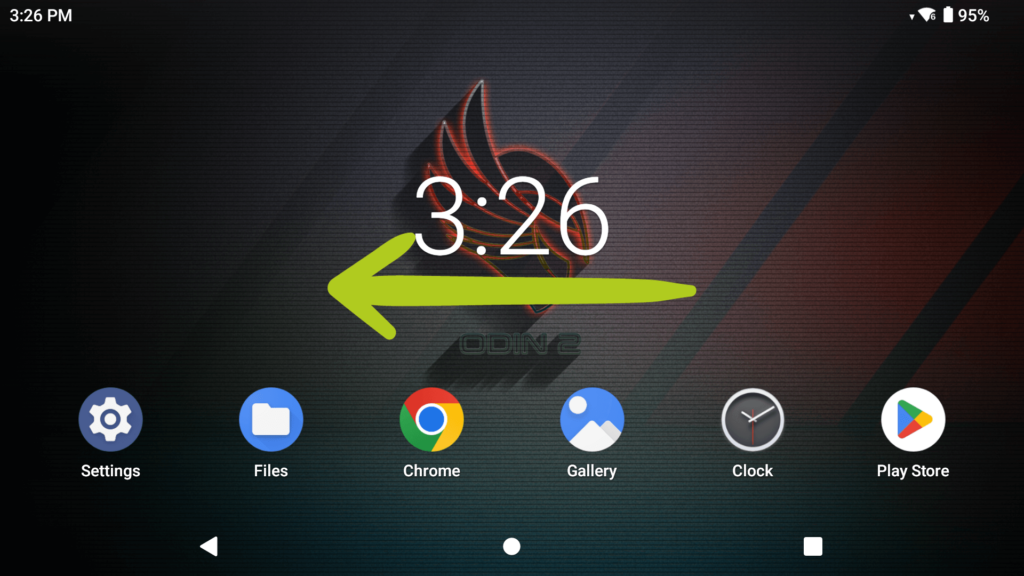
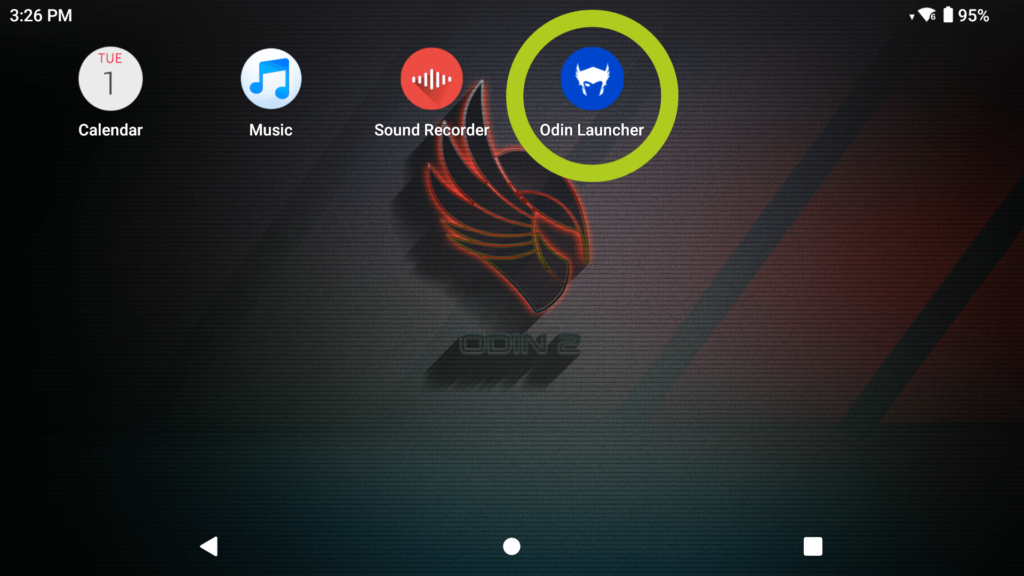
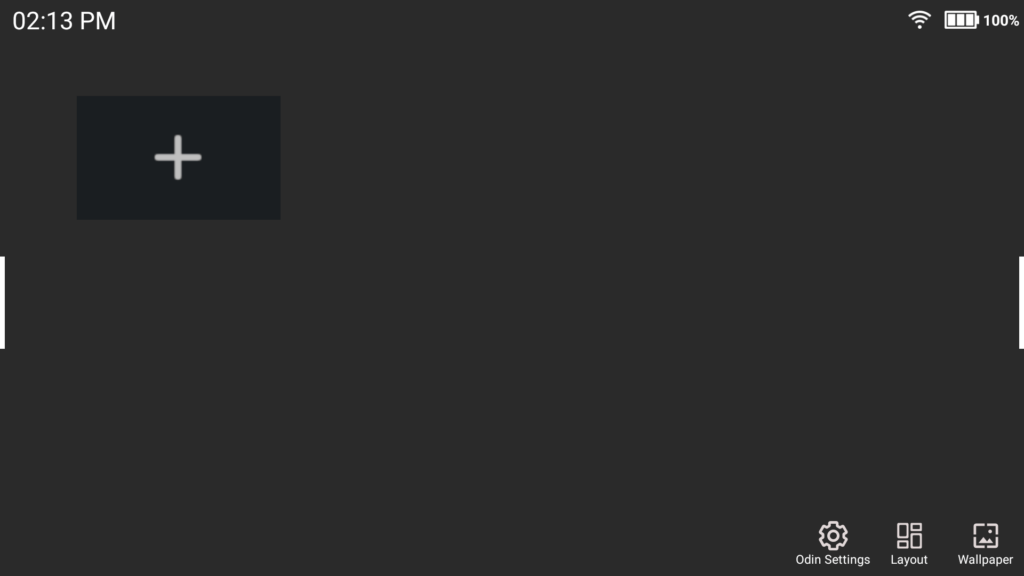
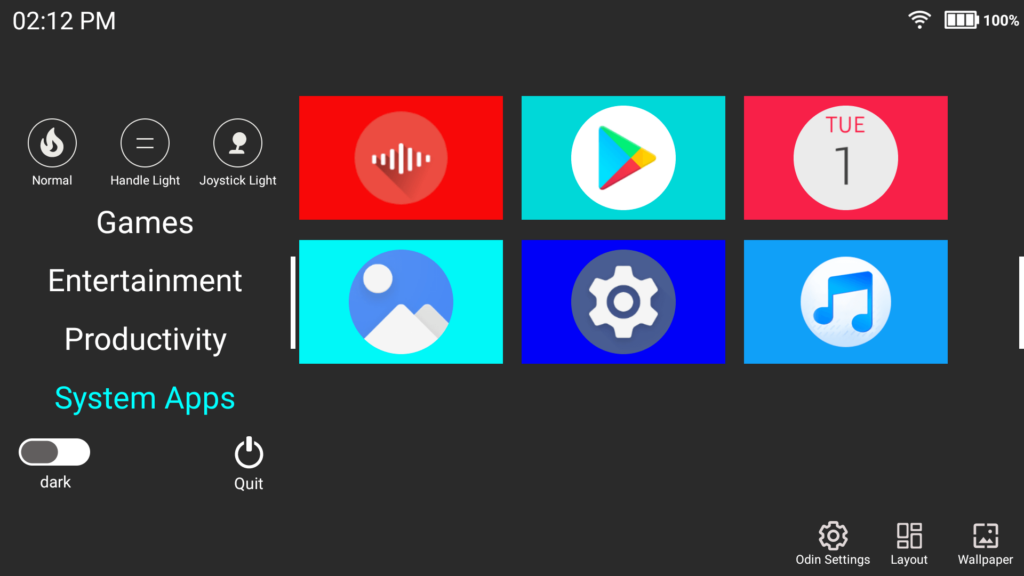
Even if using the AOSP Launcher, the Odin Launcher can be accessed at any time. Simply navigate by swiping left and right on your home screen until you find the Odin Launcher Icon (refer to Images 1 & 2 below). Tap the icon to open the launcher, and you should see an empty screen- which will get more populated the more you use your device (refer to Image 3 below). Swipe left/right at the white bars on the side (refer to Image 4 below) to access the Odin Launcher menu. From here, you will see many more options: from accessing different apps to quitting the launcher (refer to Image 5 below).

Enter Setup Wizard (Optional)
In case you need to, you can restart your setup configuration, as mentioned in the Android Setup section above, without the loss of any data. This can be done in 2 ways. You can simply access it by going into your device settings or you can access it through the Odin Launcher (refer to Image 1 below).
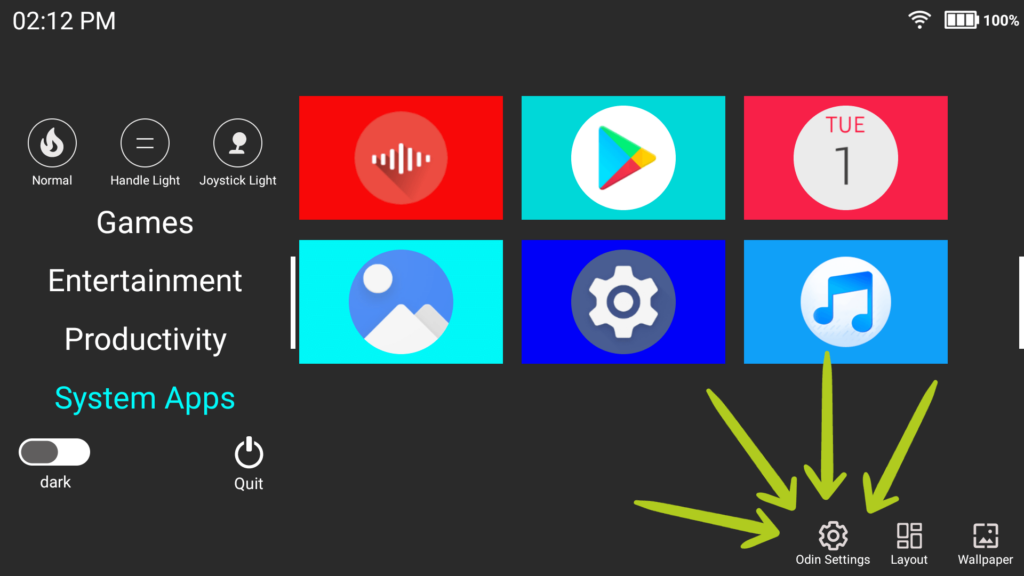
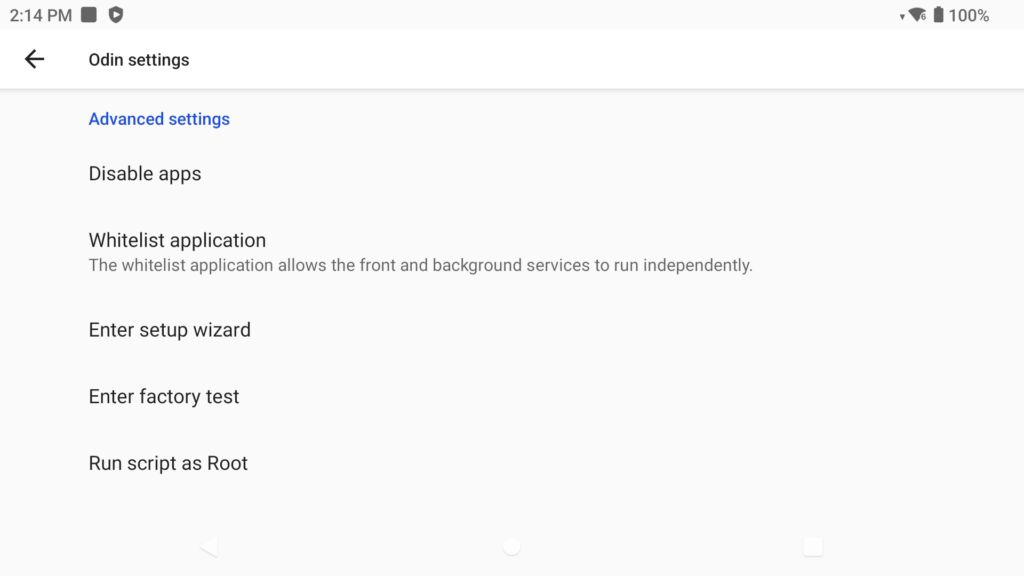
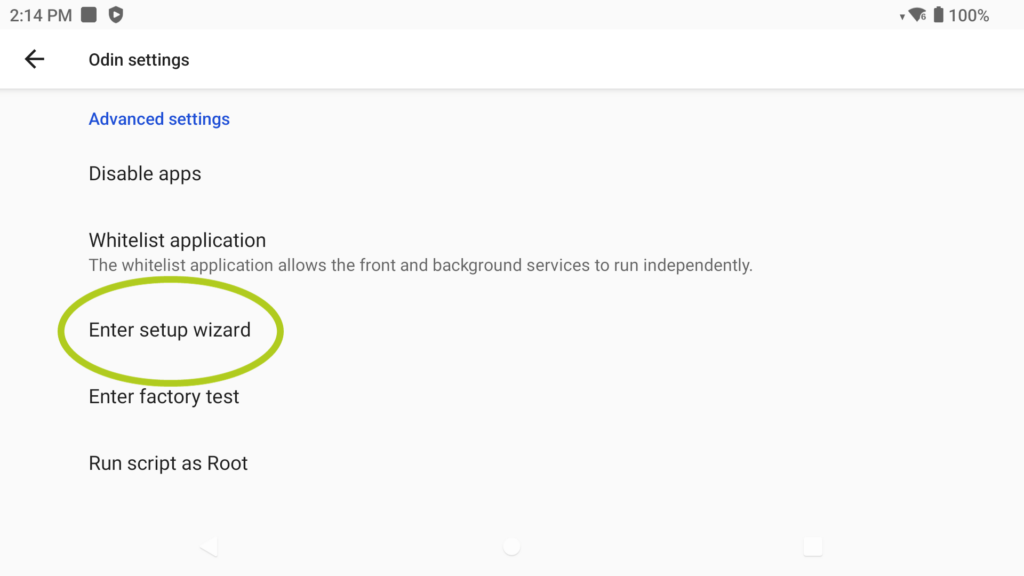
Regardless of which method you choose, it will open the Odin Settings (refer to Image 2 above), which provides many settings regarding your Odin device such as LED lighting. If you scroll down to ‘Advanced Settings’, you will an option called ‘Enter setup wizard‘ (refer to Image 3 above), selecting this will send you back to the setup/configuration process. From here you can change any settings such as your default Launcher or navigation bar.
Game Assist (Ingame Overlay)
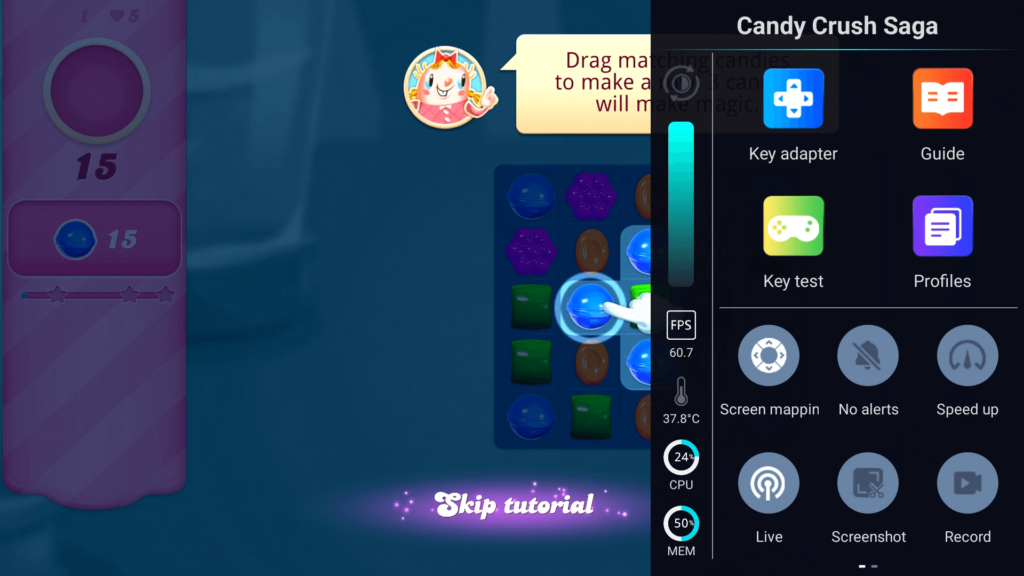
Game Assist is a handy in-game overlay feature that allows you to manage several device functions (and more) without leaving your game. You can easily adjust device brightness, manage notifications, manage memory, customize key adapter settings, and even record your gameplay. This means you can tweak your gaming experience on the fly, ensuring optimal play without interrupting the action.
Whenever you’re in a game, a thin white bar should appear on the side of you’re screen (refer to Image 1 below). To access the overlay, simply swipe left from the side of the screen that has the white bar showing and the overlay should open (refer to Images 2 & 3 below).
Onscreen Controls (Key Adapter)
The key adapter is a feature that allows you to customize on-screen controls for your games. This can be particularly useful for games for players who prefer a touch interface or games that require particular controls.
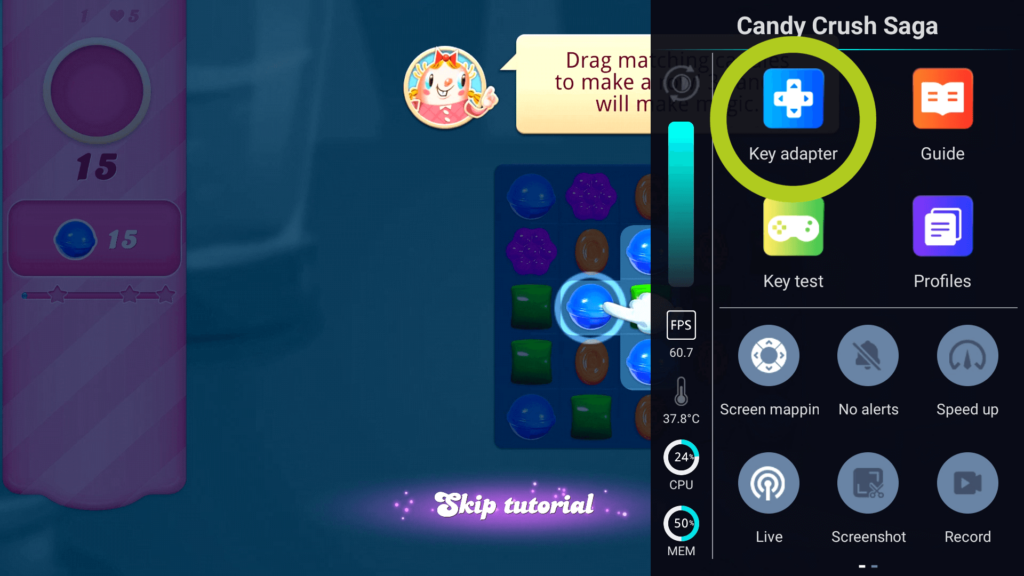
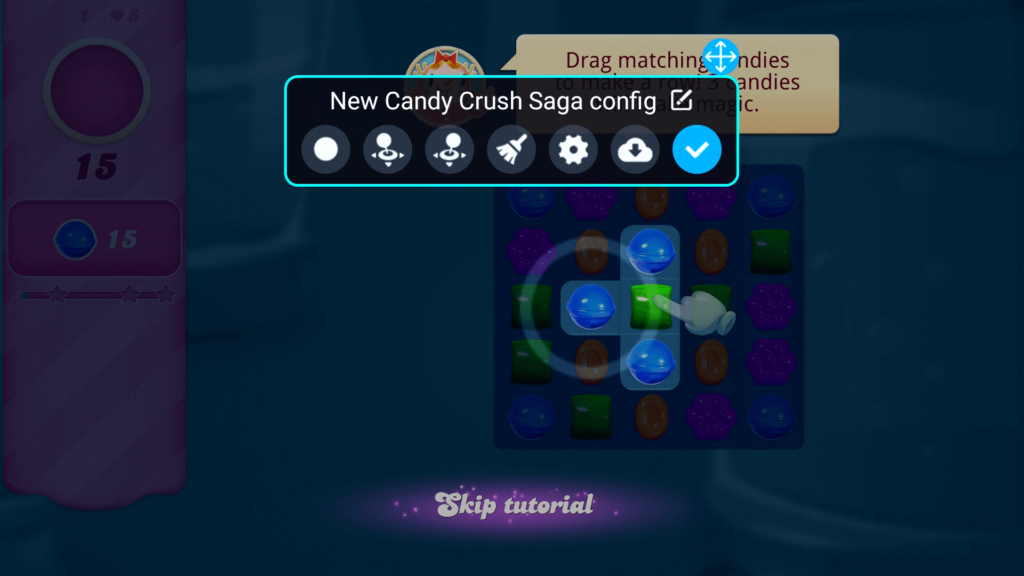
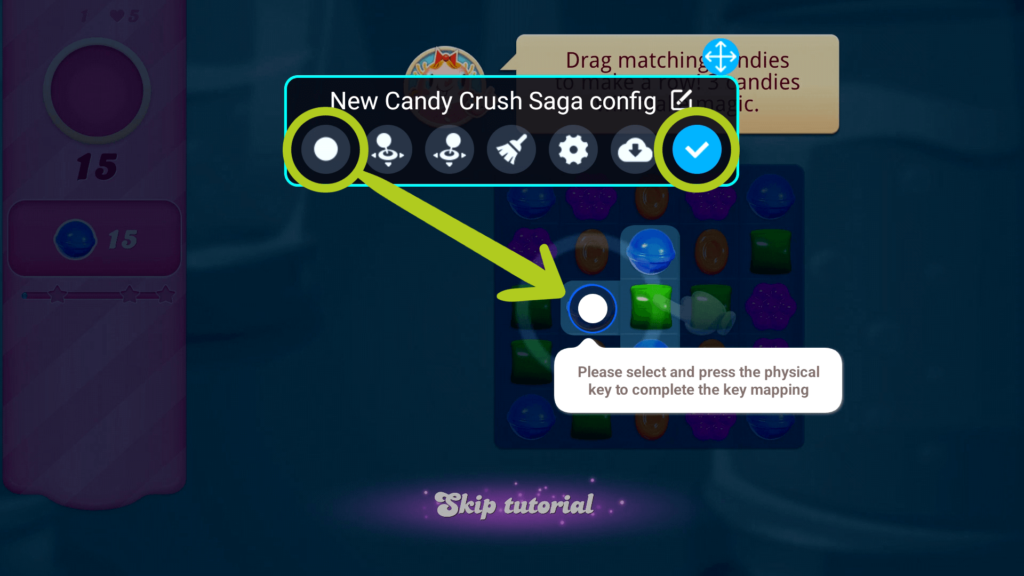
To do this, start by opening the Game Assist overlay while in your game and select the ‘Key Adapter‘ icon (refer to Image 3 below). This will open an onscreen menu where you will be able to see various control icons (refer to Image 4 below). Simply hold and drag each icon to your preferred position and confirm your changes (refer to Image 5 below).
Installing New Games
For those eager to build their game library on their Odin 2, we have a detailed guide embedded right here for you. At DroiX, we do not preload or preinstall any games on our devices. However, we fully support your gaming passion by providing a detailed, reusable guide on how to add, install, and update games (ROMs) on your device. This guide is designed to be a universal resource for all our Getting Started guides, ensuring you can set up and personalize your game library to your liking. Follow the instructions in the embedded guide to begin personalising a collection of games that cater to your unique gaming tastes and preferences.
Emulators
Unfortunately, no emulators are installed. So this will have to be downloaded and set up by you manually. To do so, simply navigate to the desired emulator’s webpage, then download and install the latest version.
Emulator Setup
For those who prefer more control and customization over their gaming experience, manually setting up each emulator on your AYN device is a beneficial approach. While this process takes a bit longer, it allows for greater personalization of both the emulator and the games. Each emulator may look different and vary slightly in its setup process, but they will all be similar.
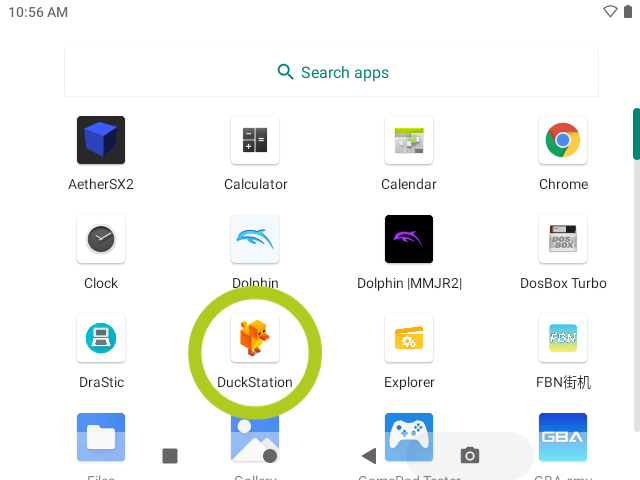
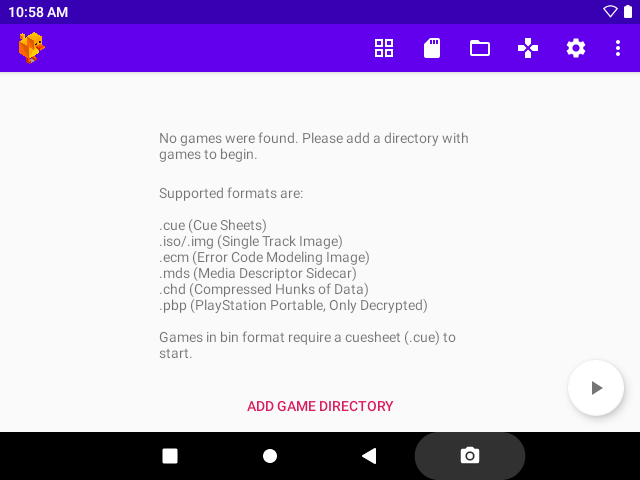
We will use DuckStation, the PS1 emulator as an example below. Like on an Android smartphone, swipe left/right to navigate your apps. This is where all your installed applications, including emulators, are located. Now, scroll through to find the emulator you wish to set up and tap on its icon to open it (refer to Image 1 below). Typically, you won’t see any games listed initially. Instead, the emulator will prompt you to add a directory. To add a game(s), select ‘Add directory’ and a new window will open (refer to Image 2 below).
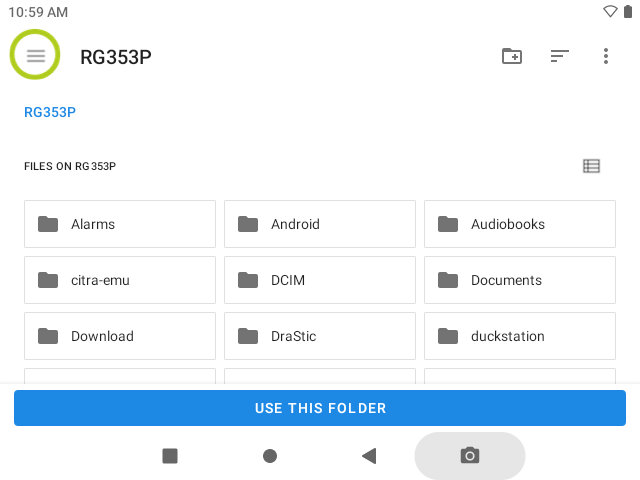
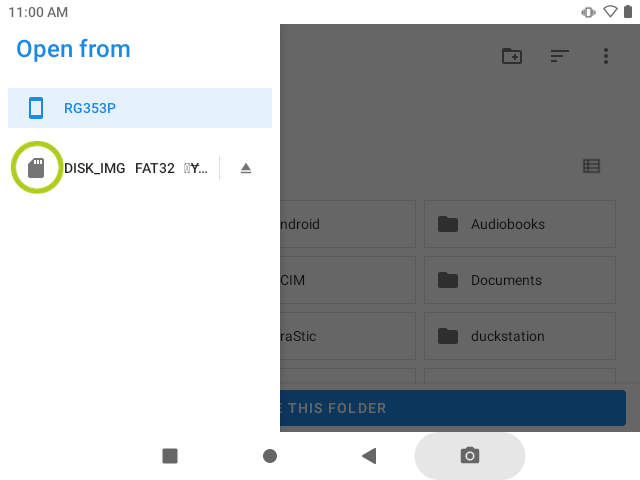
From here, tap the navigation icon, represented by three horizontal lines (refer to Image 3 below), to access different storage locations. Choose the expanded storage device from the menu, which is the MicroSD Card that you inserted into slot TF slot earlier (refer to Image 4 below).
Now you need to navigate to the folder containing all the games corresponding with the emulator’s console. For example, for DuckStation (PS1 emulator), you will need to locate and open the folder with all your PS1 games – once open, press ‘Use this folder’ at the bottom of the screen. (refer to Images 5 & 6 below).
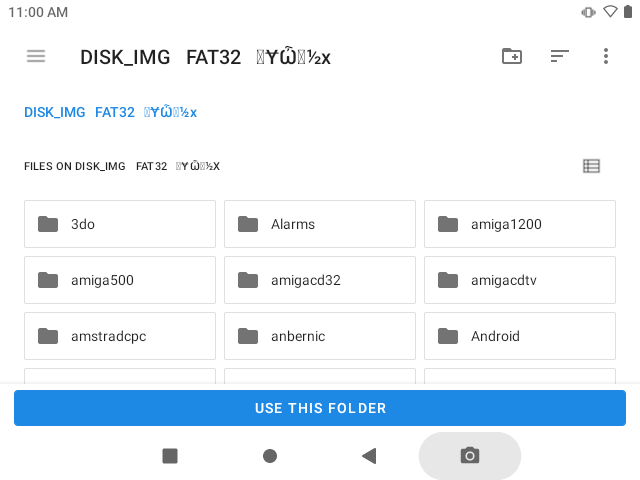
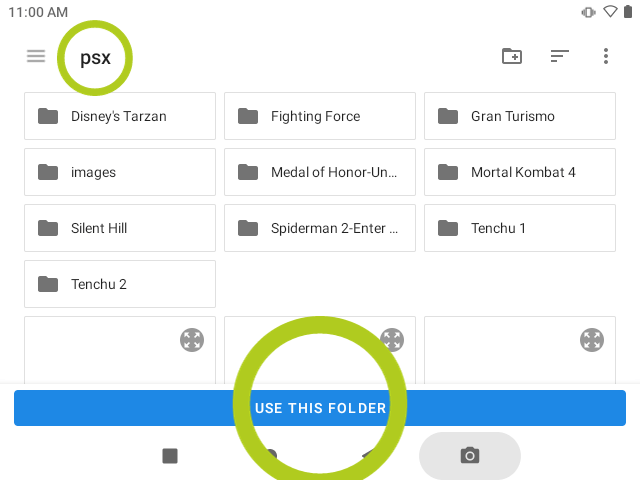
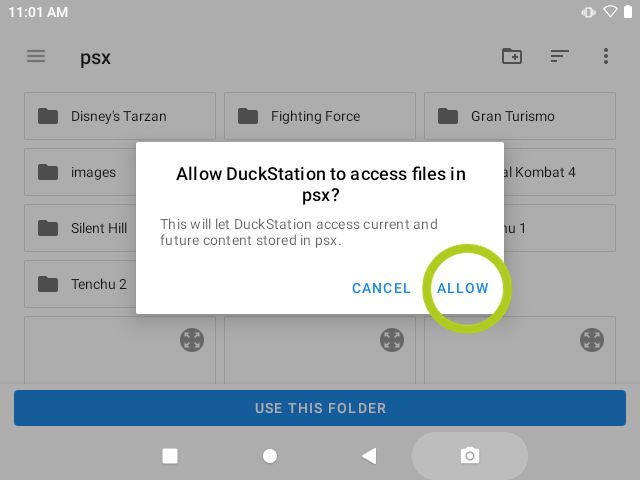
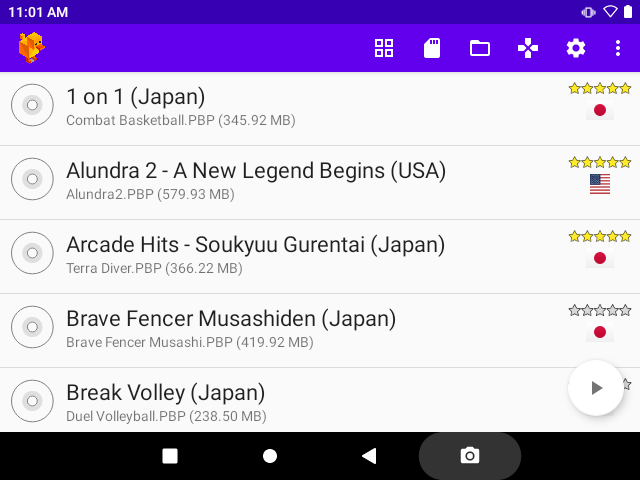
This will cause a pop-up asking for access to the device (refer to Image 7 below). Select ‘Allow Access’ and the emulator will begin scanning the folder for compatible games. Once complete, the games should appear in the emulator’s menu (refer to Image 8 below). All you need to do now is jump into a game!
OdinTools (Optional)
OdinTools from Langerhans‘ is a collection of utilities for the AYN Odin 2, that includes app overrides, custom quick settings, button utilities and more. It is currently being developed and updated, so please ensure you read the instructions from the developers and install the correct version when downloading. You can download the latest versions of OdinTools here.
Accessories & Add-Ons
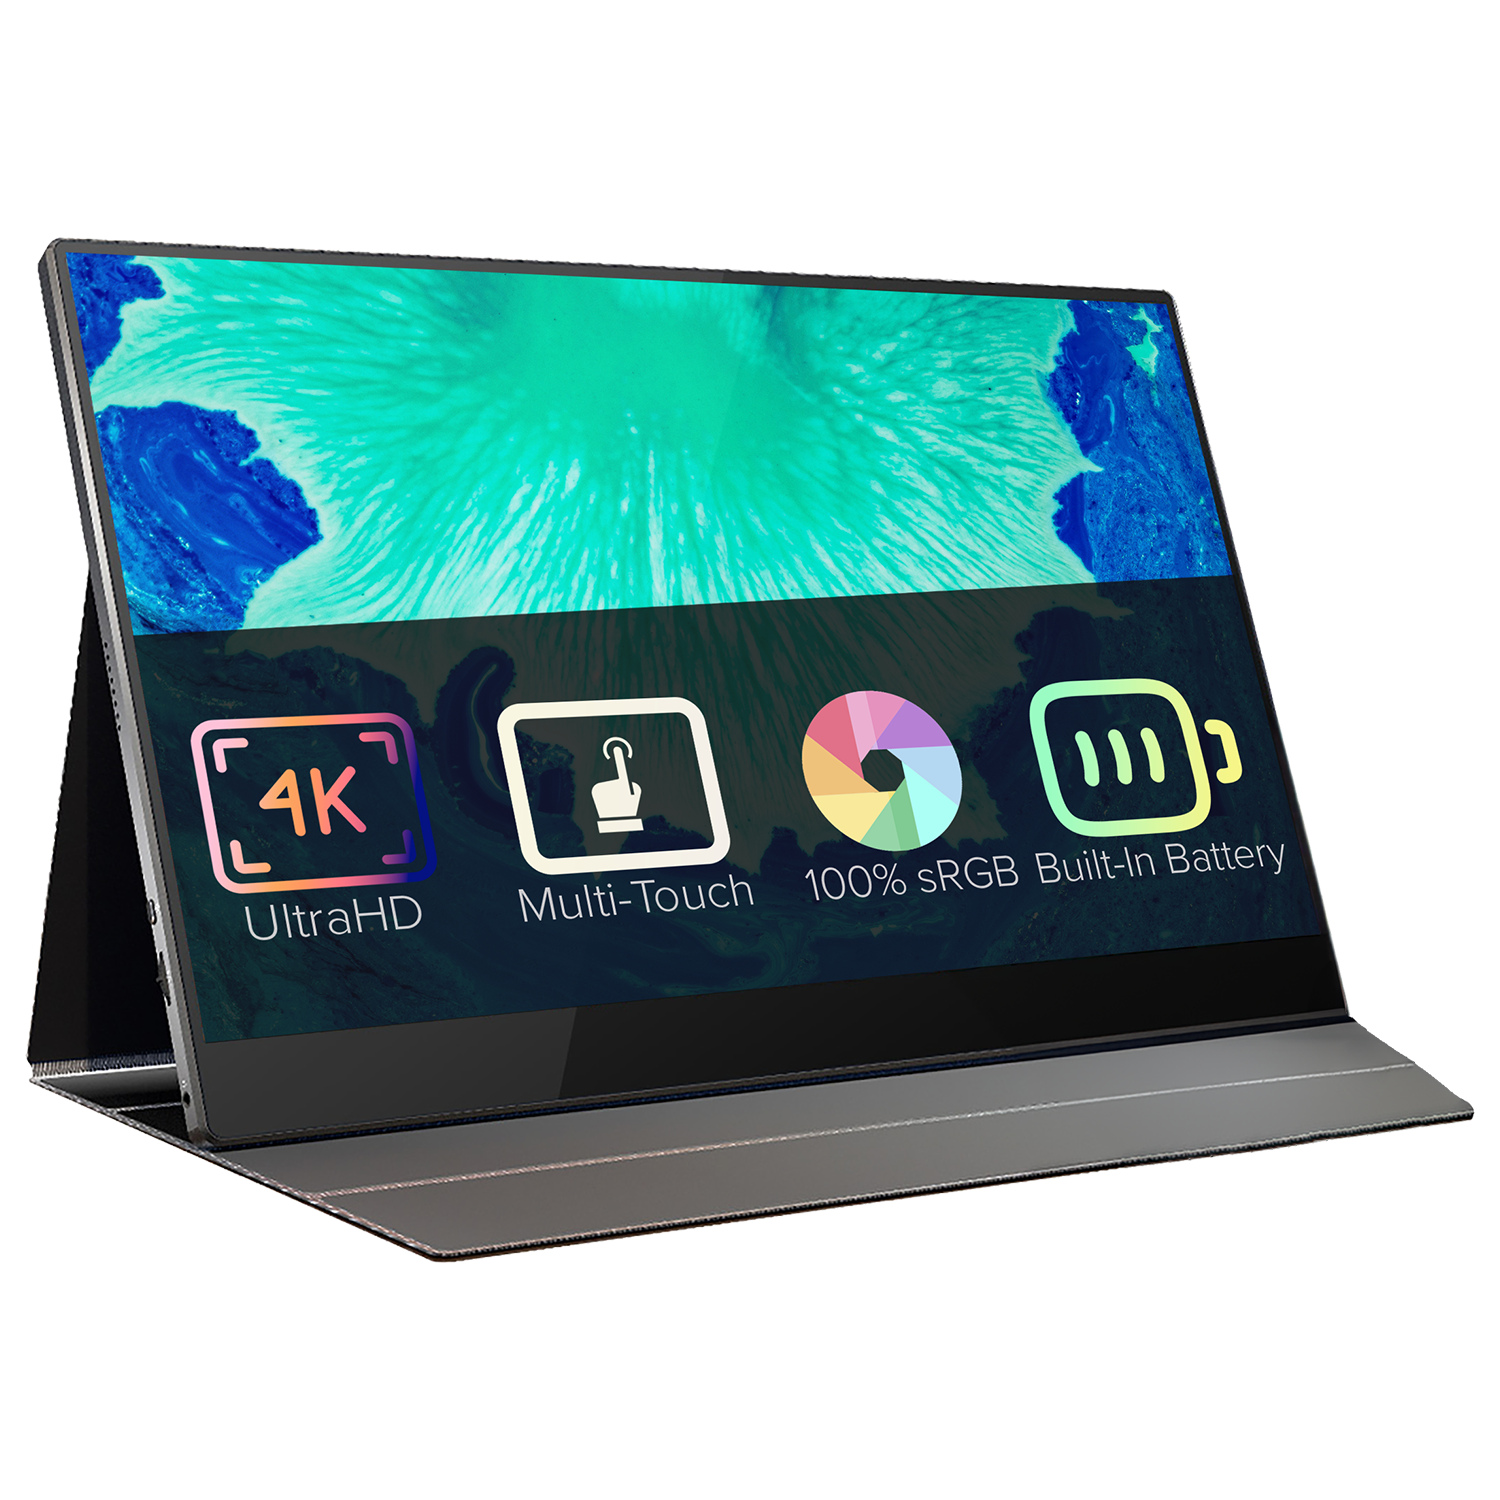
15.6″ 4K Portable Monitor | with Adobe RGB | with Stylus Support: These portable monitors offer a stunning 4K resolution across their 15.6″ display. Featuring touchscreen capabilities and even options for Adobe RGB or Stylus support, these monitors are fantastic for gamers, artists, office work and more. It serves as the ideal high-quality, portable external display, perfect for the small form factor and portability of the AYN ODIN 2 with its slim and lightweight design. This makes it not only easy to carry around but also a stylish complement to your dock setup – perfect for achieving a modern and sleek aesthetic.
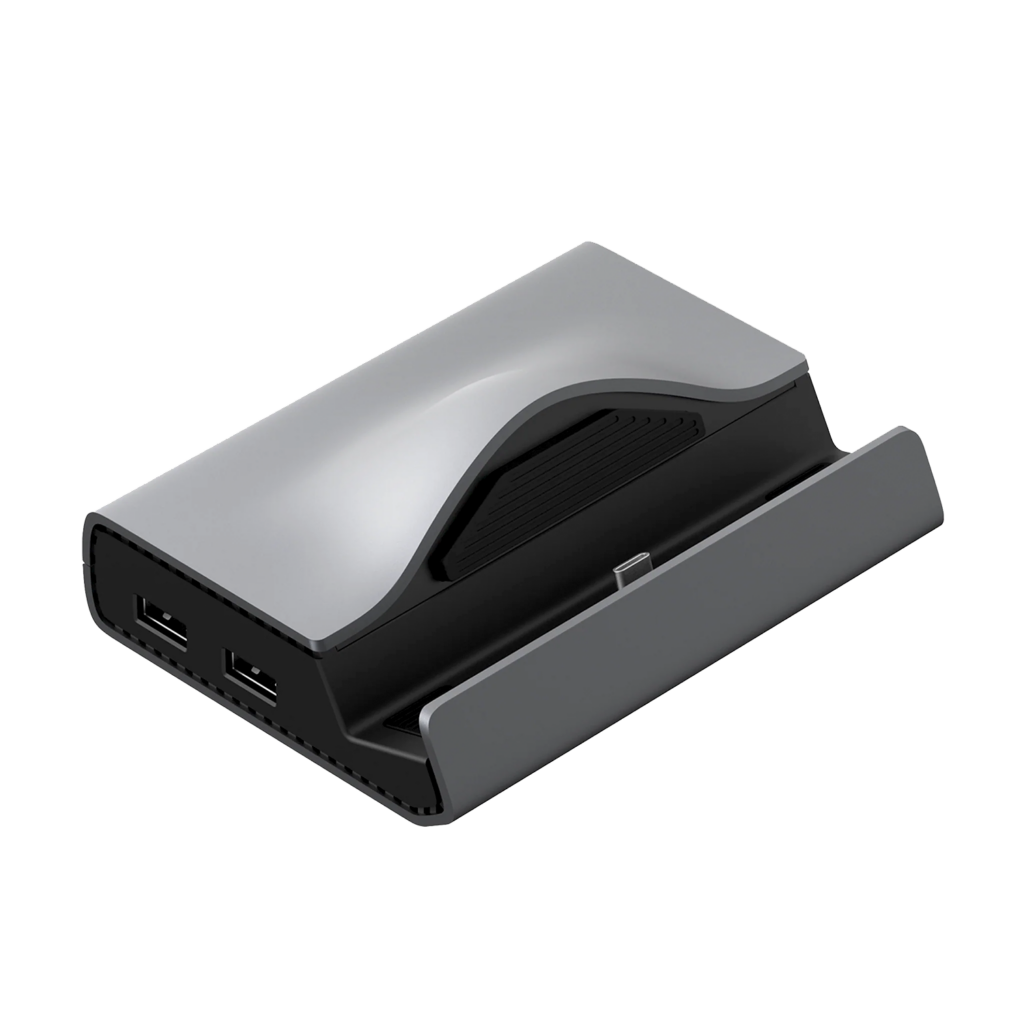
AYN Odin 2 Super Dock: If the name didn’t give it away already, this dock is the ultimate all-in-one solution for the AYN Odin 2! This official dock from AYN is the real deal completely transforming your gaming experience – you’ll never run out of storage space thanks to its M.2 NVMe/SATA enclosure and four USB-A ports for all the peripherals you could need. With its premium build and features, there’s no real downside… I mean it’s got “Super” in its name for a reason!
DroiX HDMI to Mini HDMI Cable: These versatile cables are exactly what you need for connecting the Odin 2 to a Mini HDMI device, such as our portable monitor, via the Super Dock (or other docking station). It supports full 4K resolution, providing crystal-clear video and audio transmission for an immersive viewing experience. The robust design guarantees durability, and flexibility makes it easy to manage in any setup.
Well, that’s everything we have to share regarding the AYN Odin 2 – we hope you’ve managed to correctly set up and get started with your new retro handheld, or at the very least learnt something useful. In case you still have any questions or queries, please feel free to leave a comment below or message our Support team. We’re committed to helping you and will also continue to update this page accordingly.


