
Hi there! If you’re here, then you’re probably looking for how to reinstall Windows on your Beelink mini PC!
We at DroiX have put together a guide alongside a few downloads to help you get started
Why do I need firmware?
While it is true that you can in fact reinstall generic Windows on your average mini PC. Generic Windows does not come with any specific drivers installed. Some models — such as those with fingerprint readers — need those drivers to achieve full functionality.
While Windows is quite good at finding miscellaneous drivers automatically, there are simply some that it is not able to find.
Useful Tools
To follow this guide, you will need to ultimately be able to do the three following tasks:
- Format a USB drive (and possibly rename it)
- “Image” the USB drive
- Boot into the USB drive
If you know what these three tasks entail by heart, then you can just grab the firmware from the section below and be on your merry way.
For those who are uncertain about the process however, we’ll be using the following tools in this guide:
- MiniTool Partition Wizard
- This handy utility allows you to easily format and rename USB drives with it’s simple interface.
- This software doesn’t do anything special that you can’t already do with your operating system’s built in partition management tools. But it is easier to use.
- Rufus
- This is a free, open source, lightweight tool that is used to image USB drives.
- Alternatives for other operating systems do exist. Such as ApplePi Baker for Mac.
As a side-note, you will need a separate PC for preparing the USB drive if your current one is unusable.
What is Disk Imaging?
In simple terms, disk imaging is the act of taking a hard drive, USB drive, or other storage device, and making a copy of it’s current state. This copy is called an “image file”.
You can then use this “image file” to make a duplicate of the original drive on an entirely new storage device. This can simply be referred to as “imaging” a drive.
While similar to the act of just copying and pasting files, image files contain information about the disk’s partition sizes, names, and formatting too. Making them excellent for when you need to duplicate a storage device en-masse.
(Here’s a fun fact: Did you know that you can insert an SD card into an SD card reader, and use it in the same way you would use a USB drive?)
Beelink PC Firmware Download
We have a range of Beelink drivers also available for download in our Beelink PC driver collection.
| Model | Firmware Link |
|---|---|
| AP45 | Beelink AP45 Firmware Download |
| T45 | Beelink T45 Firmware Download |
| L55 | Beelink L55 Firmware Download |
| U55 | Beelink U55 Firmware Download |
| X55 | Beelink X55 Firmware Download |
| BT3-X | Beelink BT3-X Firmware Download |
| J45 | Beelink J45 Firmware Download |
| MII-V | Beelink MII-V Firmware Download |
How to Format Your USB Drive
Ideally, you should format your USB drive before performing any kind of imaging. This minimizes the chance of errors occurring.
To format your USB drive, first open MiniTool Partition Wizard.

You’ll see a bunch of different buttons, tabs and numbers. But you’ll only have to interact with a handful of options.
First, right click your disk in the visualization overview, and select “Delete All Partitions”.

Your drive should now appear as a single, large “unallocated” partition. This means that there is space there, but nothing can currently use it (like a plot of land with no house!).
To fix this, right click the unallocated partition, then click “Create”.

A new, smaller window will open asking you to specify details about the new partition you’re creating.
Simply click OK, and the Window will then close.
OPTIONAL: You can set the partition label to “WINPE”. Only do this if you are going to copy-and-paste the firmware files onto the USB drive, instead of using imaging software.

You’re now just about ready to begin the formatting process. Double check that you are formatting the correct USB drive, then click “Apply” to actually carry out the partition deletion and creation operations.

Your USB will now be ready for imaging!
How to Image Your USB Drive
Now that you’ve formatted your USB. The next step is to actually image it.
Open up Rufus and you’ll see a bunch of different options.

First, ensure that the Device chosen matches your USB (check the drive letter, the name, etc.)
Second, click SELECT and then locate the image file you downloaded earlier.
Finally, click START at the bottom of the Window.
The imaging operation will then carry out. The time it takes will depend on a number of factors, including the size of the image file, and the speed of your USB port. Do not disconnect the USB drive or close the application during this process, otherwise you will have to start again.
Your reinstall USB is now ready for use!
Booting Into Your USB
Now that you’ve got your USB prepared, it’s time to boot into it and actually install windows.
Insert the USB into any free USB port of the device. In the picture below, we’ll be using a Beelink U55 as an example.

Now, power on the device. While the device is powering on, press the ESC key repeatedly. If successful, you’ll boot into the BIOS relatively quickly. If you fail, the device will boot into Windows — power it off and try again if so.

In the BIOS, you will only be able to use the keyboard to navigate. The BIOS may look slightly different depending on the specific model of device you are using, but it should still be very similar. Press the left and right arrow keys to switch between different tabs until you hit the “Save & Exit” tab.

If you successfully created your install USB, it should appear in the list of bootable devices. The name will vary depending on your hardware (i.e., some Kingston USBs may show up as “Kingston DataTraveller”). Use the up and down arrow keys to highlight the option corresponding to your USB drive, and then press ENTER to select it.
Your device will now begin installing Windows automatically. Some firmware requires simple yes/no input during installation in order to proceed, but for the most part it should be hands-off. Do not disconnect the power or turn off the device during this process.

Once you’re finished, you’ll have a brand new installation of Windows ready to go!
A note about some Beelink models
Some Beelink models may fail to install the first time you try to do so. This will most likely be the ones with the custom reinstall utility (instead of the command line appearing, a customized window with various buttons will appear).
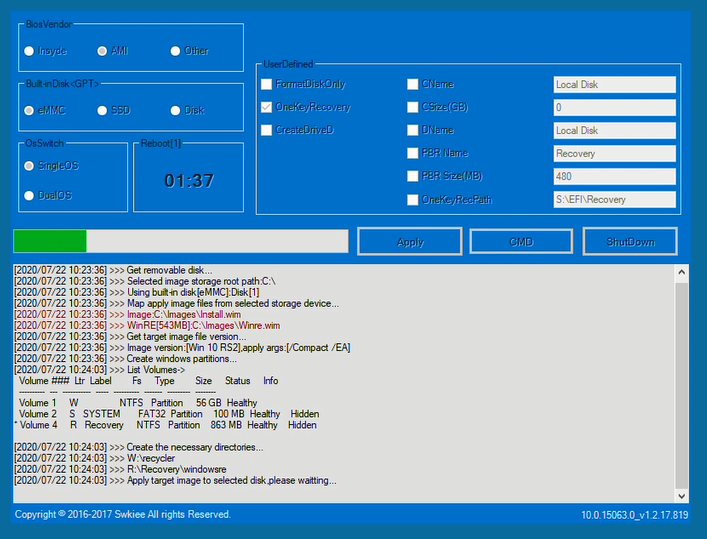
To fix this, change the target installation drive in the top left (Built-inDisk <GPT>) to eMMC or SSD depending on what your device has, so that the reinstallation will be carried out on the internal storage. Then hit “Apply”.
