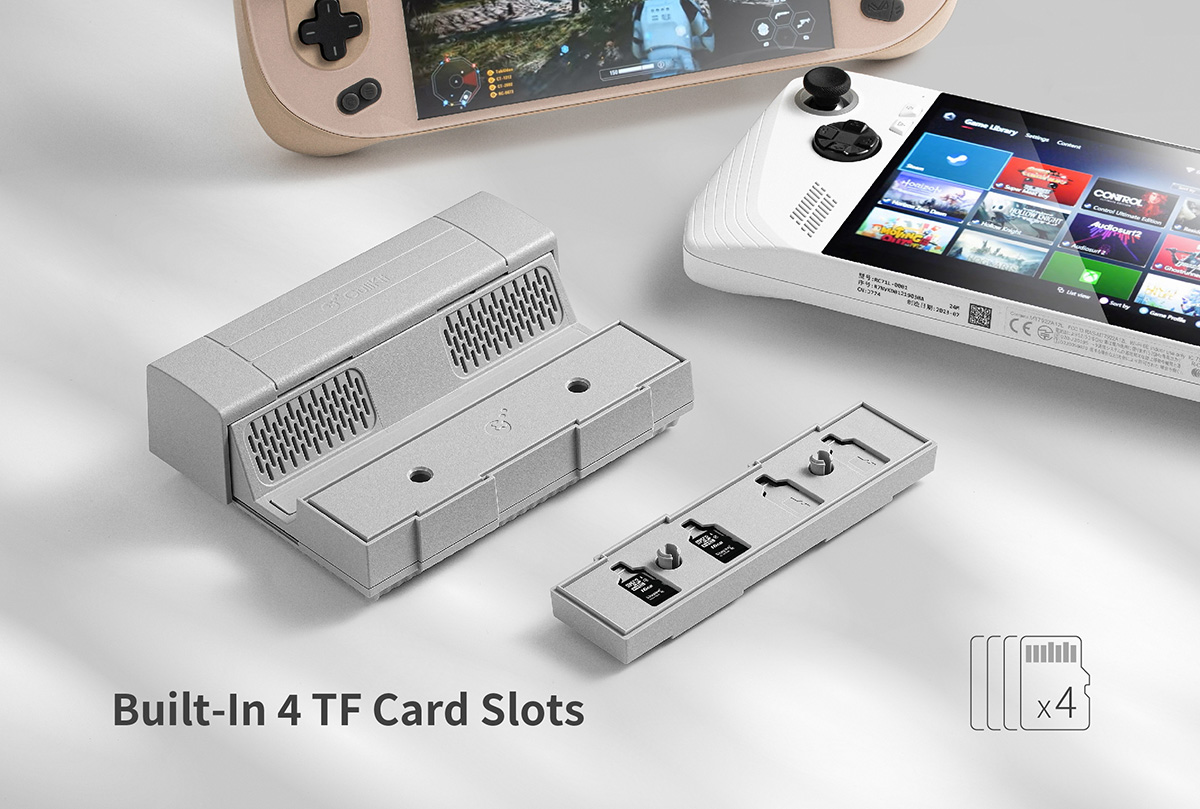
Embark on an exciting journey to transform your handheld gaming experience with the SNES-themed GuliKit 7-in-1 docking station. This Getting Started guide is your key to maximizing the remarkable features of your GuliKit dock. This dock is a powerhouse of functionality from its three USB-A ports and accommodation for up to four MicroSD cards to enabling 4K gaming at 60Hz. We’re here to assist you every step of the way. So, gear up, and let’s dive into the world of enhanced gaming!
Here at DroiX, we’re big proponents of the user’s Right to Repair. So, if you find any issues and feel confident enough to repair them, we encourage you! You can also contact DroiX Customer Support for any assistance or questions.
Unboxing
Before you start setting up your docking station, it’s important to ensure you have all the necessary components for a smooth experience. Remember to check all compartments and thoroughly inspect the box to find all the essential components for a complete setup. In your package, you should find:
- 1x GuliKit 7-in-1 Docking Station.
- 1x USB-C cable
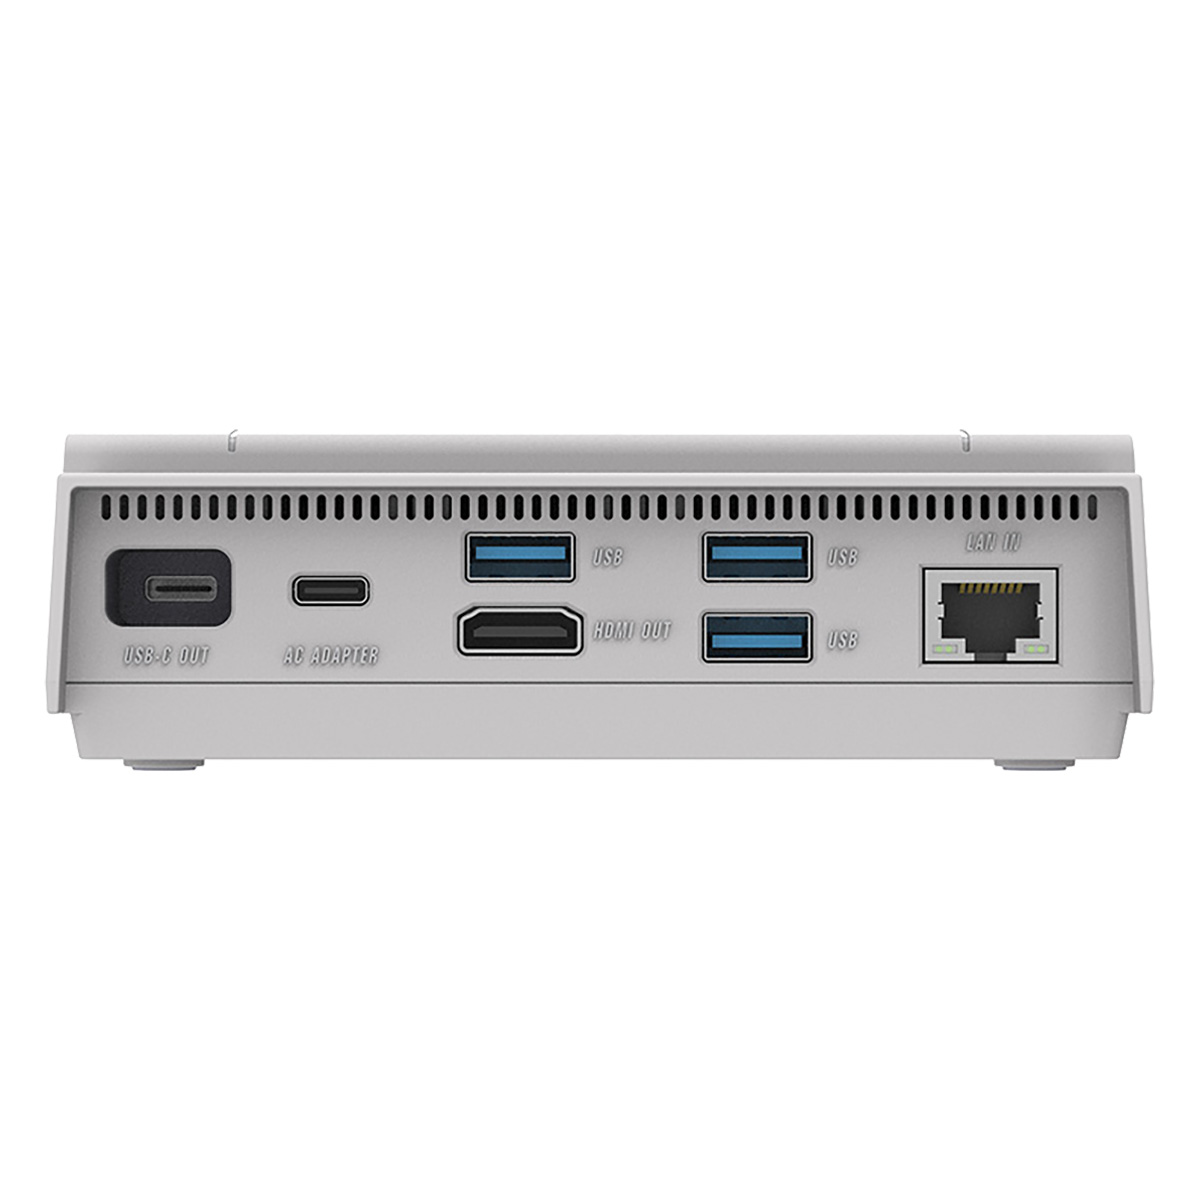
Device Overview
The GuliKit dock is equipped with various ports and connections, positioning it as the central hub of your handheld gaming setup. It’s a good idea to familiarise yourself with the device as the MicroSD card slots are discreetly designed to maintain the dock’s sleek and retro appearance.
Setting Up the GuliKit 7-in-1 Docking Station
Ensure that the dock is placed on a flat and stable surface. Any unevenness in the surface or accidental bumps can potentially affect or even damage both the dock and any of the devices connected to it. When following the steps in this section of the guide, please refer to the Device Overview for the location of each port/connection on the GuliKit 7-in-1 Docking Station.
Power Your Docking Station
First, make sure your dock is connected to a power source so that it will power all devices and peripherals connected to it. Connect it by using the USB-C AC port located at the back of the docking station (refer to Device Overview). The dock supports up to 100W charging, ideal for those lengthy gaming sessions or a quick power boost before taking your handheld on the go.
Connect Display
Connect an HDMI cable between your dock and an external display, such as a TV, monitor, or projector. You may need to change the display’s input source, though most modern displays will automatically detect and switch the connection. Supporting up to 4K resolution at 60Hz, allowing for a higher quality gaming experience.
Dock Your Handheld Device
The last thing to do is to simply connect your handheld gaming device to the dock using the provided USB-C cable via the USB-C Out port (see Device Overview). This connection will also charge your handheld gaming device when the dock is receiving power. Ensure that your device is securely placed within the dock by adjusting the GuliKit’s slidable cover.
At this point in the setup, you can power on your device and dive into any game on the big screen without delay. However, there’s still more to explore and set up to get the most out of your GuliKit docking station.
Windows Display Settings
Supporting up to 4K resolution and a smooth 60Hz refresh rate will transform your games into a stunning visual experience. If both your device and display support higher resolutions, we highly recommend setting them to the maximum resolution and refresh rate available. This will significantly enhance your enjoyment when docked, bringing out the best in your games’ graphics and ensuring smoother gameplay. To adjust your display settings in Windows 11:
- Press the Start Button (Windows logo)
- Type & select Display Settings in the search bar.
- Select the highest Display Resolution (refer to Image) and Keep Changes.
- Select the Advanced Display under Related Settings.
- Select the highest Refresh Rate option (refer to Image) and Keep Changes.
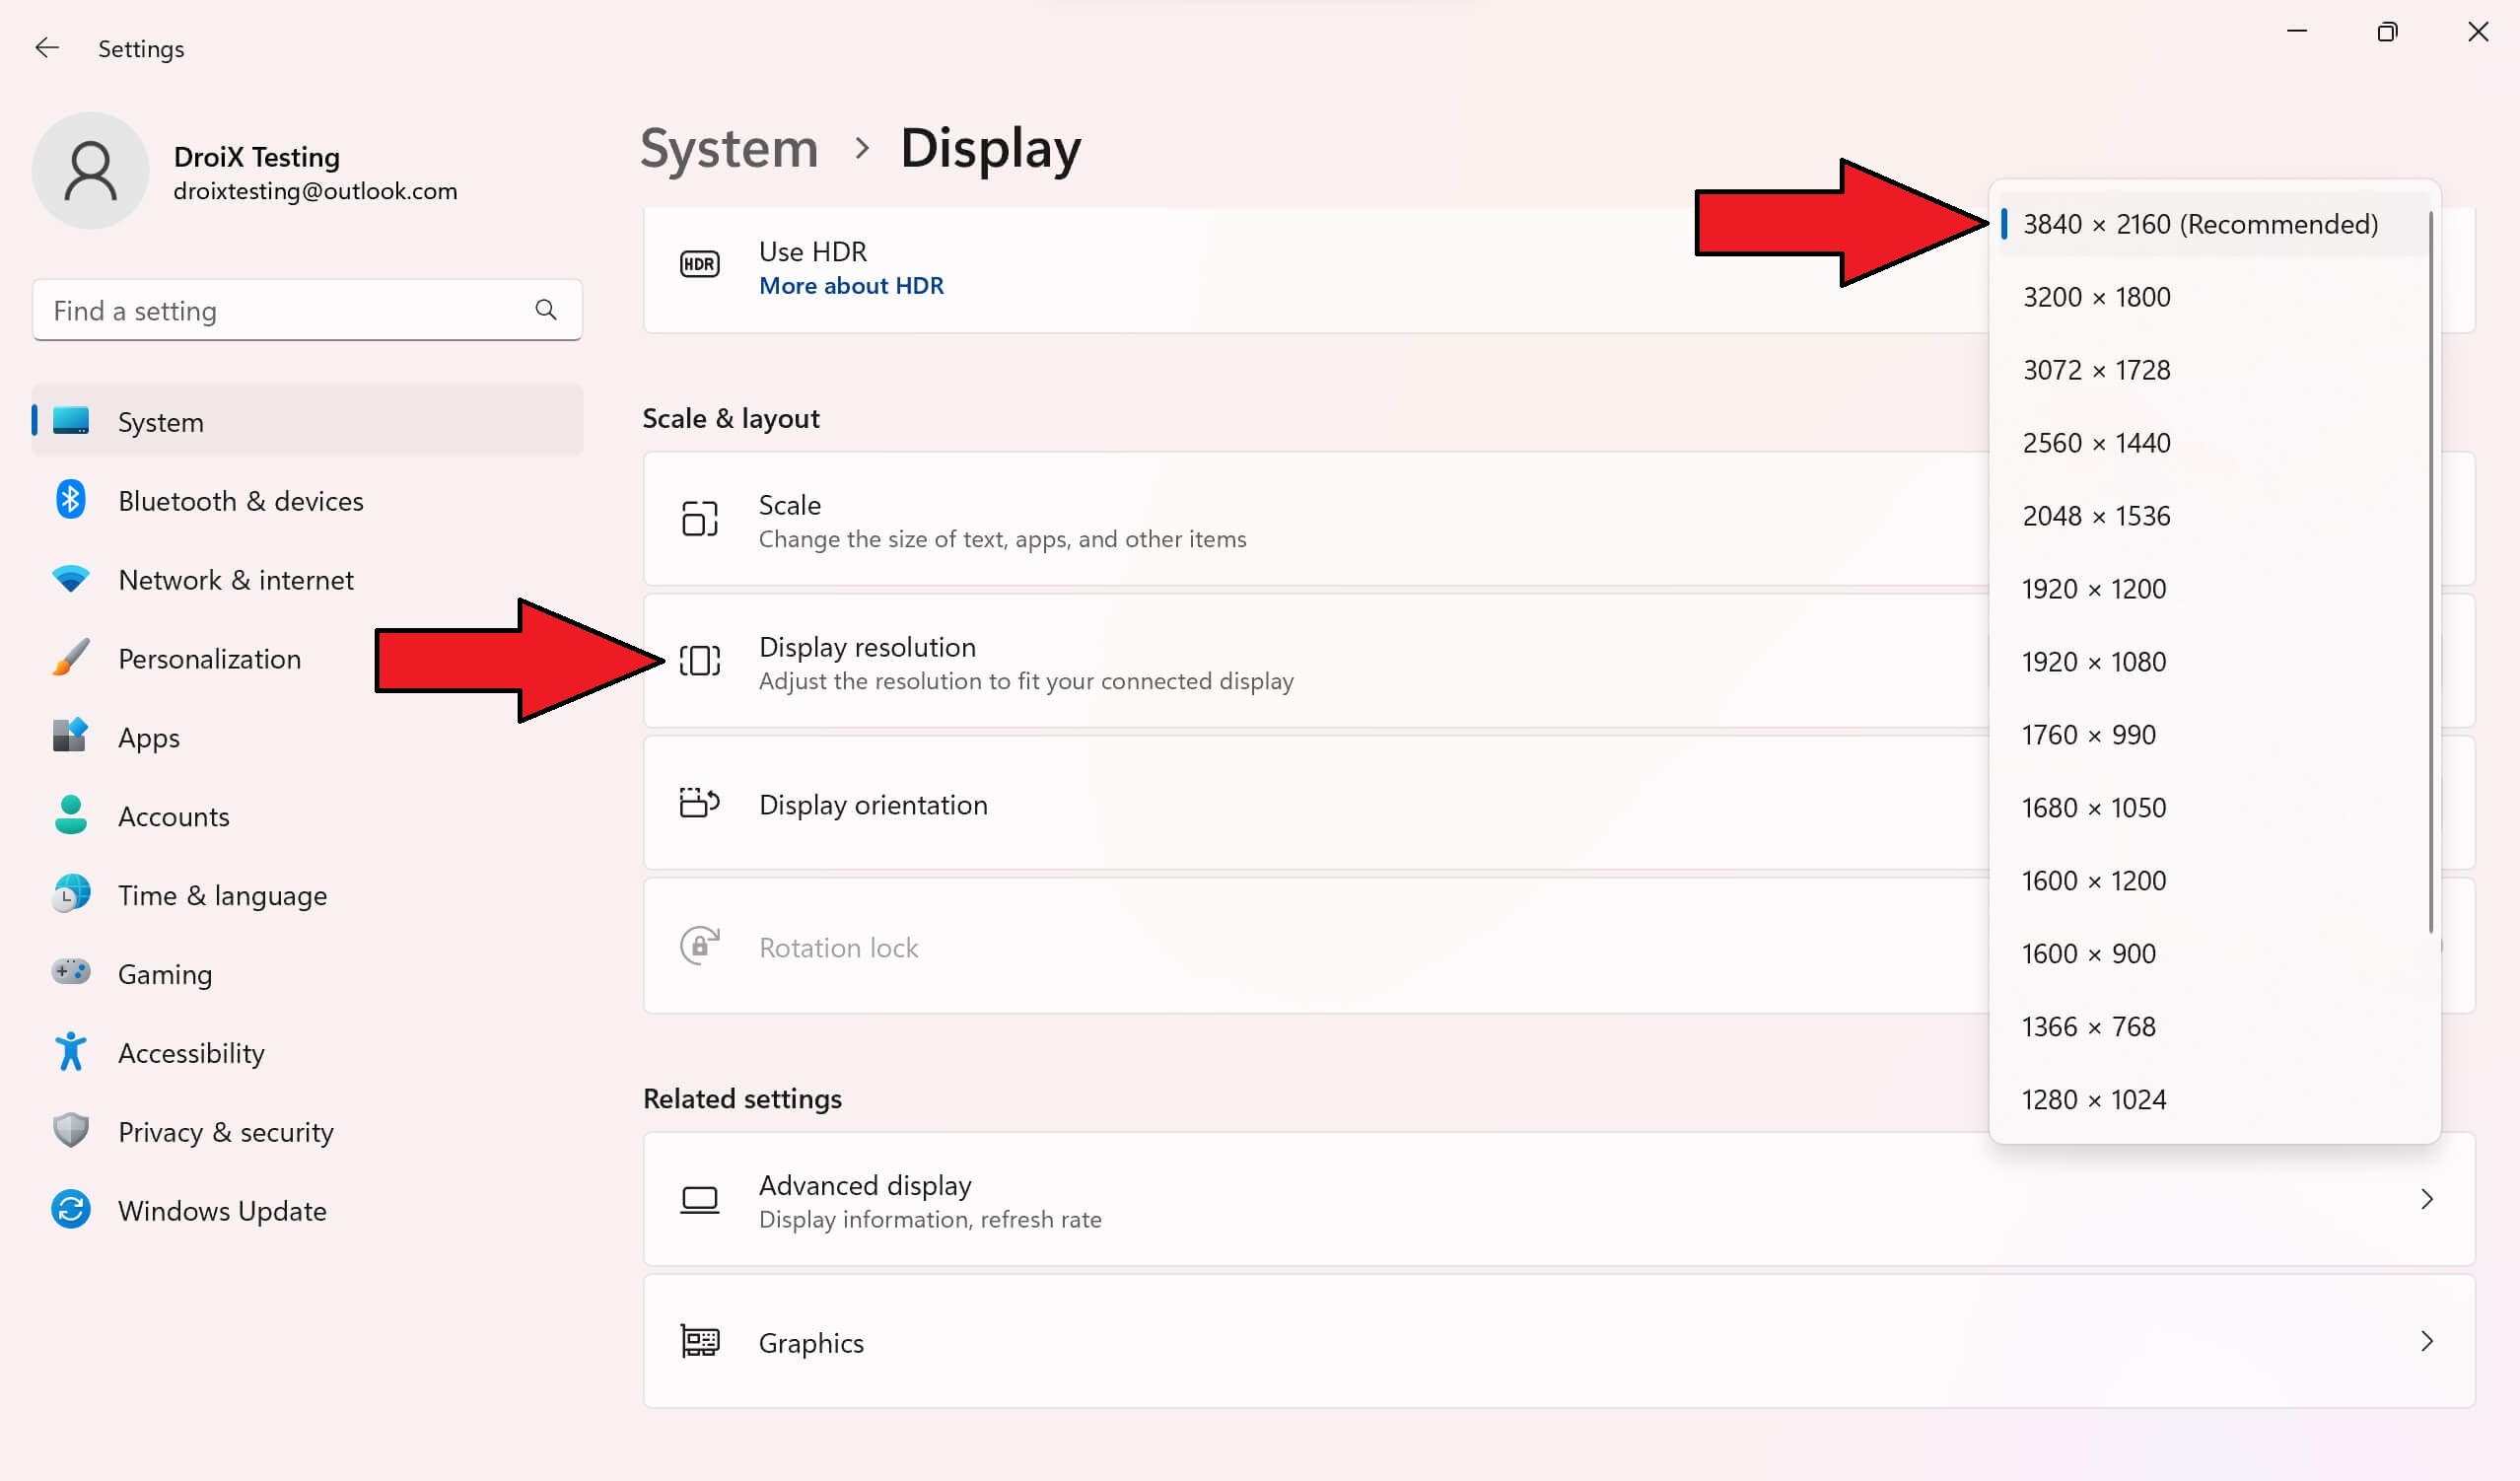
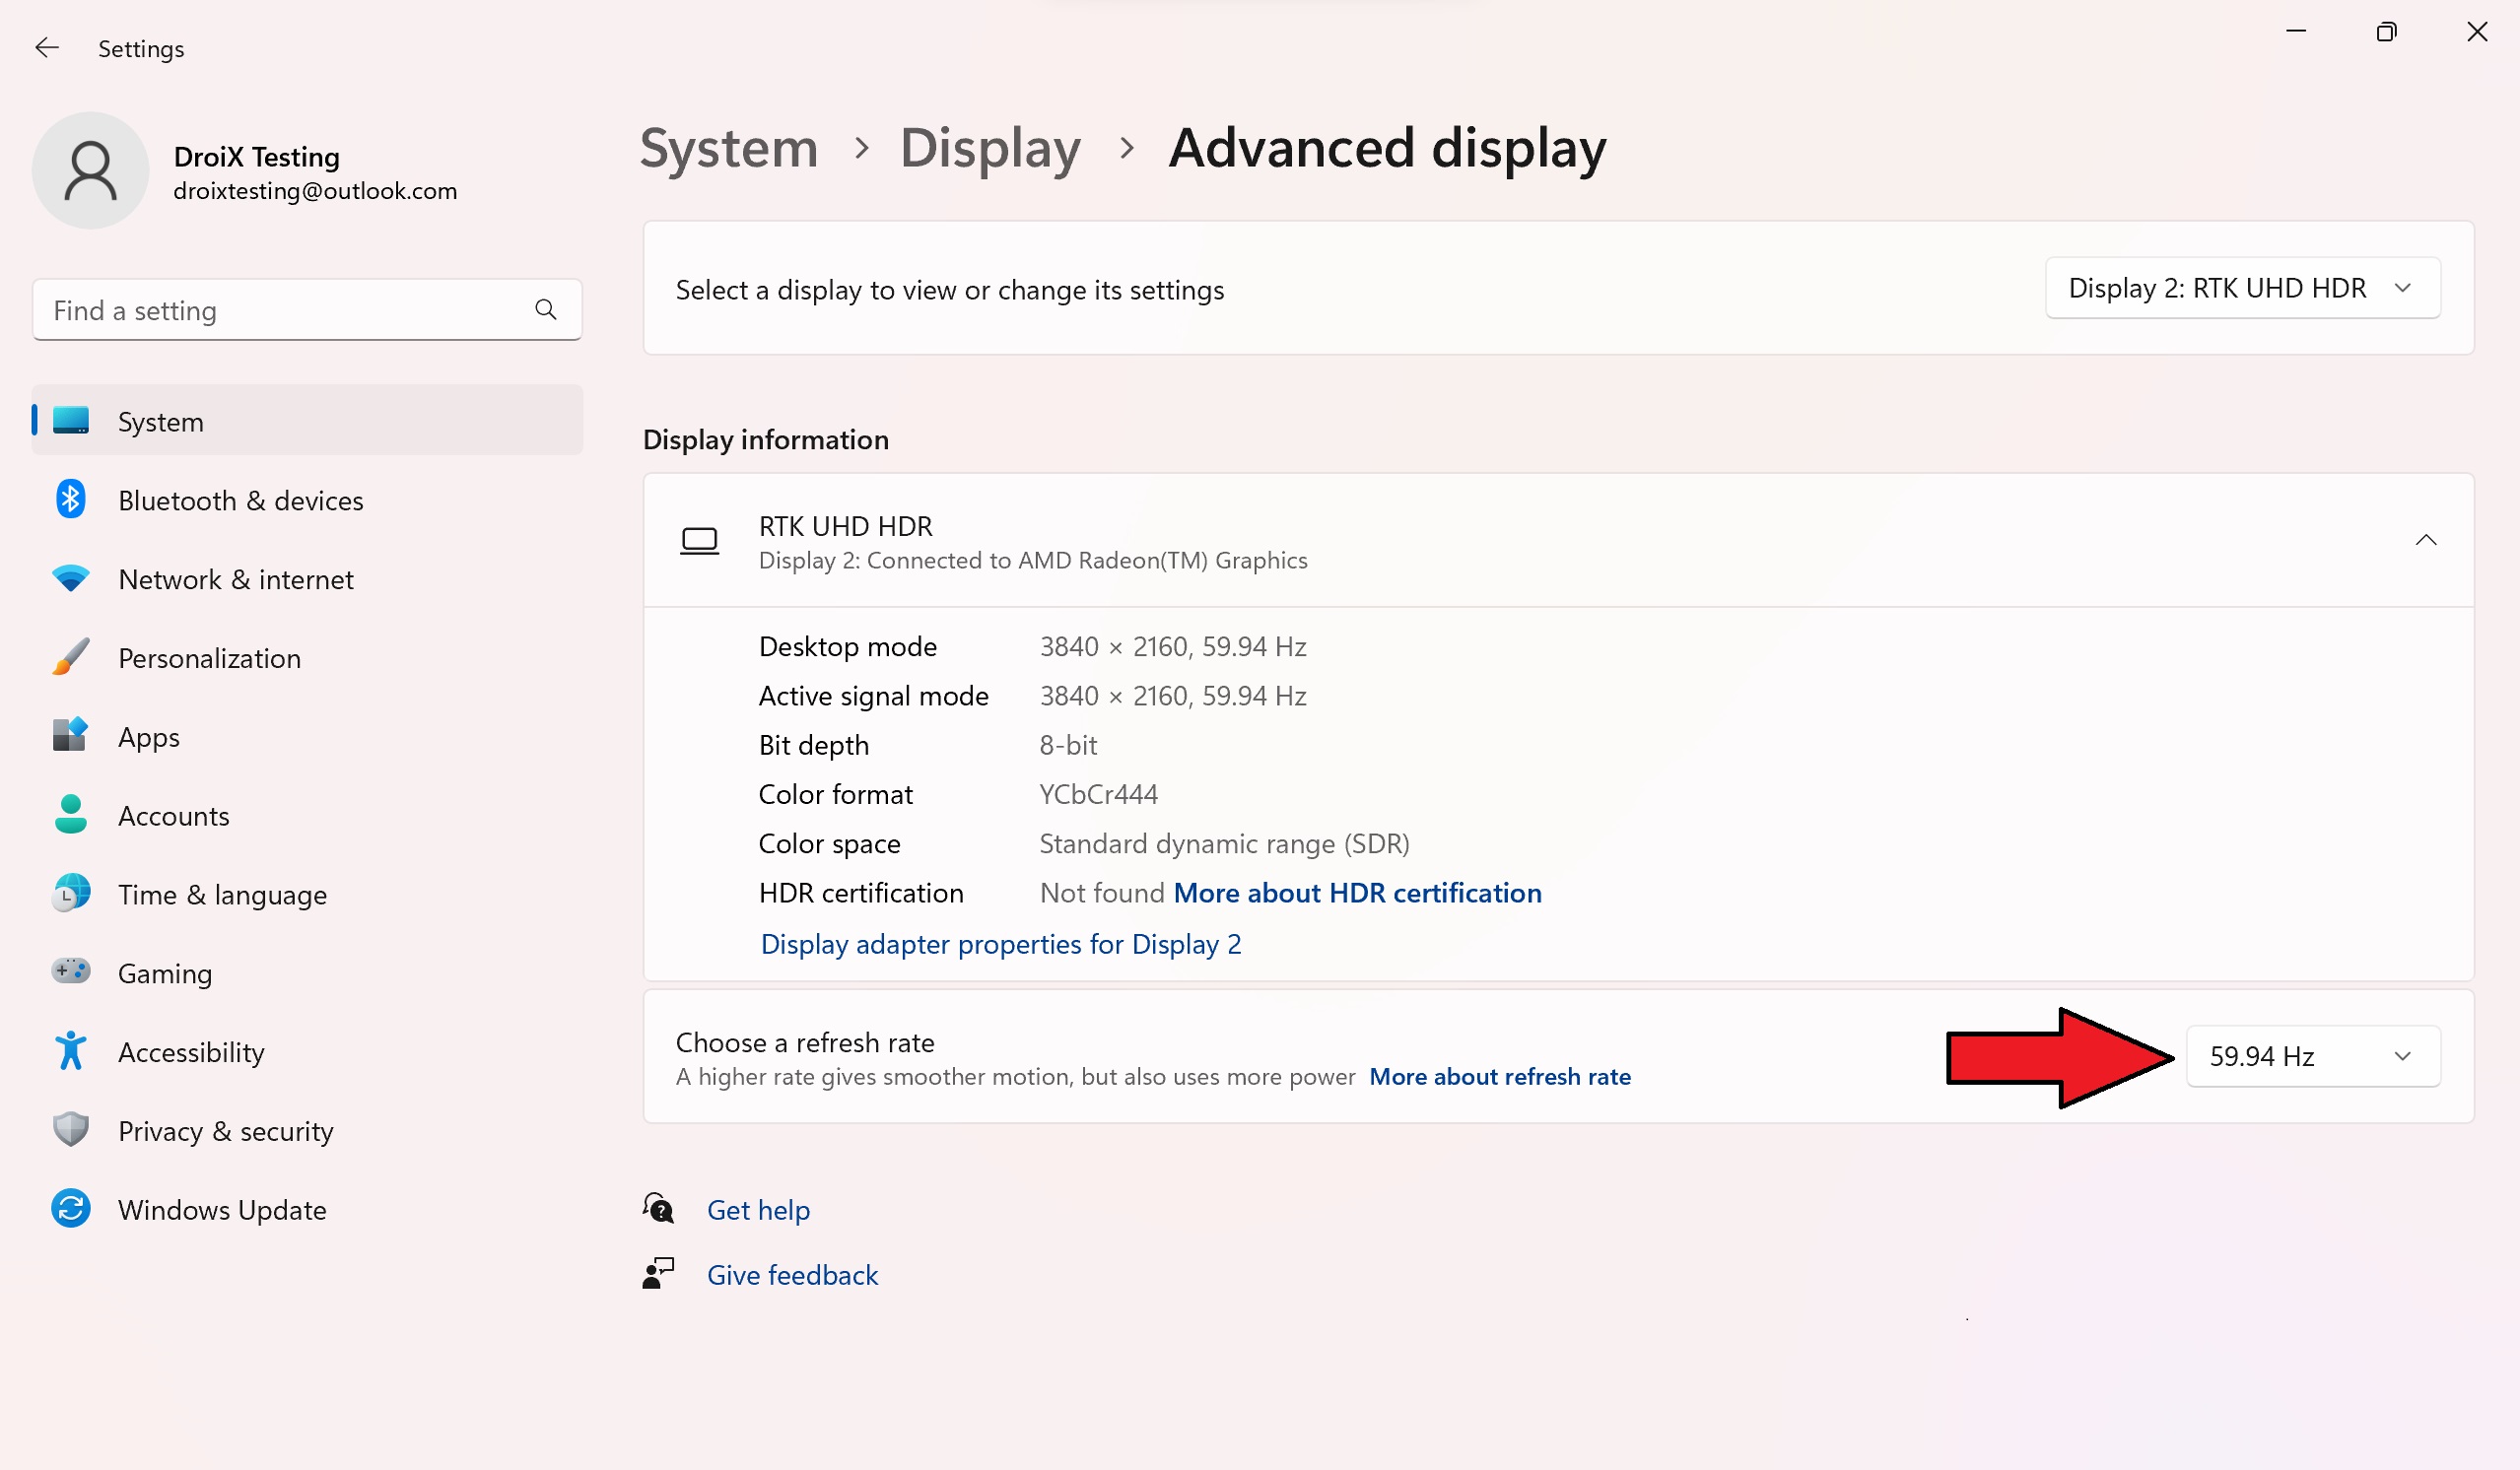
Note: Increasing the resolution and refresh rate can result in increased battery consumption. Keep this in mind when using your device in handheld mode – you may want to adjust these settings based on your current usage scenario.
Testing Your Hardware
Testing USB-C Ports (Charging & Connection)
Supply your dock with power using the AC Adapter port. Then connect your handheld device to the GuliKit docking station via the USB-C out port, when you do this your device should start charging simply by being connected to the dock.
Testing USB-A 3.0 Ports
With your device on and connected to the dock, plug different USB-A devices (portable storage, mouse & keyboard, etc.) into each of the respective ports. If recognised, you will typically get a notification on your connected handheld device. Some peripheral devices may even have LEDs to indicate they’re receiving power and/or connected.
Testing Ethernet Port
Ensure the ethernet cable is plugged into the dock and your internet access point (router, modem, etc). Once connected, check the handheld device to ensure it has internet access via an ethernet connection.
Testing External Display
If your display isn’t turning on or displaying your handheld device – just like some handheld devices, displays may have dedicated charging ports, meaning these ports cannot transfer data such as video output. We recommend trying different ports and referring to your handheld product manual to understand which ports are which.
Remember after connecting the devices, the display’s input source must match the method you’re using to connect the display to the device – most modern displays should do this automatically but you may be required to change it manually.
Handheld Compatibility
The GuliKit 7-in-1 docking station supports numerous handheld devices, but it’s essential to understand which are compatible and which ones aren’t. So, we’ve created a list of all the supported devices and some others that we’ve managed to test! We’ll add notes to any of the devices in case you’re having a hard time!
Supported:
- AOKZOE handhelds
- AYANEO handhelds
- GPD WIN 3 – requires the front screen to be lifted.
- GPD WIN 4 (& 2023 variant) – requires the front screen to be lifted.
- Nintendo Switch (& variant OLED)
- ONEXPLAYER handhelds
- ROG Ally
- Steam Deck
Not Supported:
- AYN Loki – no top port.
- AYN Loki Max – no top port.
Accessories & Add-ons
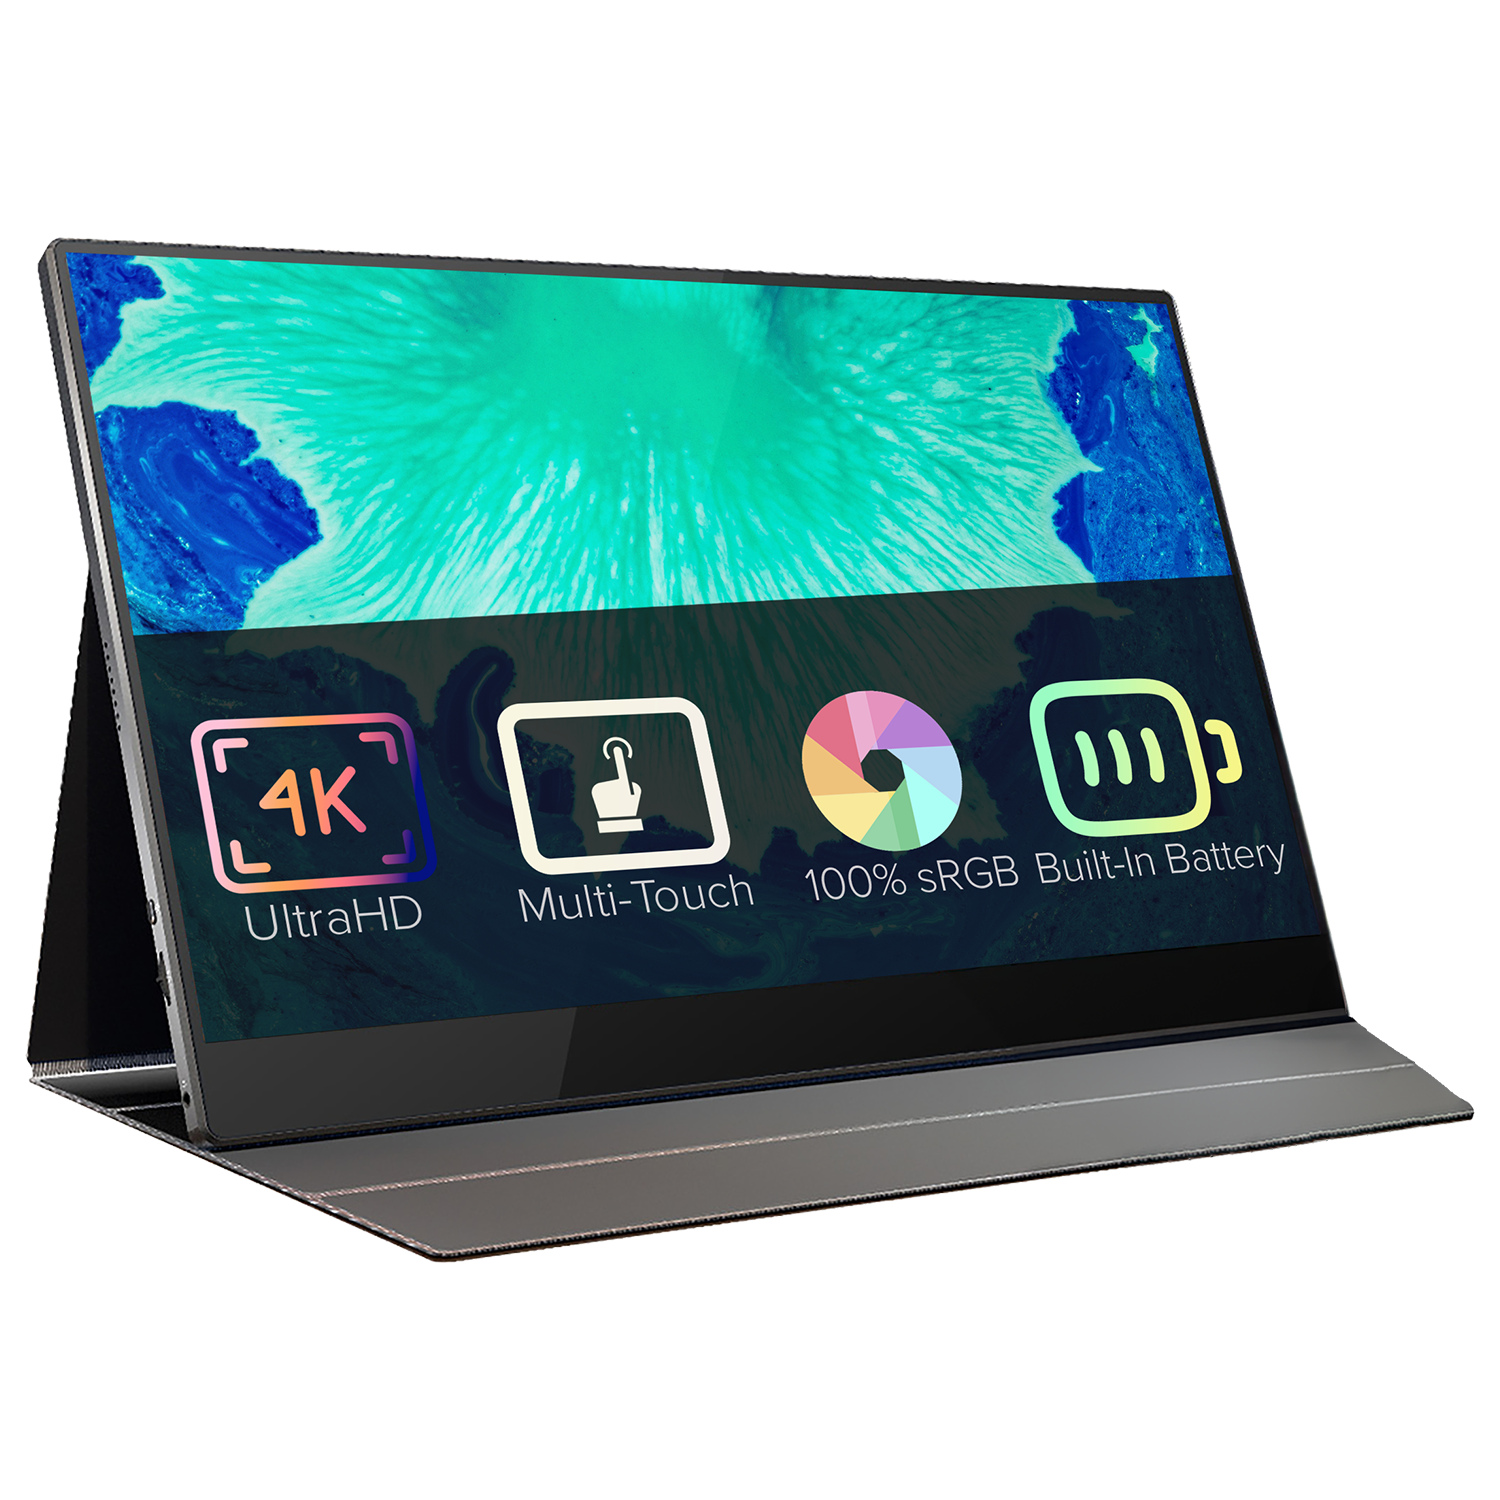
15.6″ 4K Portable Monitor | with Adobe RGB | with Stylus Support: These portable monitors offer a stunning 4K resolution across their 15.6″ display. The monitor has touchscreen capabilities and even has an option for Adobe RGB or Stylus support. It is fantastic for gamers, artists, office work and more. It’s the perfect addition as a main or additional monitor for your mini PC. Its slim and lightweight design makes it easy to carry around or look chic alongside your setup.
DroiX HDMI to Mini HDMI Cable: These versatile cables are great for connecting the GuliKit docking station to a Mini HDMI device such as our portable monitors. It supports full 4K resolution, providing crystal-clear video and audio transmission for an immersive viewing experience. The robust design guarantees durability, while its flexibility makes it easy to manage in any setup.
Summary
Well, that’s everything we have to share regarding the GuliKit 7-in-1 Docking Station – we hope you’ve managed to correctly set up, connect and get started with your new retro gaming accessory, or at the very least learnt something useful. In case you still have any questions or queries, please feel free to leave a comment below or message our Support team. We’re committed to helping you and will also update this page accordingly.
Questions & answers