Files used in this guide
Changelog
- Source guide: Custom Firmware for Retro Handhelds
- Source guide: How to Install OnionOS for Retro Handhelds
Older versions stay downloadable for rollbacks — every version keeps its own verified file.
Changelog
- Source guide: Custom Firmware for Retro Handhelds
- Source guide: How to Reinstall Stock Firmware on Retro Gaming Handhelds
Older versions stay downloadable for rollbacks — every version keeps its own verified file.
Changelog
- Source guide: Custom Firmware for Retro Handhelds
- Source guide: How To Reinstall Windows On The MinisForum UM250 / DMAF5 / UM700
- Source guide: How To Reinstall Windows On The DroiX CK1
- Source guide: Global Mini PC Reinstall Guide – How to Reinstall Windows on your Beelink, GPD, One Netbook, etc.)
- Source guide: Manually Updating Firmware On A DroiX® Q8-S
- Source guide: WiFi & Windows 10 Creators Update on a DroiX GPD Win
Older versions stay downloadable for rollbacks — every version keeps its own verified file.
Changelog
- Source guide: Custom Firmware for Retro Handhelds
Older versions stay downloadable for rollbacks — every version keeps its own verified file.
Changelog
- Source guide: Custom Firmware for Retro Handhelds
Older versions stay downloadable for rollbacks — every version keeps its own verified file.
Changelog
- Source guide: How to install MinUI custom firmware
- Source guide: How to install Spruce Custom Firmware on the Miyoo A30
- Source guide: Custom Firmware for Retro Handhelds
Older versions stay downloadable for rollbacks — every version keeps its own verified file.
Changelog
- Source guide: Custom Firmware for Retro Handhelds
Older versions stay downloadable for rollbacks — every version keeps its own verified file.
Changelog
- Source guide: Custom Firmware for Retro Handhelds
Older versions stay downloadable for rollbacks — every version keeps its own verified file.
Changelog
- Source guide: Custom Firmware for Retro Handhelds
Older versions stay downloadable for rollbacks — every version keeps its own verified file.
Versions (2)
- Source guide: Custom Firmware for Retro Handhelds
- Source guide: Custom Firmware for Retro Handhelds
Older versions stay downloadable for rollbacks — every version keeps its own verified file.
Changelog
- Source guide: Custom Firmware for Retro Handhelds
Older versions stay downloadable for rollbacks — every version keeps its own verified file.
Changelog
- Source guide: Custom Firmware for Retro Handhelds
Older versions stay downloadable for rollbacks — every version keeps its own verified file.
Changelog
- Source guide: Custom Firmware for Retro Handhelds
Older versions stay downloadable for rollbacks — every version keeps its own verified file.
Changelog
- Source guide: Custom Firmware for Retro Handhelds
Older versions stay downloadable for rollbacks — every version keeps its own verified file.
Changelog
- Source guide: Custom Firmware for Retro Handhelds
Older versions stay downloadable for rollbacks — every version keeps its own verified file.
Changelog
- Source guide: Custom Firmware for Retro Handhelds
Older versions stay downloadable for rollbacks — every version keeps its own verified file.
Changelog
- Source guide: How to Install & Setup GammaOS on the Anbernic RG ARC-D
- Source guide: Custom Firmware for Retro Handhelds
Older versions stay downloadable for rollbacks — every version keeps its own verified file.
Changelog
- Source guide: Custom Firmware for Retro Handhelds
Older versions stay downloadable for rollbacks — every version keeps its own verified file.
Changelog
- Source guide: How to Install & Setup GammaOS on the Anbernic RG ARC-D
- Source guide: Custom Firmware for Retro Handhelds
Older versions stay downloadable for rollbacks — every version keeps its own verified file.
Changelog
- Source guide: How to Install & Setup GammaOS on the Anbernic RG ARC-D
- Source guide: Custom Firmware for Retro Handhelds
Older versions stay downloadable for rollbacks — every version keeps its own verified file.
Changelog
- Source guide: Custom Firmware for Retro Handhelds
Older versions stay downloadable for rollbacks — every version keeps its own verified file.
Changelog
- Source guide: Custom Firmware for Retro Handhelds
Older versions stay downloadable for rollbacks — every version keeps its own verified file.
Changelog
- Source guide: Custom Firmware for Retro Handhelds
Older versions stay downloadable for rollbacks — every version keeps its own verified file.
Changelog
- Source guide: Custom Firmware for Retro Handhelds
Older versions stay downloadable for rollbacks — every version keeps its own verified file.
Changelog
- Source guide: Custom Firmware for Retro Handhelds
Older versions stay downloadable for rollbacks — every version keeps its own verified file.
Changelog
- Source guide: Custom Firmware for Retro Handhelds
Older versions stay downloadable for rollbacks — every version keeps its own verified file.
Versions (2)
- Source guide: Custom Firmware for Retro Handhelds
- Source guide: Custom Firmware for Retro Handhelds
Older versions stay downloadable for rollbacks — every version keeps its own verified file.
Changelog
- Source guide: NEW RG35XX Dual Boot Firmware + OS
- Source guide: Custom Firmware for Retro Handhelds
Older versions stay downloadable for rollbacks — every version keeps its own verified file.
Installing custom firmware is one of the best things you can do for your retro console. These community developed and maintained additions often offer better support for games, consoles and services that will take your retro gaming experience to the next level.
The world of custom firmware and OSs can be a daunting one to step into, especially for the first time. In this guide we’re going to take you through some of the best options to upgrade your retro handheld.
Useful Software
We’ll need a couple different pieces of software in this so here you can find the links to download them. Don’t worry the links will also be in the tutorial itself, this is just to keep them all collated.
| Software Name | Download Link |
| 7Zip | Download (7-zip.org) |
| Skraper | Skraper |
| Balena Etcher | balenaEtcher – Flash OS images to SD cards & USB drives |
| MiniTool Partition Wizard | https://cdn2.minitool.com/?p=pw&e=pw-free |
| USB Image Tool | https://www.alexpage.de/usb-image-tool/ |
| Win32DiskImager | https://win32diskimager.org/ |
Custom Firmware for Retro Handhelds
We’re going to take a look at a couple different kinds of devices. In the world of retro handhelds, your big players are Miyoo, Anbernic and Retroid. This guide will focus primarily on Miyoo and Anbernic along with the custom firmware available for each.
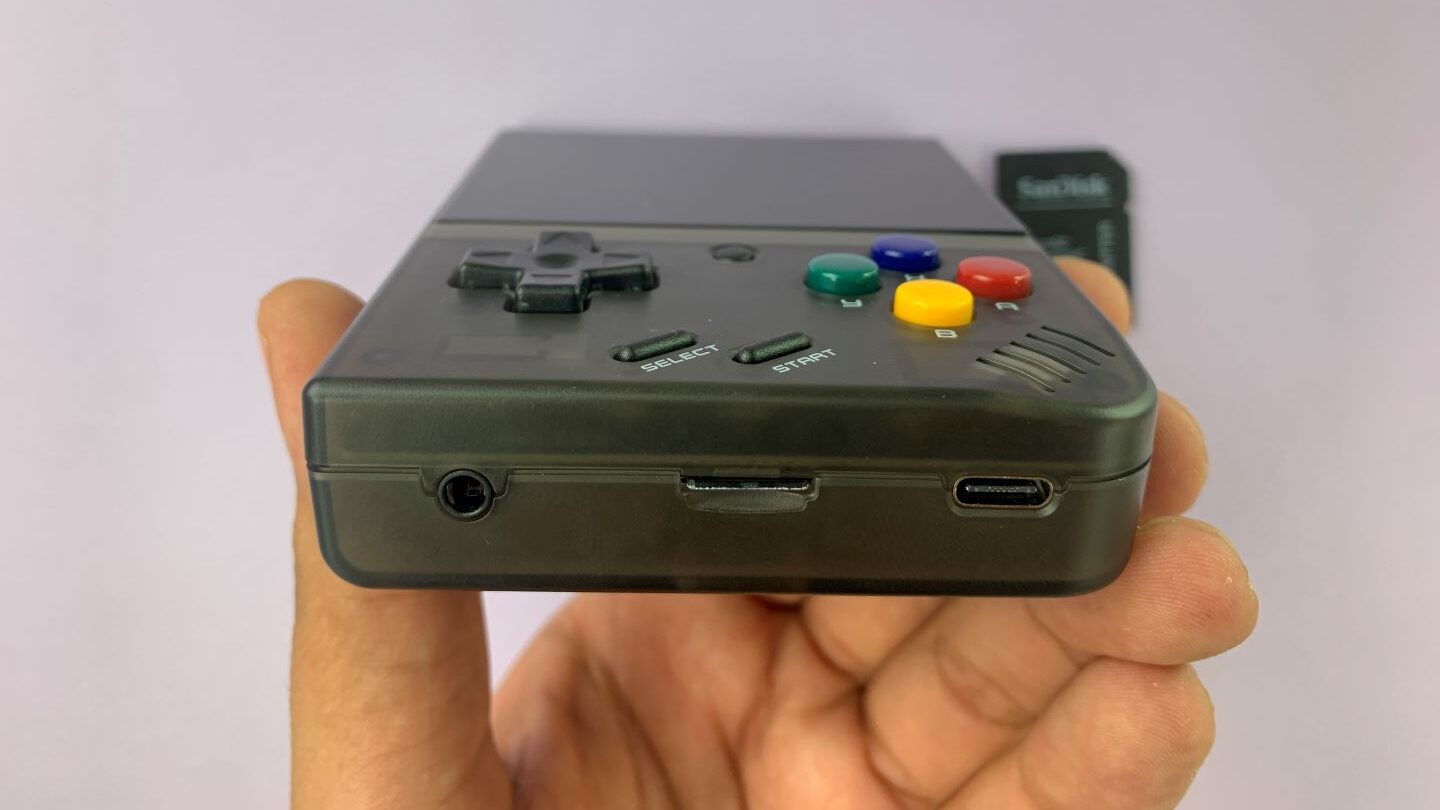
Miyoo
This section of the guide will focus on the custom firmware options for the Miyoo Mini and the Miyoo Mini Plus+. These two handhelds come with stock Miyoo firmware, that you can learn to reinstall here.
We will cover three custom options for firmware. Firstly the popular OnionOS, which we have covered in another guide here, but we’ll briefly go over it again. Secondly we’ll look at Koriki which, according to their GitHub page, is a fork of the SimpleMenu frontend. Koriki runs atop RetroArch and is adapted to the Miyoo Mini. Finally we will take a look at MiniUI. MiniUI is an incredibly simple, even to a fault, custom launcher and integrated in-game menu for the Miyoo Mini and Miyoo Mini Plus+.
Before starting to install your custom firmware ensure that your stock firmware is up to date. You can download the latest firmware from here for the Miyoo Mini and here for the Miyoo Mini Plus+ and can install it by flashing the .img file within using Balena Etcher.
OnionOS

| Compatible Devices | Download Link |
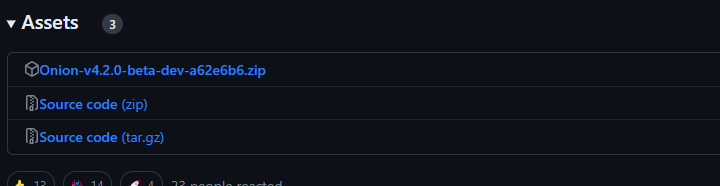
| Miyoo Mini | Release Onion V4.1.4 · OnionUI/Onion · GitHub |
| Miyoo Mini Plus+ | Release Onion V4.2.0.1-beta · OnionUI/Onion · GitHub |
In-depth instructions for installing OnionOS can be found here, however we will go over an abridged version.
To install Onion OS on your Miyoo Retro Handheld, follow these steps:
Prepare the MicroSD Card:
- Remove the microSD card from the bottom of your device and plug it into your PC using an SD card converter, microSD to USB adapter, or directly into the PC if it has a microSD card slot.
- Confirm that your computer can detect the microSD card.
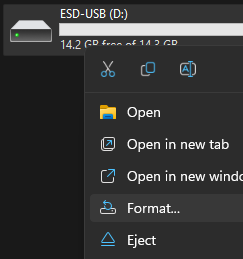
- Format the microSD to “FAT32” within File Explorer.
- Once formatting is complete, verify that the microSD card is recognized by your computer.
Install OnionOS:
- Download the latest version of OnionOS compatible with your device from the GitHub page.
- Extract the downloaded zip file to a folder on your PC with 7Zip
- Copy all the extracted folders to the formatted microSD card.
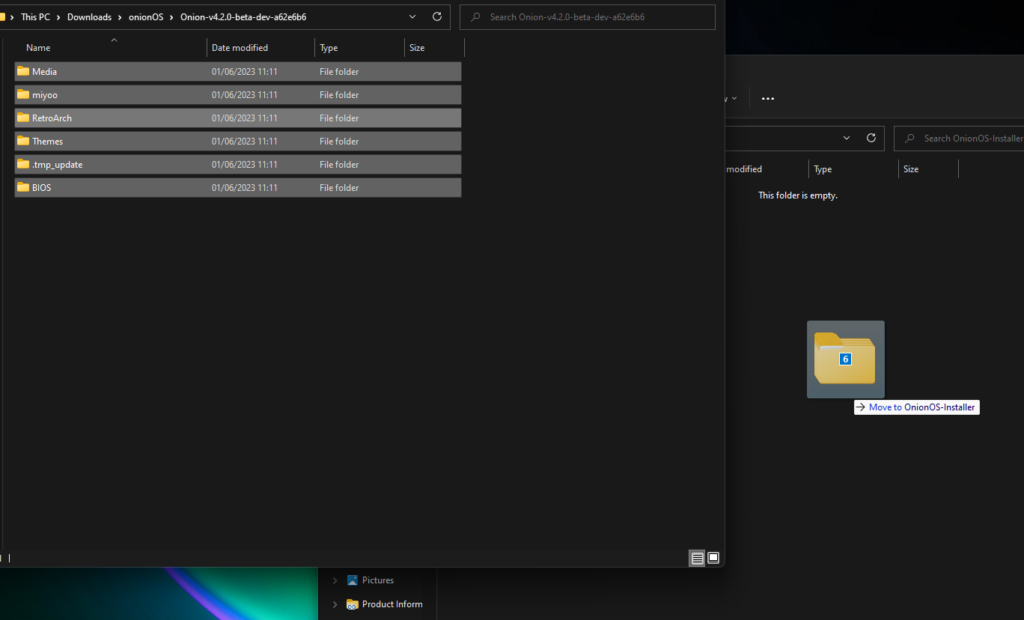
- Safely eject the microSD card from your PC and insert it back into the Miyoo Retro Handheld.
- Power on the device, and it will automatically begin installing OnionOS and RetroArch.
- Once the installation is complete, you’ll be taken to a menu where you can scroll through options.
- Select the emulators and apps you want to install by pressing ‘X’ for each item.

- Confirm your choices on the summary page by pressing ‘Start.’
- The device will install your selected choices, and once finished, you will be taken to the home page of OnionOS.
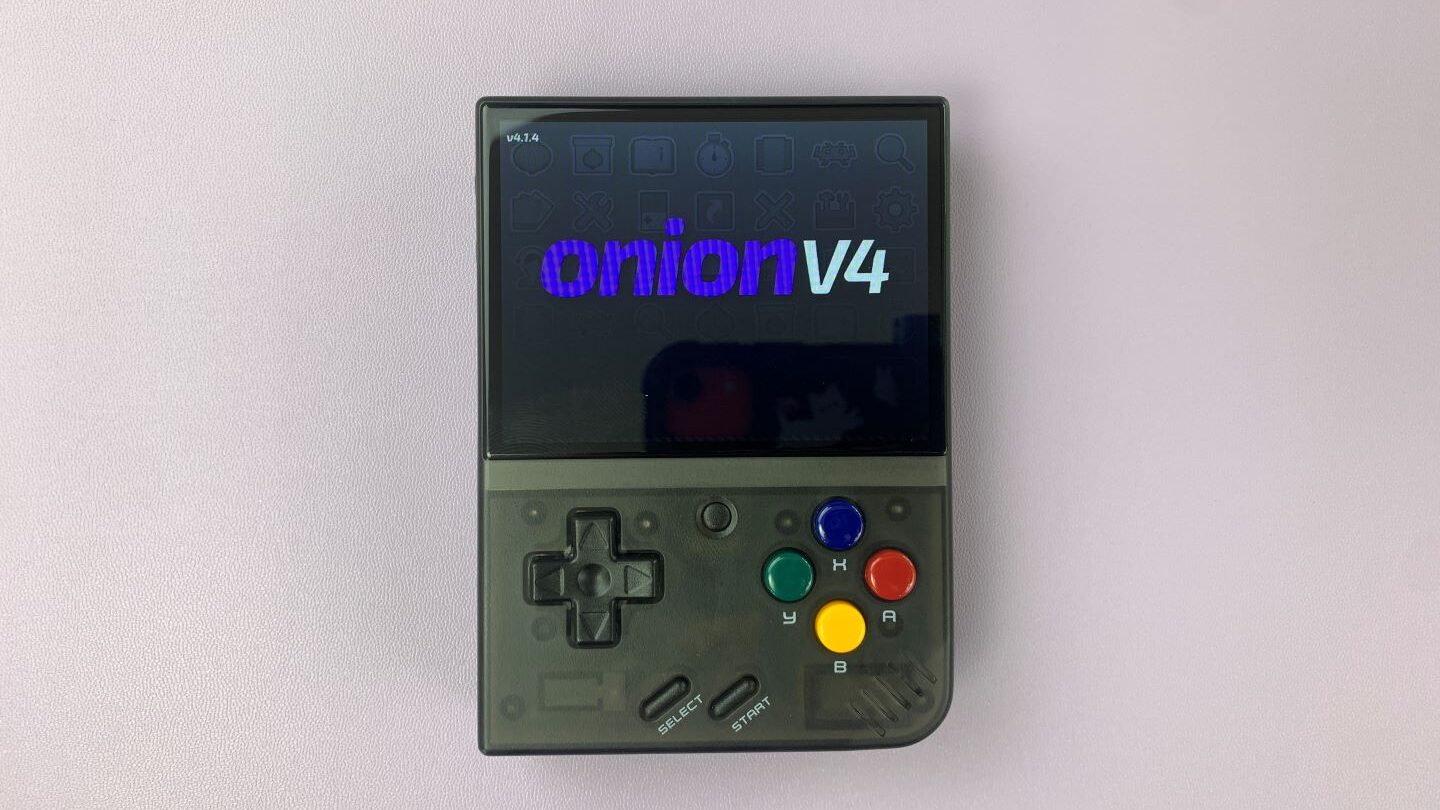
Congratulations! You have successfully installed OnionOS on your Miyoo Retro Handheld. From the home page, you can access your favorite games, game and app libraries, and customize settings according to your preferences.
Koriki
| Compatible Devices | Download Link |
| Miyoo Mini | Release Koriki v1.2 · Rparadise-Team/Koriki · GitHub |
| Miyoo Mini Plus+ | Release Koriki v1.2 · Rparadise-Team/Koriki · GitHub |
Koriki is one of the less well known custom firmwares for Miyoo devices, only having been release at the tail end of 2022. While not as feature-rich as OnionOS, it has a unique focus on design and theme combined with the SImpleMenu frontend makes for a customisable and unique experience.
To install the Koriki Custom Firmware on the Miyoo Mini and Miyoo Mini Plus, follow these steps:
Prepare the MicroSD Card and Install Koriki:
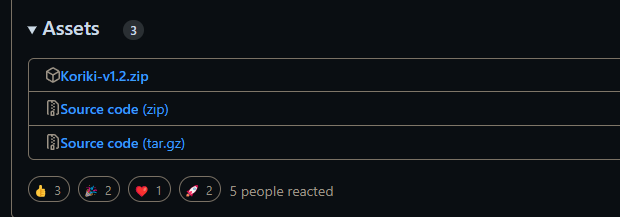
- Download the Koriki firmware from this link:Release Koriki v1.2 · Rparadise-Team/Koriki · GitHub and unzip the file with 7Zip..
- Use an SD card reader to connect the SD card to your computer.
- Find the ‘bios’ folder in the SD card and copy it onto your PC.
- Format the microSD to “FAT32” within File Explorer.
- Open the Koriki folder you unzipped and copy its contents to the blank, unlabeled FAT32 SD card.
- Find the “BIOS” folder you saved earlier and copy it over to the BIOS folder located at the root of the SD card.
- Copy your ROMs to the relevant folders on the SD card. You can refer to the GitHub page for Koriki, specifically the section “02. Content installation” on the following link for information on ROM folder names and game compatibility: En: 02. Content installation · Rparadise-Team/Koriki Wiki · GitHub
- Place your ROM thumbnails in the “Imgs” folder.
- You can use an application called Skraper to scrape thumbnails for your ROM library.
- Safely eject the SD card from your computer.
Install the Firmware and ROMs:
- Insert the SD card into your Miyoo Mini or Miyoo Mini Plus device.
- Power on the device, and the Koriki Custom Firmware will be installed automatically.
- Once the installation is complete, your device is ready to use with the new firmware and ROMs. Your ROM library and customization options will be available.
MiniUI
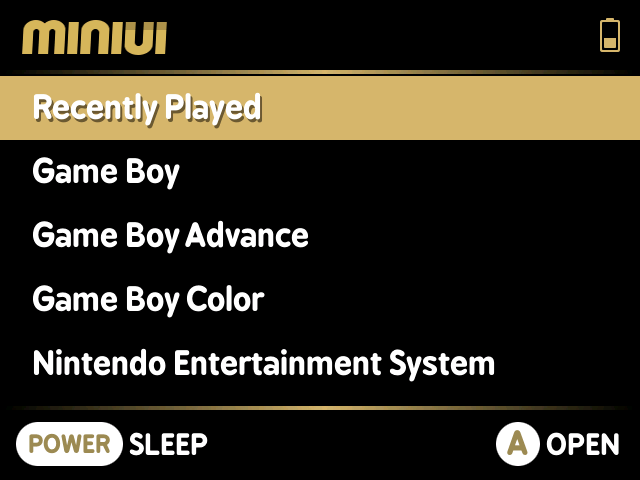

| Compatible Devices | Download Link |
| Miyoo Mini | Release MiniUI-20221023 · shauninman/MiniUI · GitHub |
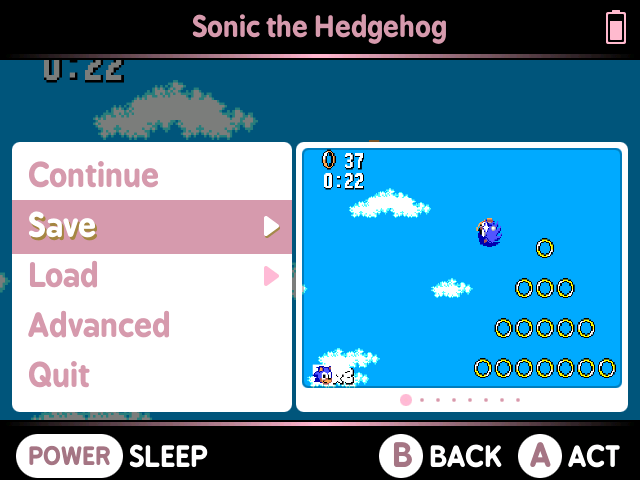
MiniUI is a minimalist launcher and in-game menu designed exclusively for the Miyoo Mini handheld retro console and NOT the Miyoo Mini Plus+. It prioritizes simplicity and a streamlined experience, stemming from its origins in MinUI and the Trimui Model S. By intentionally removing features like boxart images, video previews, background menu music, custom themes, and alternative options, MiniUI aims to minimize distractions and provide efficient game access.
Despite its simplicity, MiniUI offers extensibility through the addition of extra paks and customization options. Users can enhance its functionality according to their preferences. Before downloading, you can explore the features and setup of MiniUI by referring to the included readme
To get started, download MiniUI’s latest release from here.
To install MiniUI, follow these straightforward steps:
- Remove the MicroSD card from your Miyoo device.
- Format an SD card to the FAT32 file system. It is recommended to use a fresh SD card for this purpose.
- Download the MiniUI archive and extract its contents using 7ZIP.

- Copy all the extracted files and folders, including the “miyoo” folder, to the root directory of the FAT32 formatted SD card.
- Insert the SD card into your Miyoo handheld device.
- Power on the device. MiniUI will automatically install itself.
- Wait for approximately 10 seconds, and MiniUI will be ready to use.
By following these steps, you can easily install MiniUI on your Miyoo handheld device without the need for a firmware upgrade. Enjoy the streamlined experience provided by MiniUI’s custom launcher and integrated in-game menu.
DotUI

| Compatible Devices | Download Link |
| Miyoo Mini Plus+ | Release DotUI v1.0 · Xpndable/DotUI · GitHub |
DotUI is a port of the popular MiniUI custom launcher and integrated in-game menu, compatible with the Miyoo Mini Plus handheld emulator
To get started, download DotUI’s latest release from here.
To install DotUI, follow these straightforward steps:
- Remove the MicroSD card from your Miyoo device.
- Format an SD card to the FAT32 file system. It is recommended to use a fresh SD card for this purpose.
- Download the DotUI archive and extract its contents using 7ZIP.
- Copy all the extracted files and folders, including the “miyoo” folder, to the root directory of the FAT32 formatted SD card.
- Insert the SD card into your Miyoo handheld device.
- Power on the device. DotUI will automatically install itself.
- Wait for approximately 10 seconds, and DotUI will be ready to use.
By following these steps, you can easily install DotUI on your Miyoo handheld device without the need for a firmware upgrade. Enjoy the streamlined experience provided by DotUI custom launcher and integrated in-game menu.
Anbernic
It would be an understatement to say that Anbernic has a lot of Retro Handheld Consoles, so we will try to add information for as many as possible however the install process is very similar on all consoles and can easily be found. We will be looking at four different custom firmware options for Anbernic devices, GarlicOS, ArcOS, JELOS and AmberELEC. Each one has their own list of compatible devices and requires similar but different installation routines which will be covered below.
GarlicOS

| Compatible Devices | Download Link |
| RG35XX | GarlicOS for Anbernic RG35XX | Patreon |
GarlicOS is a custom operating system for the Anbernic RG35XX handheld device, developed by Black-Seraph. It improves usability with features like expanded emulation options, customization, automatic save state creation, and overclocking capabilities. It is inspired by OnionOS and is fully compatible with it, allowing seamless swapping of SD cards between devices.
To install GarlicOS, choose between a single-card or dual-card setup. In a single-card setup, all files are stored on a single SD card, while a dual-card setup utilizes separate cards for system and game files, offering better organization and potentially more storage capacity. Follow the appropriate instructions for your preferred setup.
For a single-card setup:
- Visit Black Seraph’s website and find the Anbernic RG35XX section with the Patreon post for GarlicOS.
- Scroll to the bottom and download both “RG35XX-Garlic-MicroSDCardImage.7z.001” and “RG35XX-Garlic-MicroSDCardImage.7z.002” ensuring that they are saved in the same location exactly like that.

- Right click on “RG35XX-Garlic-MicroSDCardImage.7z.001” and open with 7ZIP.
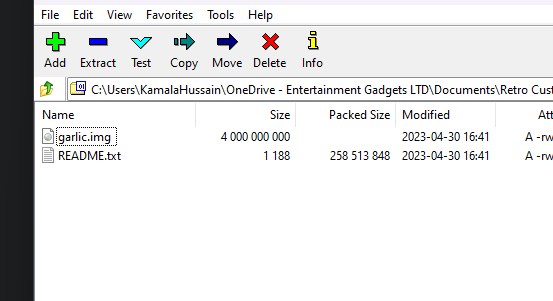
- Extract both files to the same location, find detailed instructions in README.txt
- Use Balena Etcher to flash the “garlic.img” file onto your SD1 card.
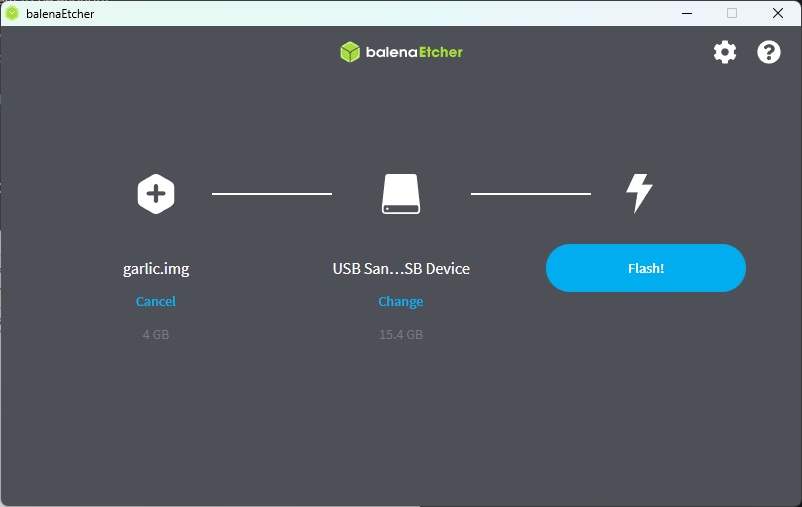
- Open MiniTool Partition Wizard and locate your SD1 card, ensuring the FAT32 partition has a drive letter assigned.
- Access the FAT32 partition, which contains BIOS, ROMs, and CFW folders. Make a backup of these folders on your computer.
- Optionally, expand the FAT32 partition or create a new one named “ROMs” for better utilization of available space. Move the backed-up folders to this new partition.

Note: Ignore pop-up warnings about formatting partitions when flashing the “garlic.img” file with Balena Etcher.
For a dual-card setup:
- Follow all the same instructions to flash garlic.img onto SD1.
- Once done, access the FAT32 partition, containing BIOS, ROMs, and CFW folders, and create a backup of these folders on your computer.
- Format your SD2 card to FAT32.
- Move the BIOS and ROMs folders from your computer to the SD2 card.
- Optionally, expand the SD1 card’s FAT32 partition using Disk Genius or similar tools, or create a new partition named “ROMs” to utilize available space. Move the backed-up folders to this new partition.
Your dual card setup should look like this:
SD1:
- System partition (FAT16): System files and modules.
- Storage partition (FAT32):
- BIOS folder (optional if ROMs are on this card too)
- CFW folder (custom firmware)
- ROMs folder (optional for additional game files)
- Saves folder (auto-generated for game saves)
SD2:
- BIOS folder
- ROMs folder
- Saves folder (auto-generated for game saves)
This dual-card setup separates system and game files for better organization and efficient access on your Anbernic RG35XX device running GarlicOS.
Insert the cards into your RG35XX device, and enjoy GarlicOS and your game library.
ArkOS

| Compatible Devices | Download Links |
| CHI | Link |
| RG503 | Link |
| RG353V/RG353VS | Link |
| RG353M | Link |
| RK2023 | Link |
| RG351V | Link |
| RG351MP (Will not work for the the RG351P or RG351M! | Link |
| RG351P/RG351M (Will not work for the the RG351MP!) | Link |
| OGA 1.0/RK2020 | Link |
| OGA 1.1/RGB10/RGB10s/RGB20 (Will not work for the the RGB20s!) | Link |
ArkOS is a highly customizable operating system designed with a focus on performance, online updates, and ease of use. It originated as a fork of The Retro Arena, initially created to enable roms folder management on an NTFS partition using a Windows 10 computer. Over time, it has evolved and diverged significantly from TheRA, leading to its rebranding as ArkOS.
Based on Ubuntu 19.10, ArkOS offers both 64-bit and 32-bit userspaces, providing a wide range of support for various video game system emulators and ports. With the ability to emulate over 90 gaming systems and support over 90 ports through PortMaster. ArkOS offers extensive capabilities for gaming enthusiasts. Its name, ArkOS, stands for “Another rk3326 rockchip Operating System” and reflects its dedication to delivering a comprehensive and versatile gaming experience. ArkOS is supported on many devices, the official list of below:
First of all:
- Do not manually expand the EasyROM partition. It will be done automatically during the first boot.
- Use an 16GB micro SD card or larger for the best experience. Avoid low-quality or no-name brand SD cards.
To install ArkOS, follow these steps:
- Download the image for your device from the provided links at the bottom of the page. Uncompress the image using 7zip.

- Use a program like USB Image Tool (recommended) or Win32DiskImager to flash the image onto your micro SD card. Do not use Balena Etcher with this image, as it may cause strange issues and inconsistent performance.
- Do not format the SD card from here.
- Insert the micro SD card into your device and power it on. The device will reboot twice to expand the NTFS partition and convert it to exFAT to fill the remaining space on the card.
- Once the Emulationstation menu is displayed, your device is ready.
- You can add ROMs to their respective folders in the EASYROMS exFAT partition. You can use network connectivity (samba share or FTP) or insert the SD card into your computer after shutting down the device (start + power).
- Do not delete any existing folders or their contents in the EASYROMS (roms) folder, as some emulators (e.g., PSP and NDS) depend on them for correct operation.
- Reinsert the SD card into your rk3326 device and power it on. If you removed it to load ROMs, simply reboot your device and enjoy!
JELOS (Just Enough Linux OS)
| Compatible Devices | Download Link |
| Anbernic RG351P/M, ODROID Go Advance, ODROID Go Super | Link |
| Anbernic RG353P/M/V/VS, RG503, and Powkiddy RK2023 | Link |
| Ayaneo Handhelds, Atari VCS, and other x86_64 devices | Link |
| Hardkernel ODROID Go Ultra | Link |
| Orange Pi 5, and Indiedroid Nova | Link |
| Powkiddy x55 | Link |
JELOS stands for Just Enough Linux Operating System. It is an immutable Linux distribution for handheld gaming devices developed by a small community of enthusiasts. Their goal is to produce an operating system that has the features and capabilities that they need, and to have fun as they develop it.
To install JELOS, you can follow these steps:
- Download the latest version of JELOS (.img.gz) for your device from the link here.
- Decompress the image with 7ZIP.
- Insert your microSD card into the PC and backup the folder ‘bios’ onto your computer.
- Ensure that your microSD card is formatted to FAT32.
- Write the image to an SDCARD using an imaging tool such as Balena Etcher.
- Copy the contents of your backed up ‘bios’ folder to the new ‘bios’ folder on the SD card.
- Insert the card into your device and power on, it will automatically install.
- Boot to JELOS. If you are using a one card solution you can shut down and put your games on your card. If dual card then you can shut down and put your games on the second card before booting .
- Play your games and have fun.
AmberELEC

AmberELEC is a custom firmware designed for Anbernic RG351P/M/V/MP and RG552 devices. It offers a 64-bit optimized firmware with an up-to-date UI and various features. With an active community, AmberELEC encourages open-source participation. It has pre-configured settings for an easy and optimised setup, including an integrated scraper for media retrieval.
It supports RetroAchievements and features a package manager for community themes. The firmware supports an exFAT games partition accessible from Linux, Windows, and MacOS, ensuring compatibility and user convenience.
To install AmberELEC on your device, charge your console to 100% before installing AmberELEC.
- Download the latest img.gz image from the official AmberELEC releases page.
- Unzip the downloaded file to obtain the .img file.
- Use an image writer like balenaEtcher to flash the .img file onto your MicroSD card.
- Insert the MicroSD card into slot 1 of your retro device and let AmberELEC initialize. This may take a minute or two.
(Optional) Step 5: If you have a second SD card slot and want to use it for games, format the card as ExFAT or ext4. Insert the game SD card into the second slot and let AmberELEC create the necessary folder structure during bootup. You can now transfer games to and from the second SD card.
Enjoy!
GammaOS (RK3566)
GammaOS (RK3566) is a custom firmware designed specifically for the Anbernic RK3566 devices – the RG353 and ARC-D models. This firmware based on LineageOS v19.1 (Android 12), provides a debloated and stylish experience for users who are looking to get the best Android experience out of their retro gaming devices.
It’s important to note that installing GammaOS will overwrite the stock Android OS on your device – so before proceeding with the installation, we strongly recommend backing up your existing system to ensure the safety and integrity of your files. However, the good news is that your Linux setups that boot from MicroSD cards will remain unaffected.
You can download the custom firmware below.
GammaOS Download
| Compatible Devices | Download Link |
| RG ARC-D | Download, Alternative Link |
| RG353 | Download, Alternative Link |
Stock Firmware Download
| Compatible Devices | Download Link |
| RG ARC-D (Android) | Download, Alternative Link |
| RG ARC-D (Linux) | Download, Alternative Link |
| RG353 Series (Android) | Download, Alternative Link |
| RG353 Series (Linux) | Download, Alternative Link |
Installation Process
We already have a dedicated installation & setup guide for GammaOS on RK3566 devices. This guide covers everything from the entire installation process as well as how to restore the stock firmware. First, download the GammaOS Firmware linked above and then proceed to the guide. If you are looking to restore Android OS, download the Stock Firmware and continue.
Note: although this guide uses the Anbernic RG ARC-D, it applies to all RK3566 devices (ARC-D/353P/353V/353M).

Questions & answers 2
O.K… so what about my “X9” then ?.. (no, not THAT “X9” !. THIS one)
https://www.aliexpress.com/item/1005008593464893.html?spm=a2g0o.productlist.main.3.4d52699bHXHIHF&algo_pvid=e3568f8a-861a-44e1-bd2d-ef306c7ee83b&algo_exp_id=e3568f8a-861a-44e1-bd2d-ef306c7ee83b-2&pdp_ext_f=%7B%22order%22%3A%222%22%2C%22eval%22%3A%221%22%7D&pdp_npi=4%40dis%21SEK%21479.81%21278.27%21%21%2147.71%2127.67%21%40211b619a17471195412657481e1cf9%2112000045872661639%21sea%21SE%213550096225%21X&curPageLogUid=6TdlDllGo8zS&utparam-url=scene%3Asearch%7Cquery_from%3A
This system REALLY NEEDS A BETTER FIRMWARE (OR EVEN BETTTER, A NEW O P). It´s surely crappy now, but i feel that the hardware “would have more to offer”, if it only had the right software preconditions !)
We have not seen the model you mentioned before so we cant be sure what firmware if any would work with it. Generally I would advise stick with the popular brands as they are more likely to have custom firmware support.