Files used in this guide
Changelog
- Source guide: How to Install & Setup GammaOS on the Anbernic RG ARC-D
- Source guide: Custom Firmware for Retro Handhelds
Older versions stay downloadable for rollbacks — every version keeps its own verified file.
Changelog
- Source guide: How to Install & Setup GammaOS on the Anbernic RG ARC-D
- Source guide: Custom Firmware for Retro Handhelds
Older versions stay downloadable for rollbacks — every version keeps its own verified file.
Changelog
- Source guide: How to Install & Setup GammaOS on the Anbernic RG ARC-D
- Source guide: Custom Firmware for Retro Handhelds
Older versions stay downloadable for rollbacks — every version keeps its own verified file.
Changelog
- Source guide: How to Install & Setup GammaOS on the Anbernic RG ARC-D
Older versions stay downloadable for rollbacks — every version keeps its own verified file.
Looking to take your Anbernic RG ARC-D to the next level? Look no further than GammaOS, as the first custom firmware designed for the ARC-D, it brings new functionality and a refreshed design to your gaming device to elevate your gaming experience. Experience a sleeker interface, smoother navigation, and enhanced personalization features, making each gaming session uniquely yours. Dive into a more enjoyable and tailored experience with GammaOS.
What is GammaOS?
GammaOS is a custom firmware – an overhaul for your Anbernic ARC-D for those who want more beyond the default settings of their retro gaming handheld. With GammaOS, you gain access to the Google Play Store which opens up a myriad of apps and games that were previously unavailable. This new custom firmware provides a more modern and improved user interface thanks to the Daijisho Launcher, which makes navigation and customisation more enjoyable. If you’re looking to elevate your gaming setup with a fresh look, and some expanded functionality, then the GammaOS firmware is an excellent choice.
Before We Start
Before you begin installing GammaOS on your Anbernic ARC-D, it’s essential to ensure you have all the necessary tools listed below. We will provide links to the required software later in the guide, so there’s no need to search for them right now.
Hardware:
- Anbernic ARC-D
- PC/Laptop
- MicroSD Card
- USB Memory Card Reader
Software:
- GammaOS Firmware
- SD_Firmware_tool
Download GammaOS Image
To start, download the GammaOS custom firmware. You can download the custom firmware image from one of the links provided below. GammaOS comes in two versions: Full and Lite. The Full version includes access to Google Services and the Google Play Store, while the Lite version does not. Feel free to choose the version that best suits your needs, but we will proceed with the Full version to take advantage of Google Services and the Google Play Store.
| Title | Links |
| GammaOS Firmware | Download, Alternative Link |
Create Firmware Upgrade Tool
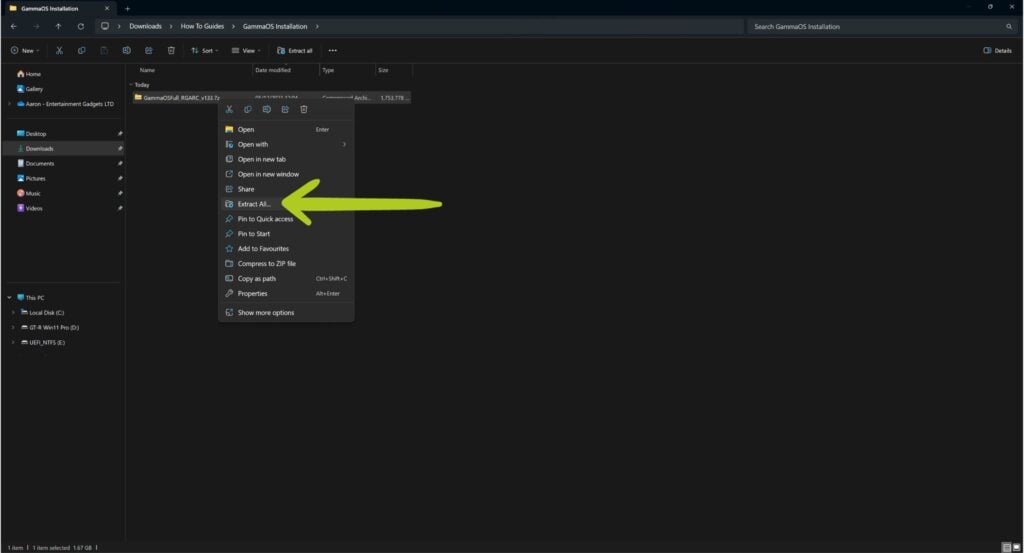
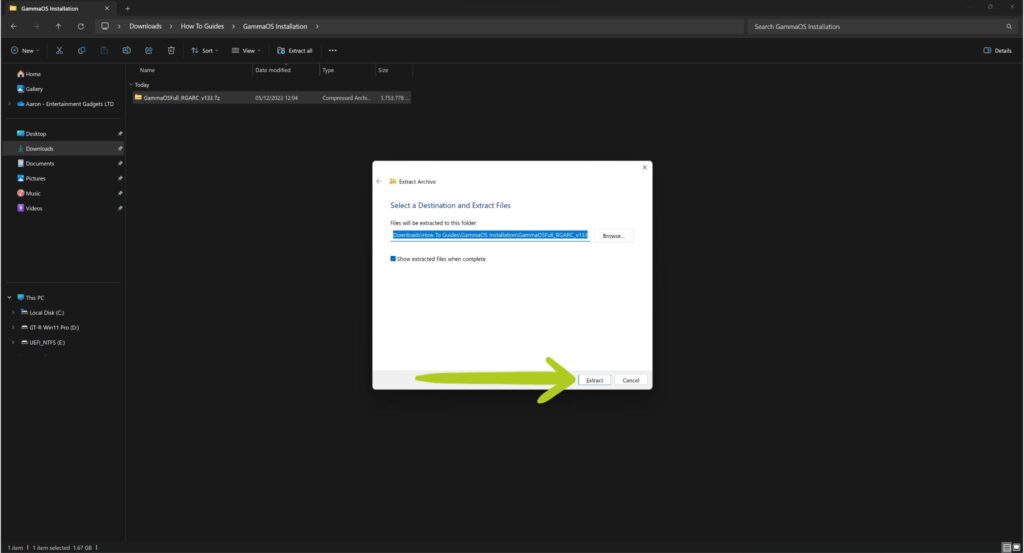
After downloading, locate and extract the downloaded file. Right-click the file and select Extract All (refer to Images 1 & 2 below).”
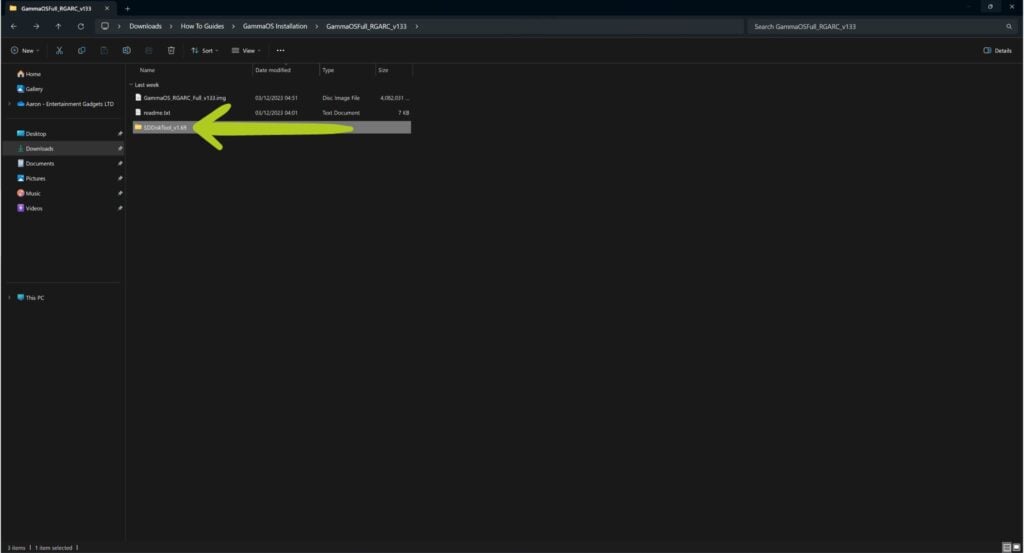
Once extracted, open the folder if it does not automatically open. Inside, you’ll find a disk image file, a readme file, and a folder named SSDiskTool (see Image 3 below). For now, open the SSDiskTool folder and run SD_Firmware_Tool.exe (refer to Image 4 below).

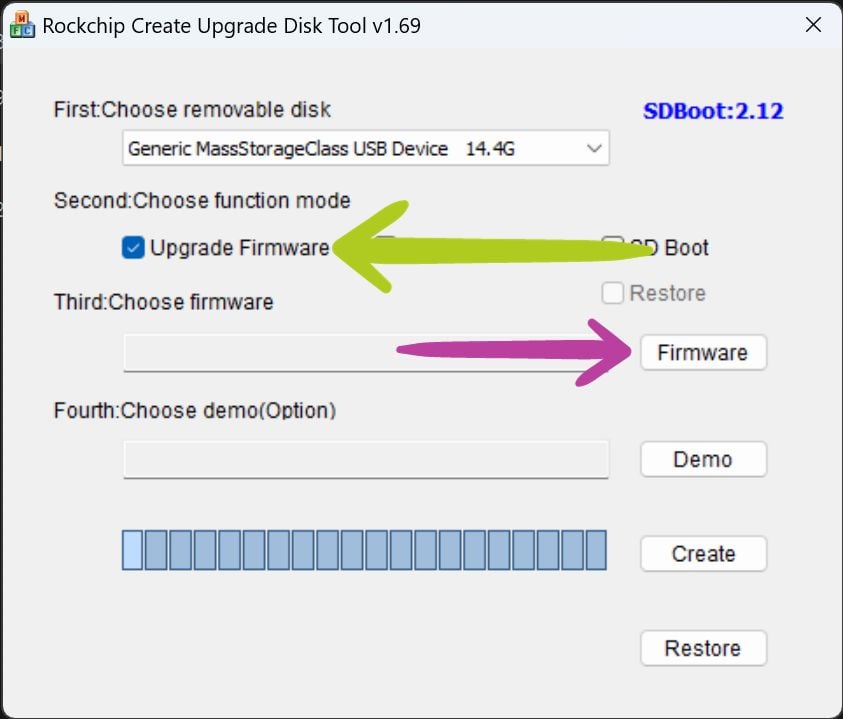
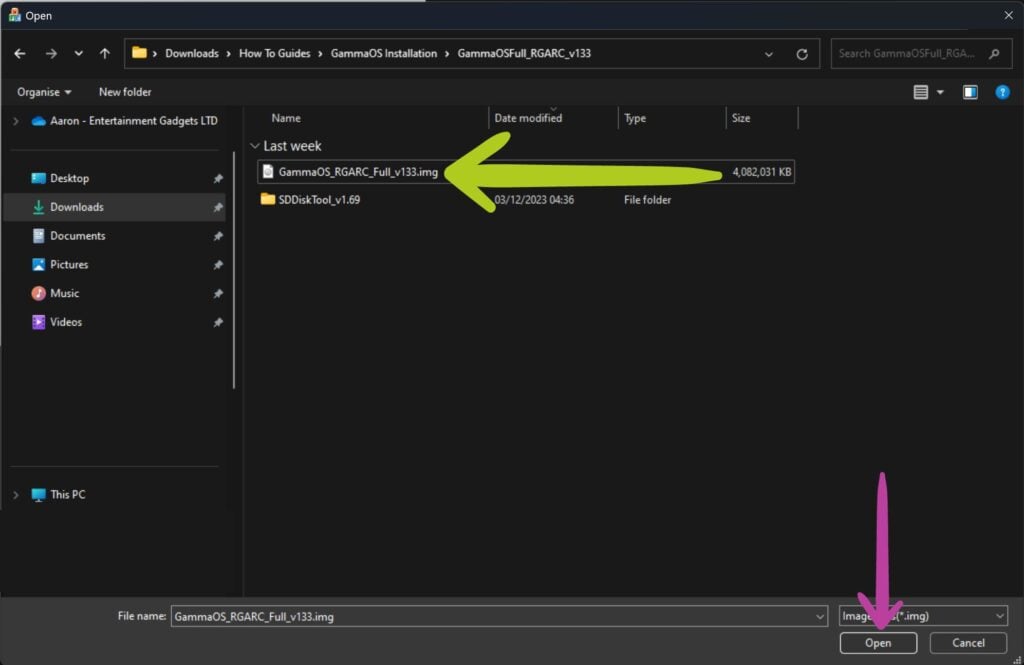
This will open the Rockchip firmware tool. First, ensure your MicroSD Card is selected as the removable disk. Enable Upgrade Firmware and then click the Firmware button (shown in Image 5 below). A file explorer window will appear – here, locate and select the disc image file GammaOS_RGARC_Full_v133.img (see Image 6 below).
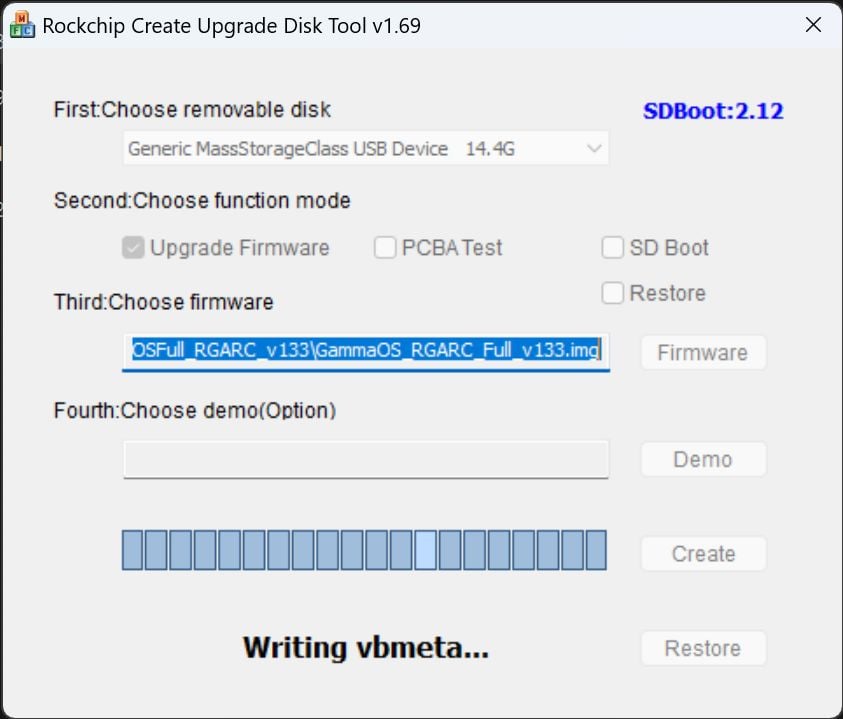
Next, you should see the file path under the Third option. Double-check all the settings are correct (refer to Image 7 below). At this point, click Create. A warning will appear about erasing the contents of the removable storage – click Yes to proceed (refer to Images 7 & 8 below).


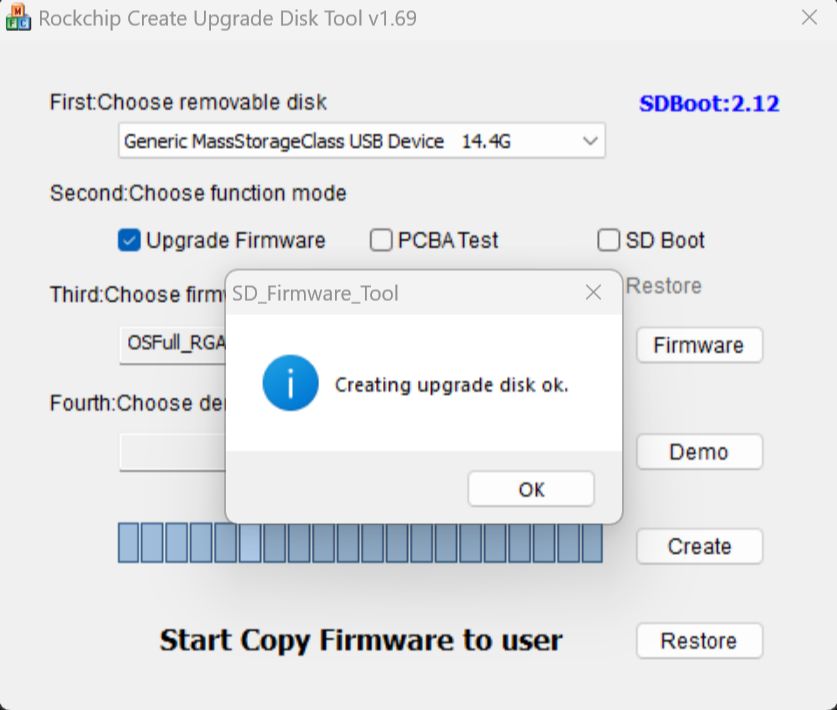
The tool will now use the .img file to convert your removable storage into a boot device for the custom firmware installation (see Image 9 below). This process might take a while, so don’t worry if it’s taking a long time. Avoid doing anything that could affect disk writing during this time. Once complete, a confirmation window will pop up; click OK (refer to Image 10 below).
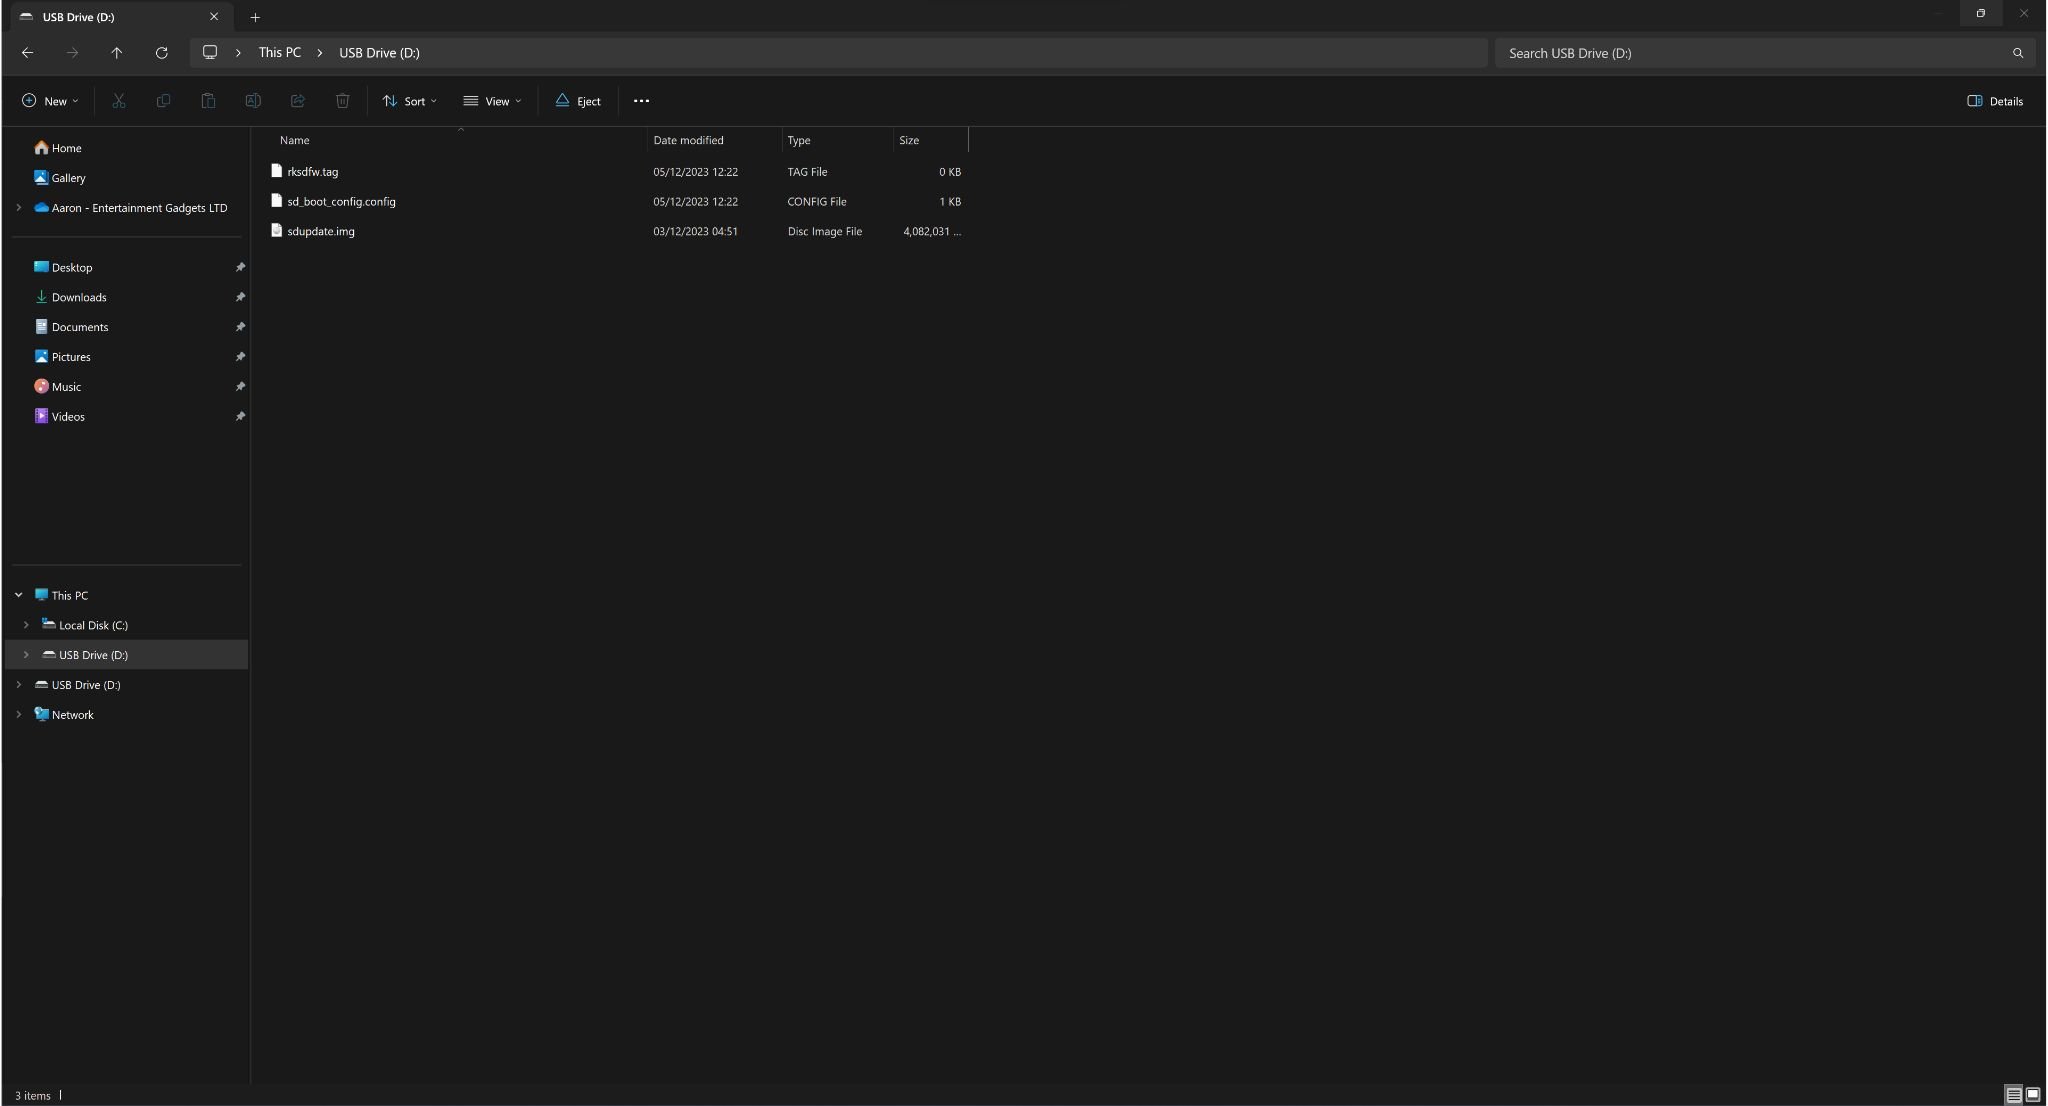
Finally, Close the software and check the SD Card’s contents to ensure everything is correctly loaded (see Image 11 below). If all looks good, safely Eject the device.
GammaOS Installation on ARC-D
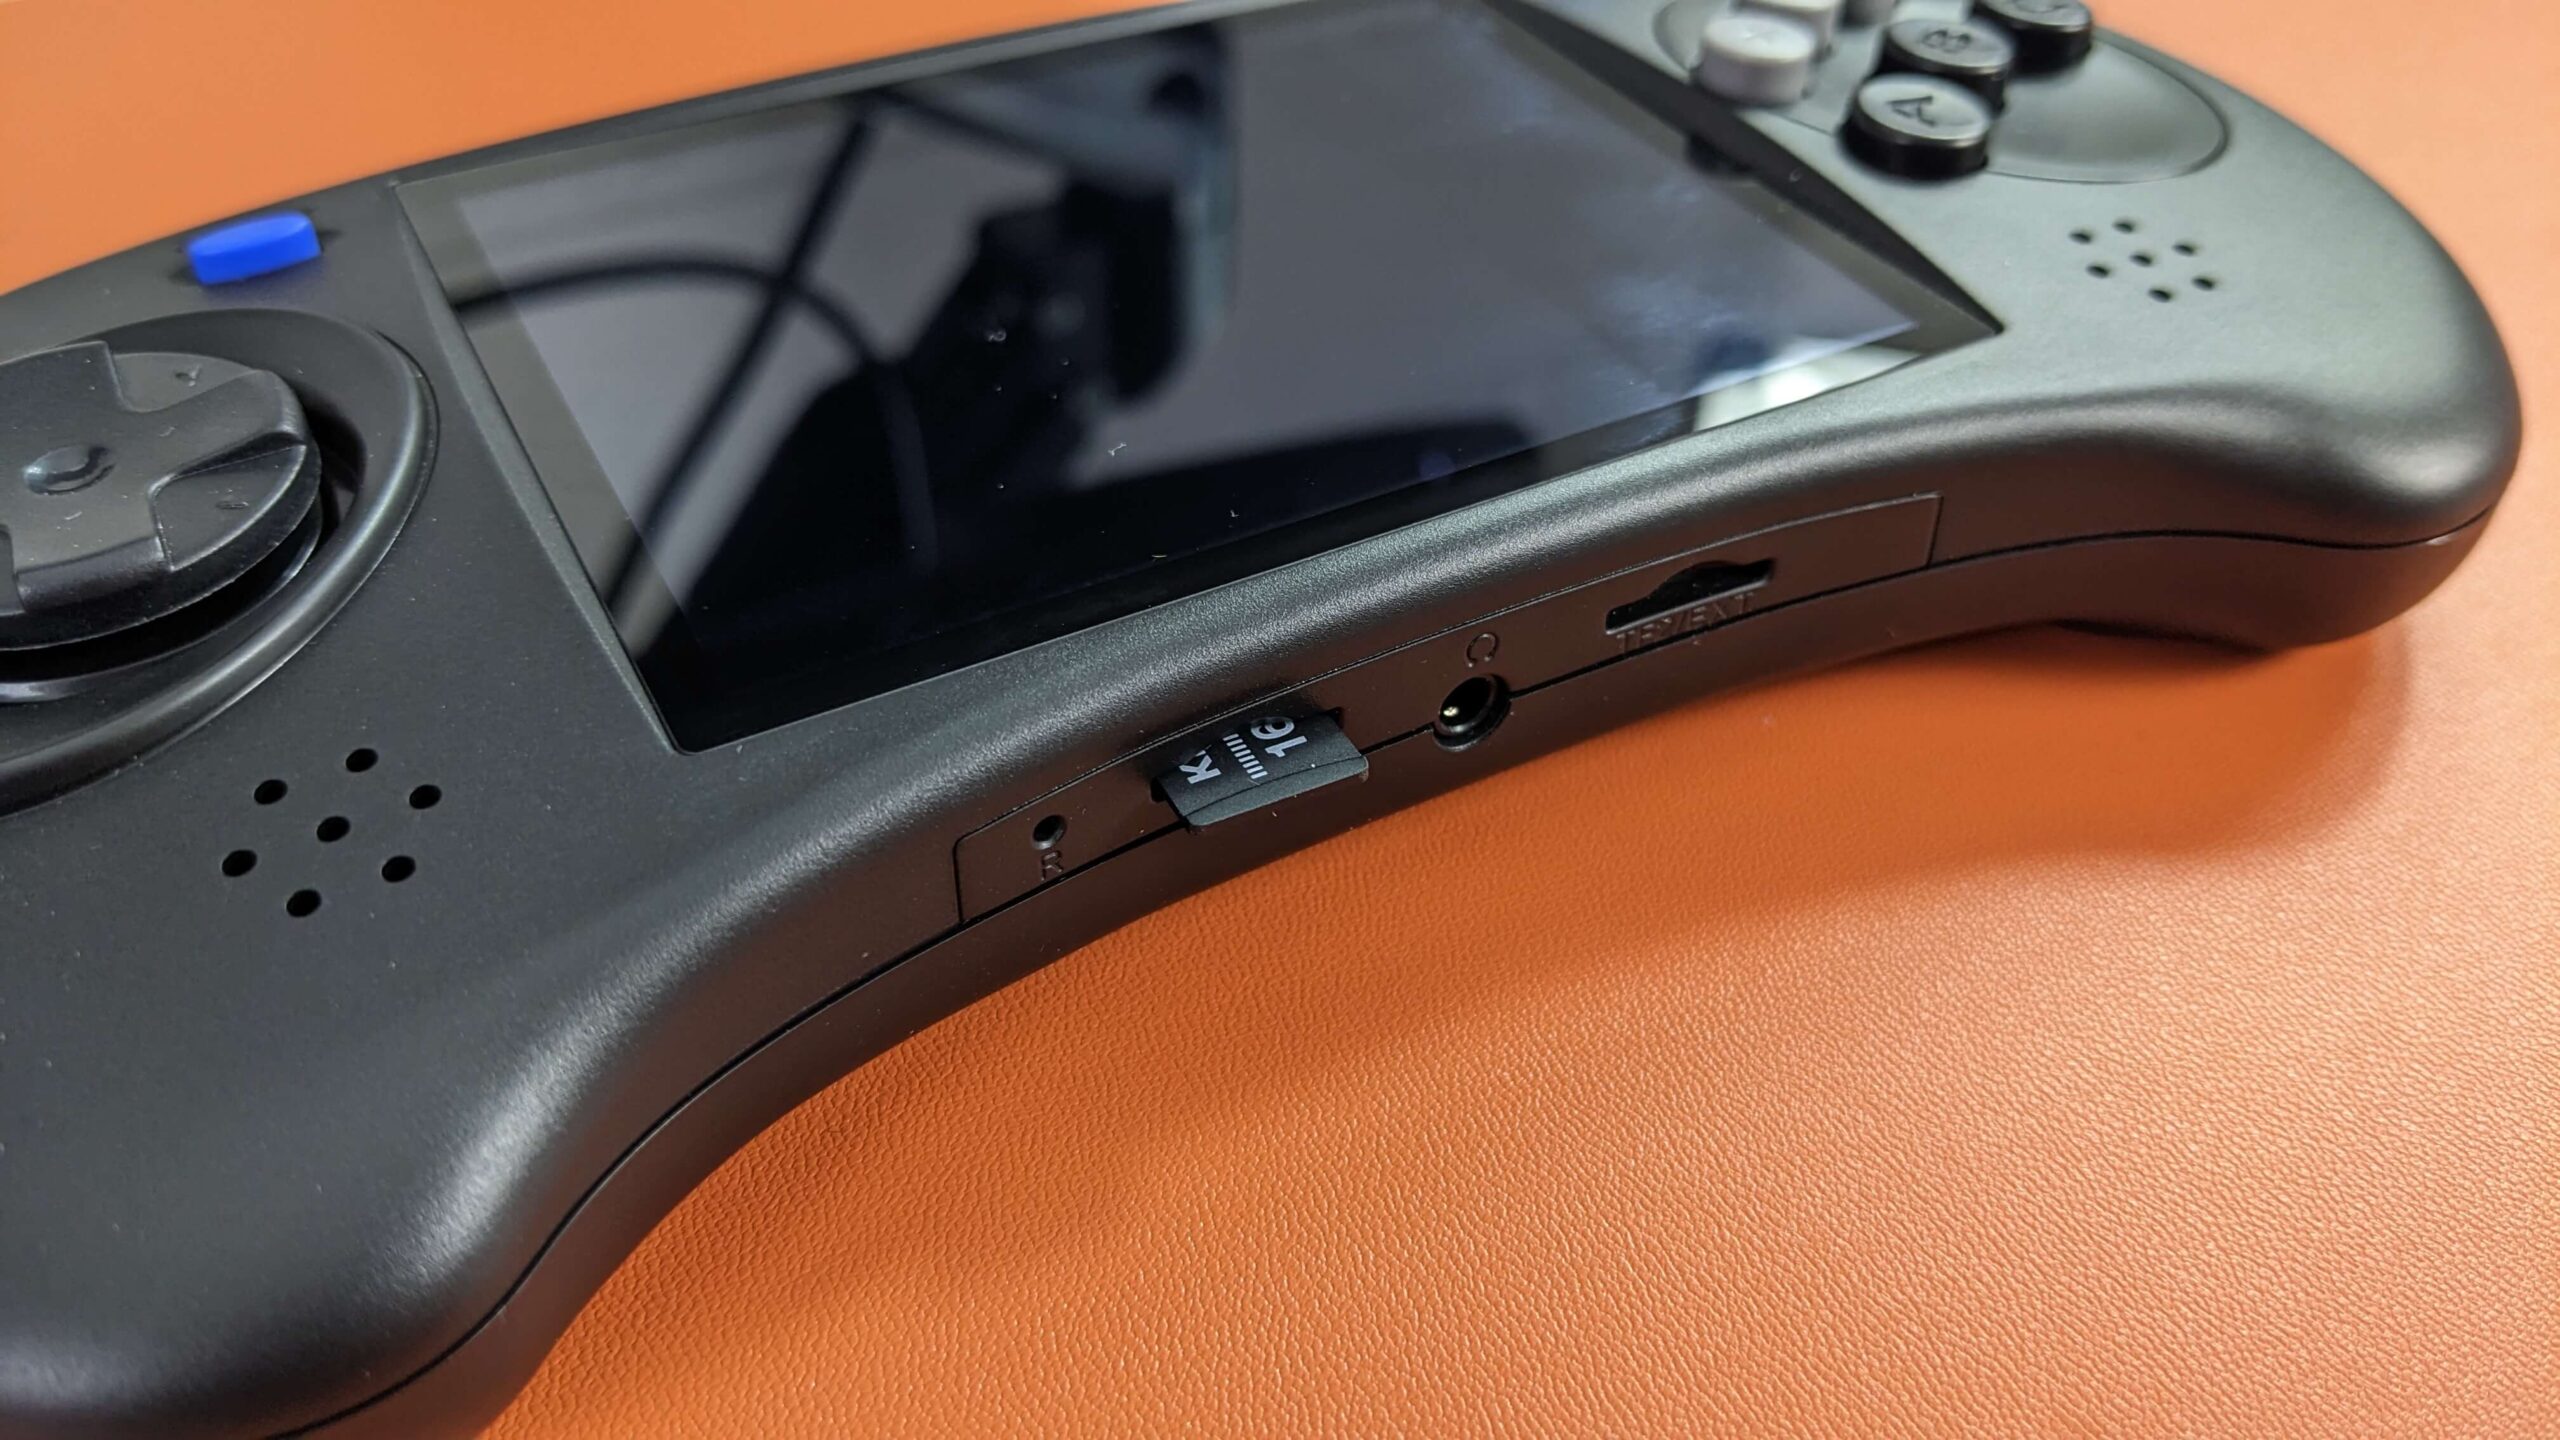
Now, we are all set to install the GammaOS firmware onto our portable gaming device. First, ensure your device is powered down. Then, insert the MicroSD card into the TF1/INT slot, which is conveniently located and labelled at the bottom of your Anbernic ARC-D (see Image 1 below). After inserting the card, power on your device. The firmware upgrade screen should appear and begin the upgrade process automatically (see Image 2 below).
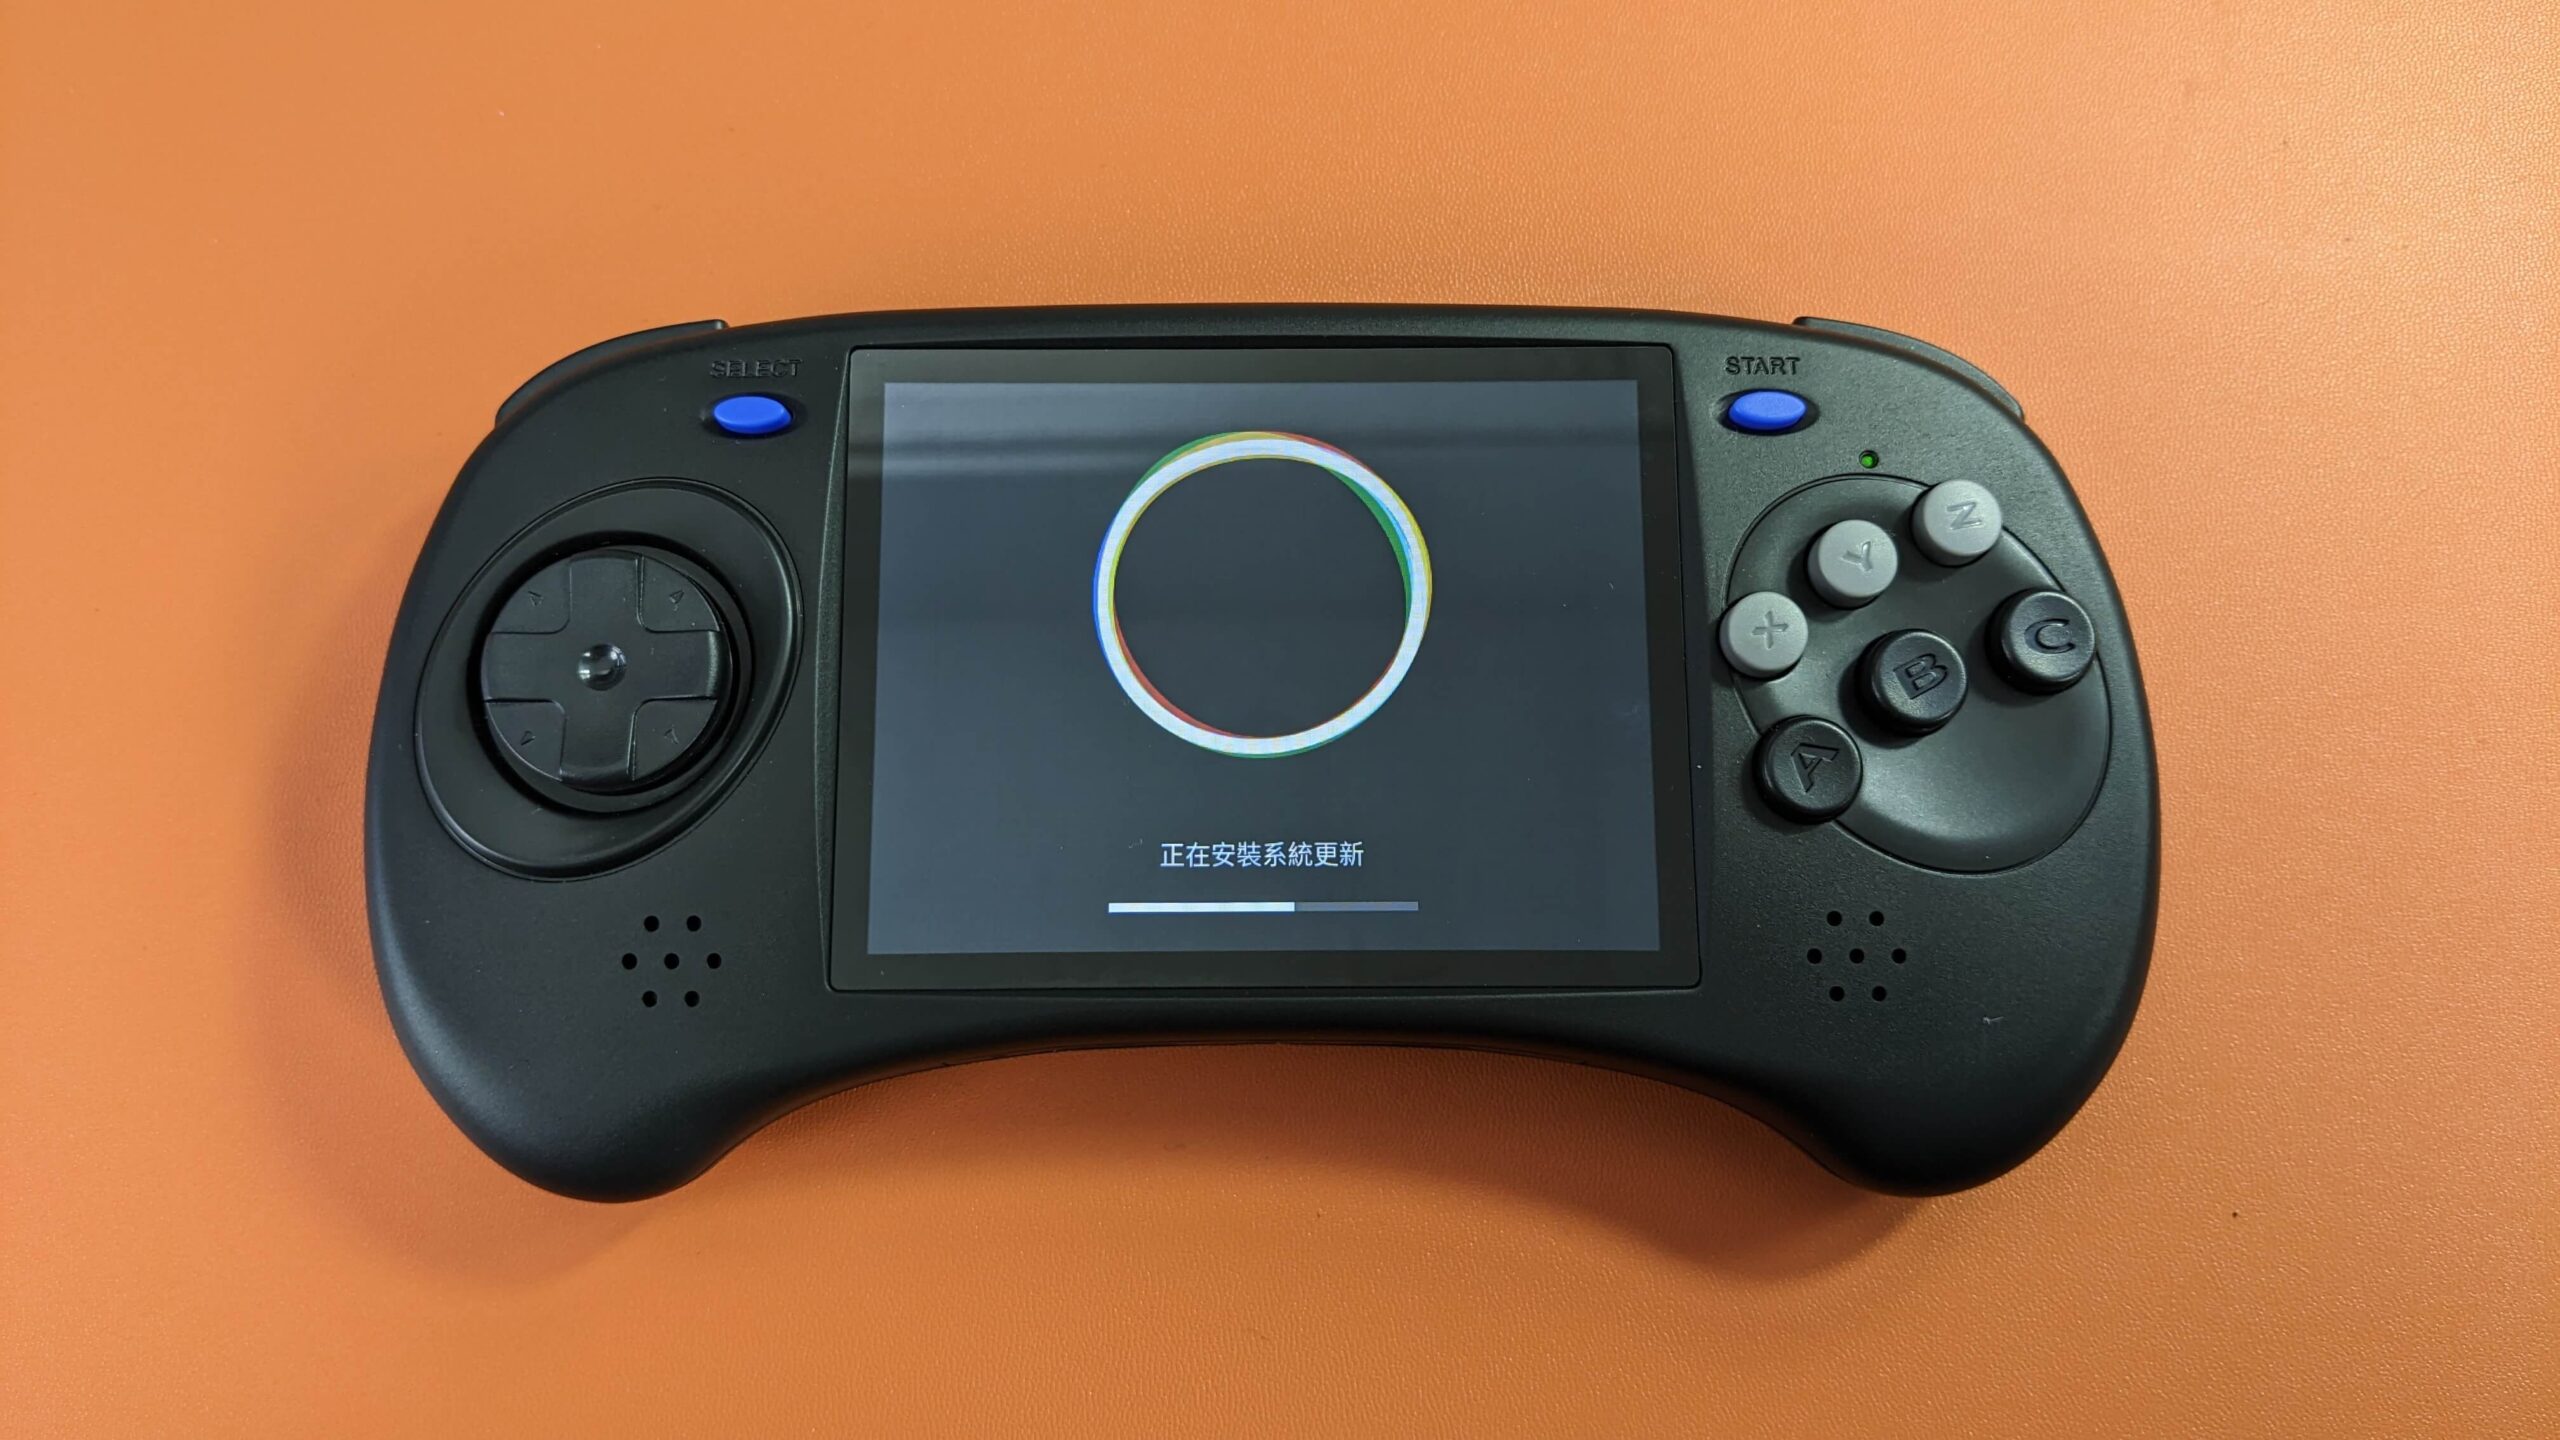
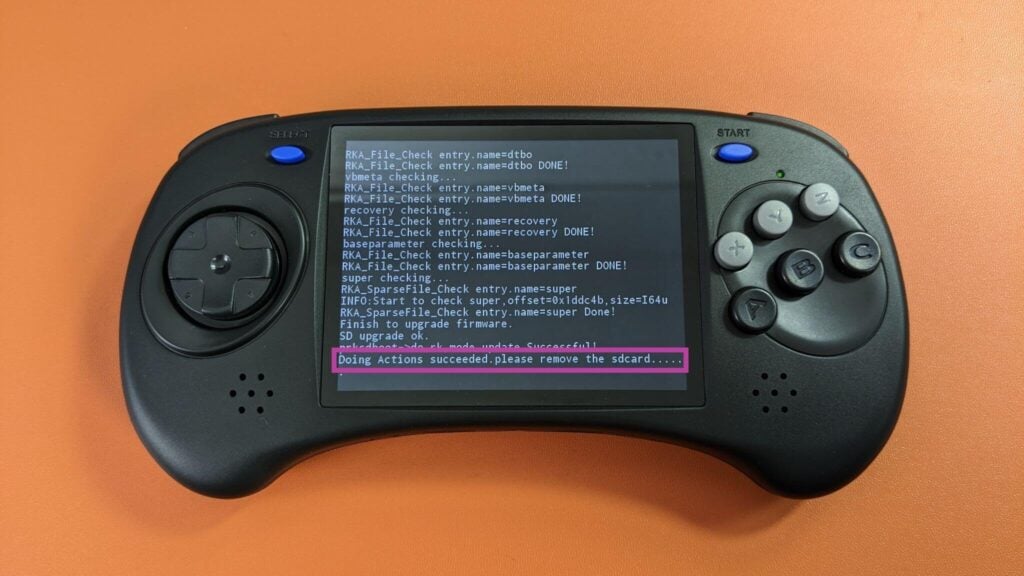
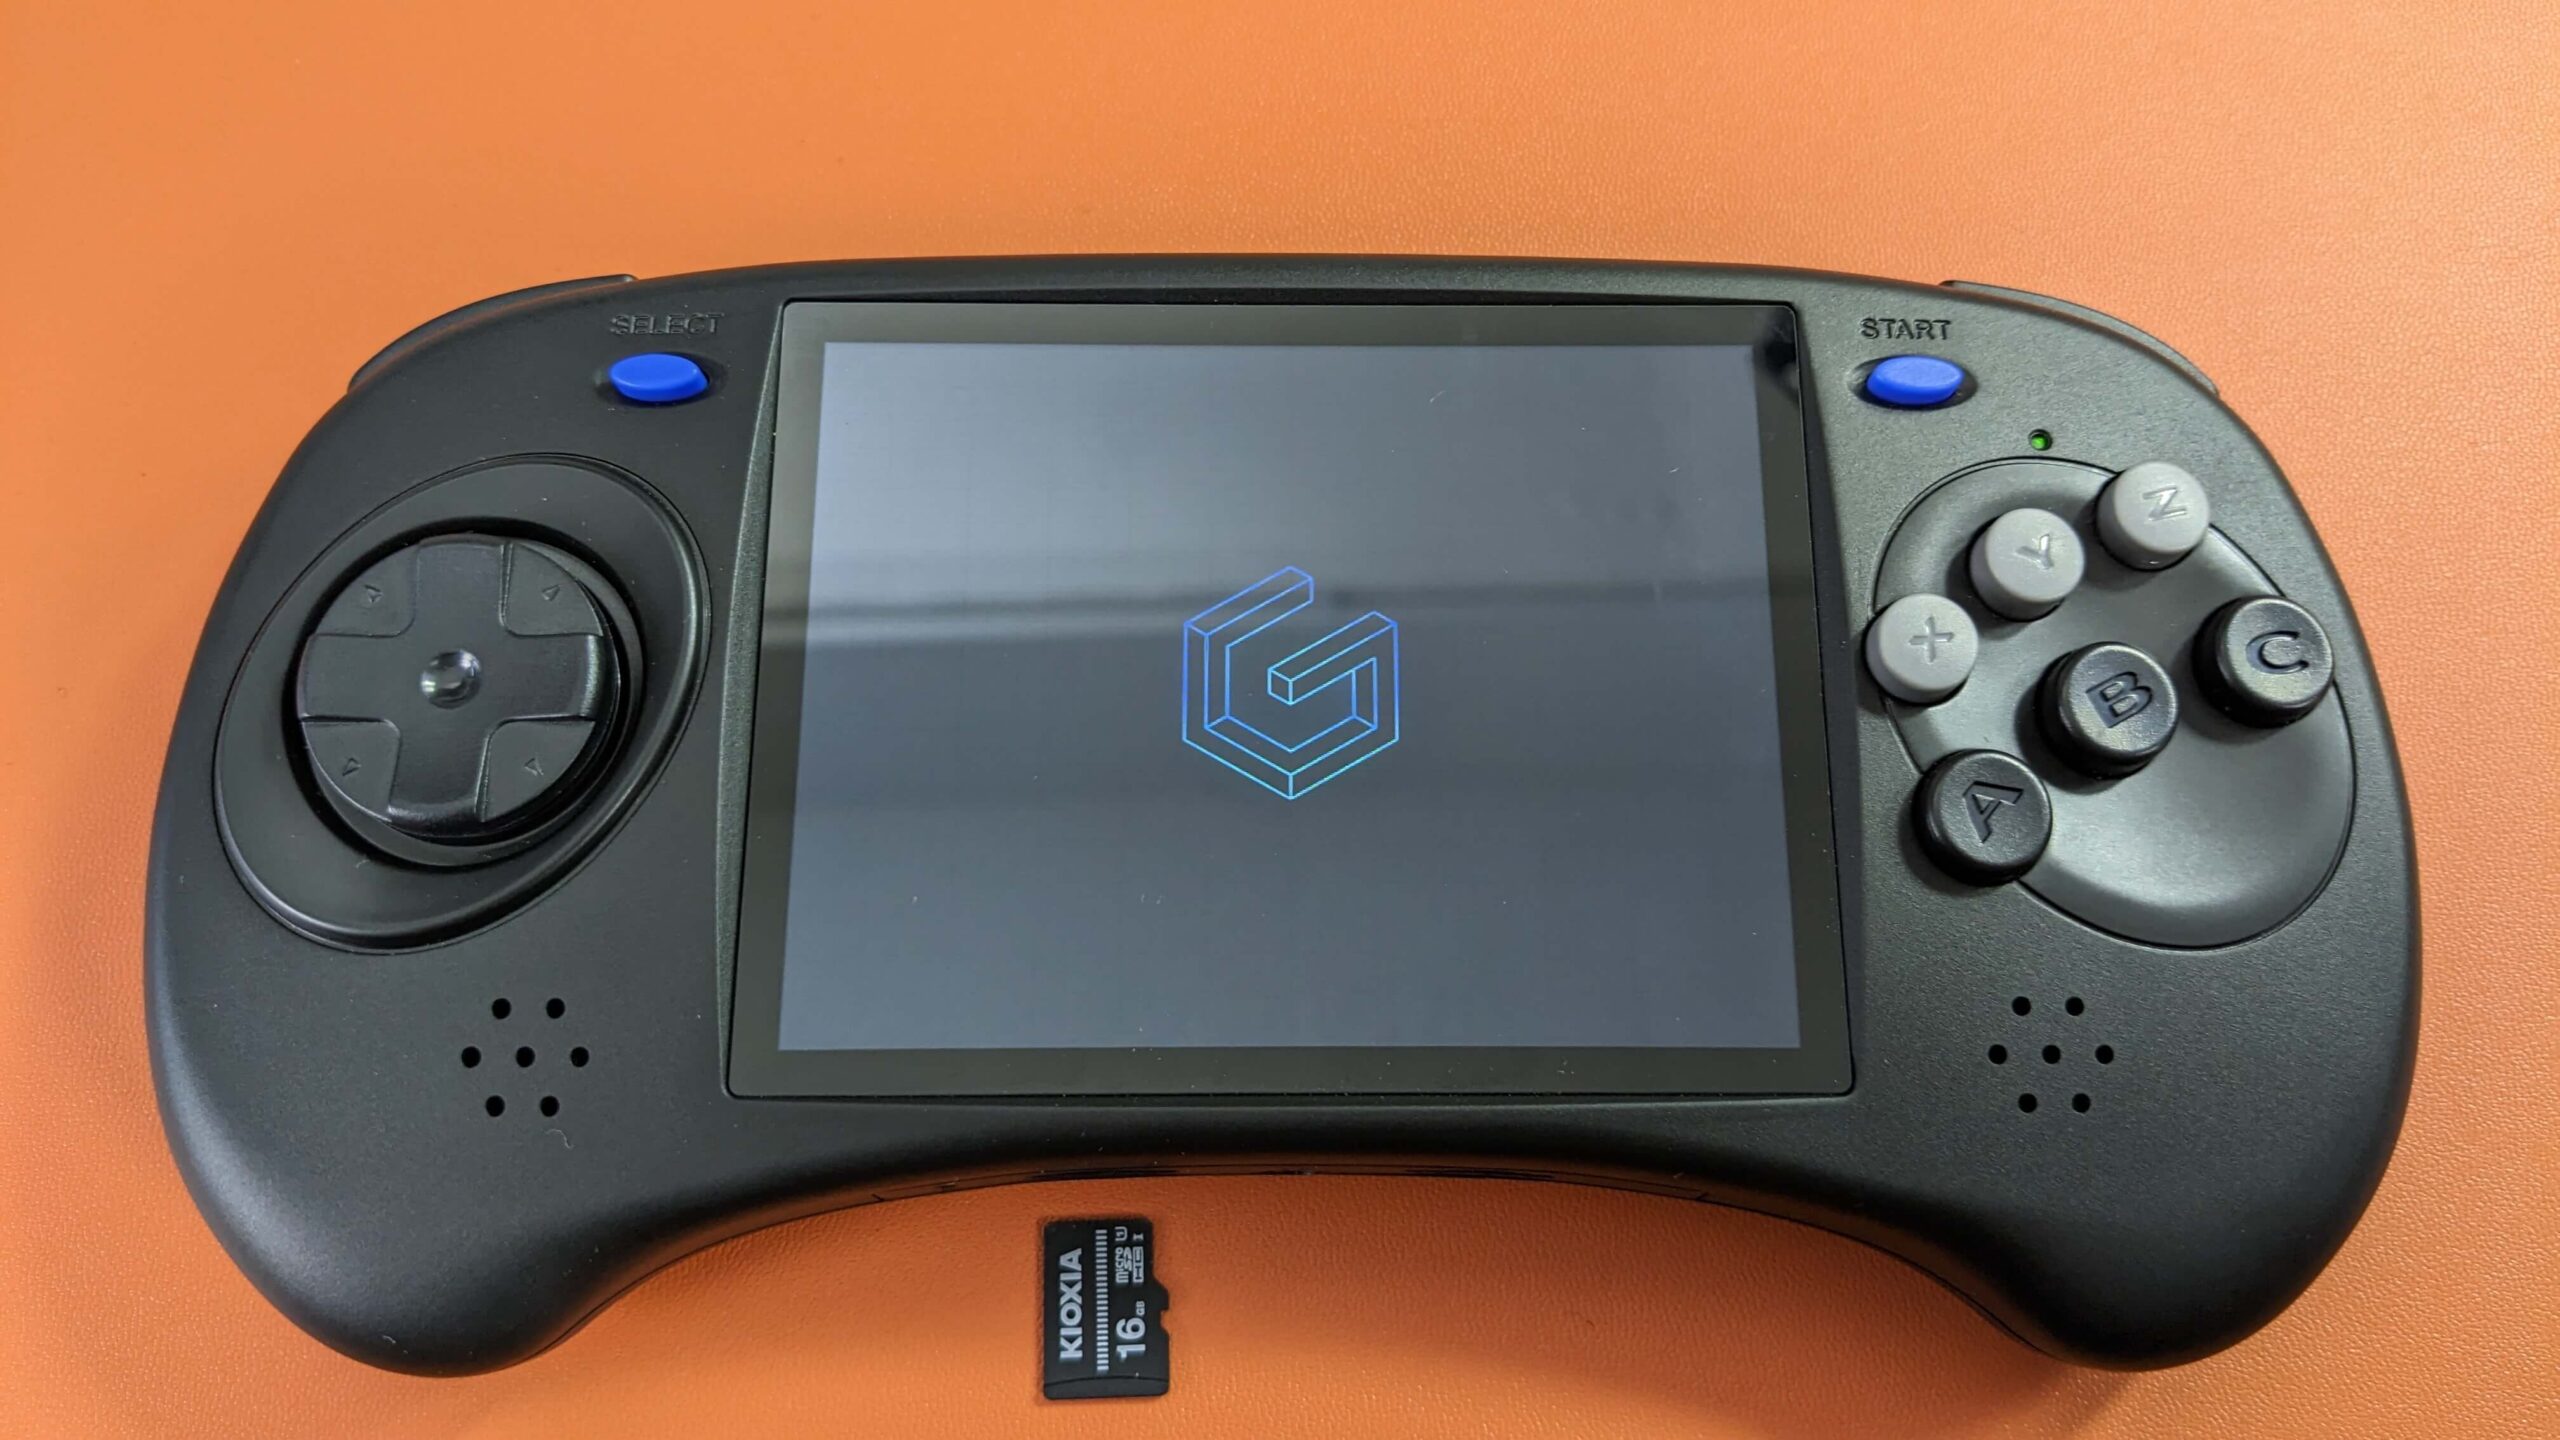
This step took us about 10 minutes, so don’t worry if it takes a bit longer. Once the upgrade is complete, a message will confirm the successful firmware upgrade and provide the next steps (refer to Image 3 below). Follow these instructions by removing the MicroSD Card from the TF1/INT slot while the device is still powered on. This action will trigger the initial boot process (see Image 4 below). Note that this first boot might take some time, but subsequent boots will be significantly faster. After this initial setup, you will no longer need the MicroSD card.
GammaOS Setup
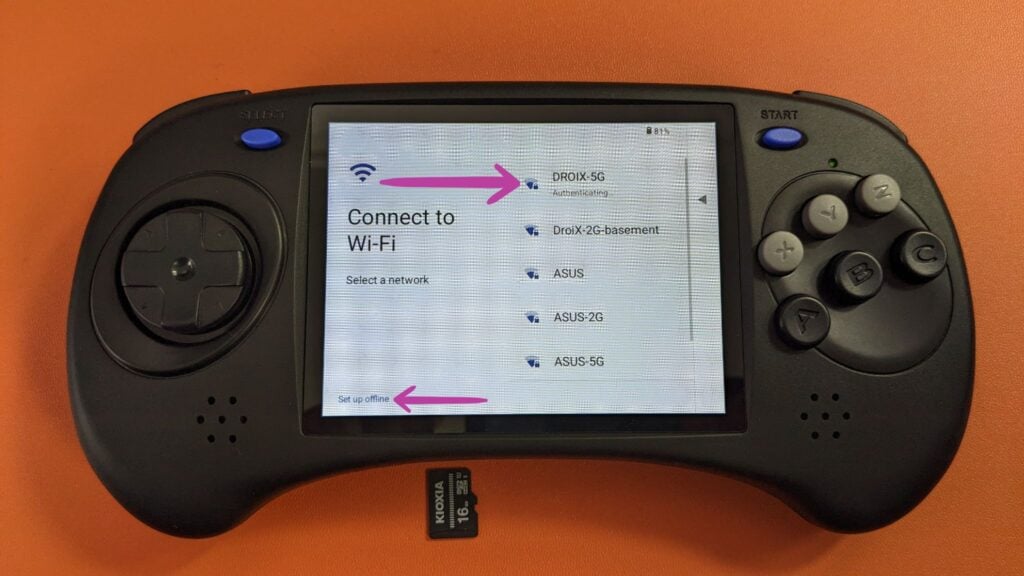
With the initial boot completed, the last step is to finish configuring your device. Begin by pressing Start on the welcome screen. You’ll first be prompted to connect to a mobile network – choose to Skip this step (refer to Images 1 & 2 below). Next, you have the option to connect to WiFi or continue offline (see Image 3 below).


If you installed the Full Version of GammaOS, you’ll be asked to accept Google Services. To do this, swipe up or scroll to the bottom of the page and click Accept (refer to Image 4 below).
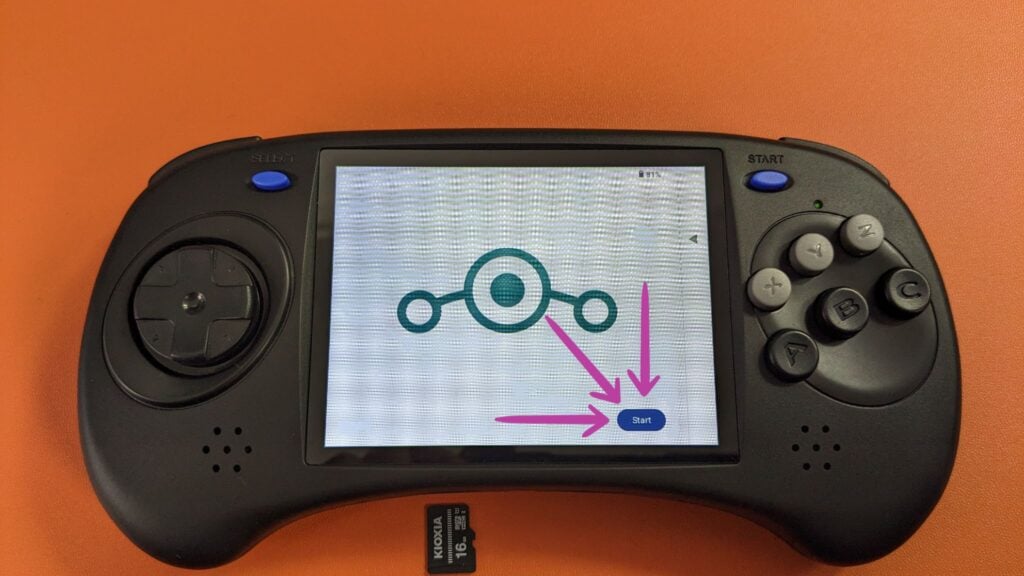
You’ll then be prompted to set up a password (see Image 6 below). It’s important to select Not Now and skip this step to avoid potential complications later. Once these steps are completed, simply press Start, and this will launch the GammaOS Launcher.


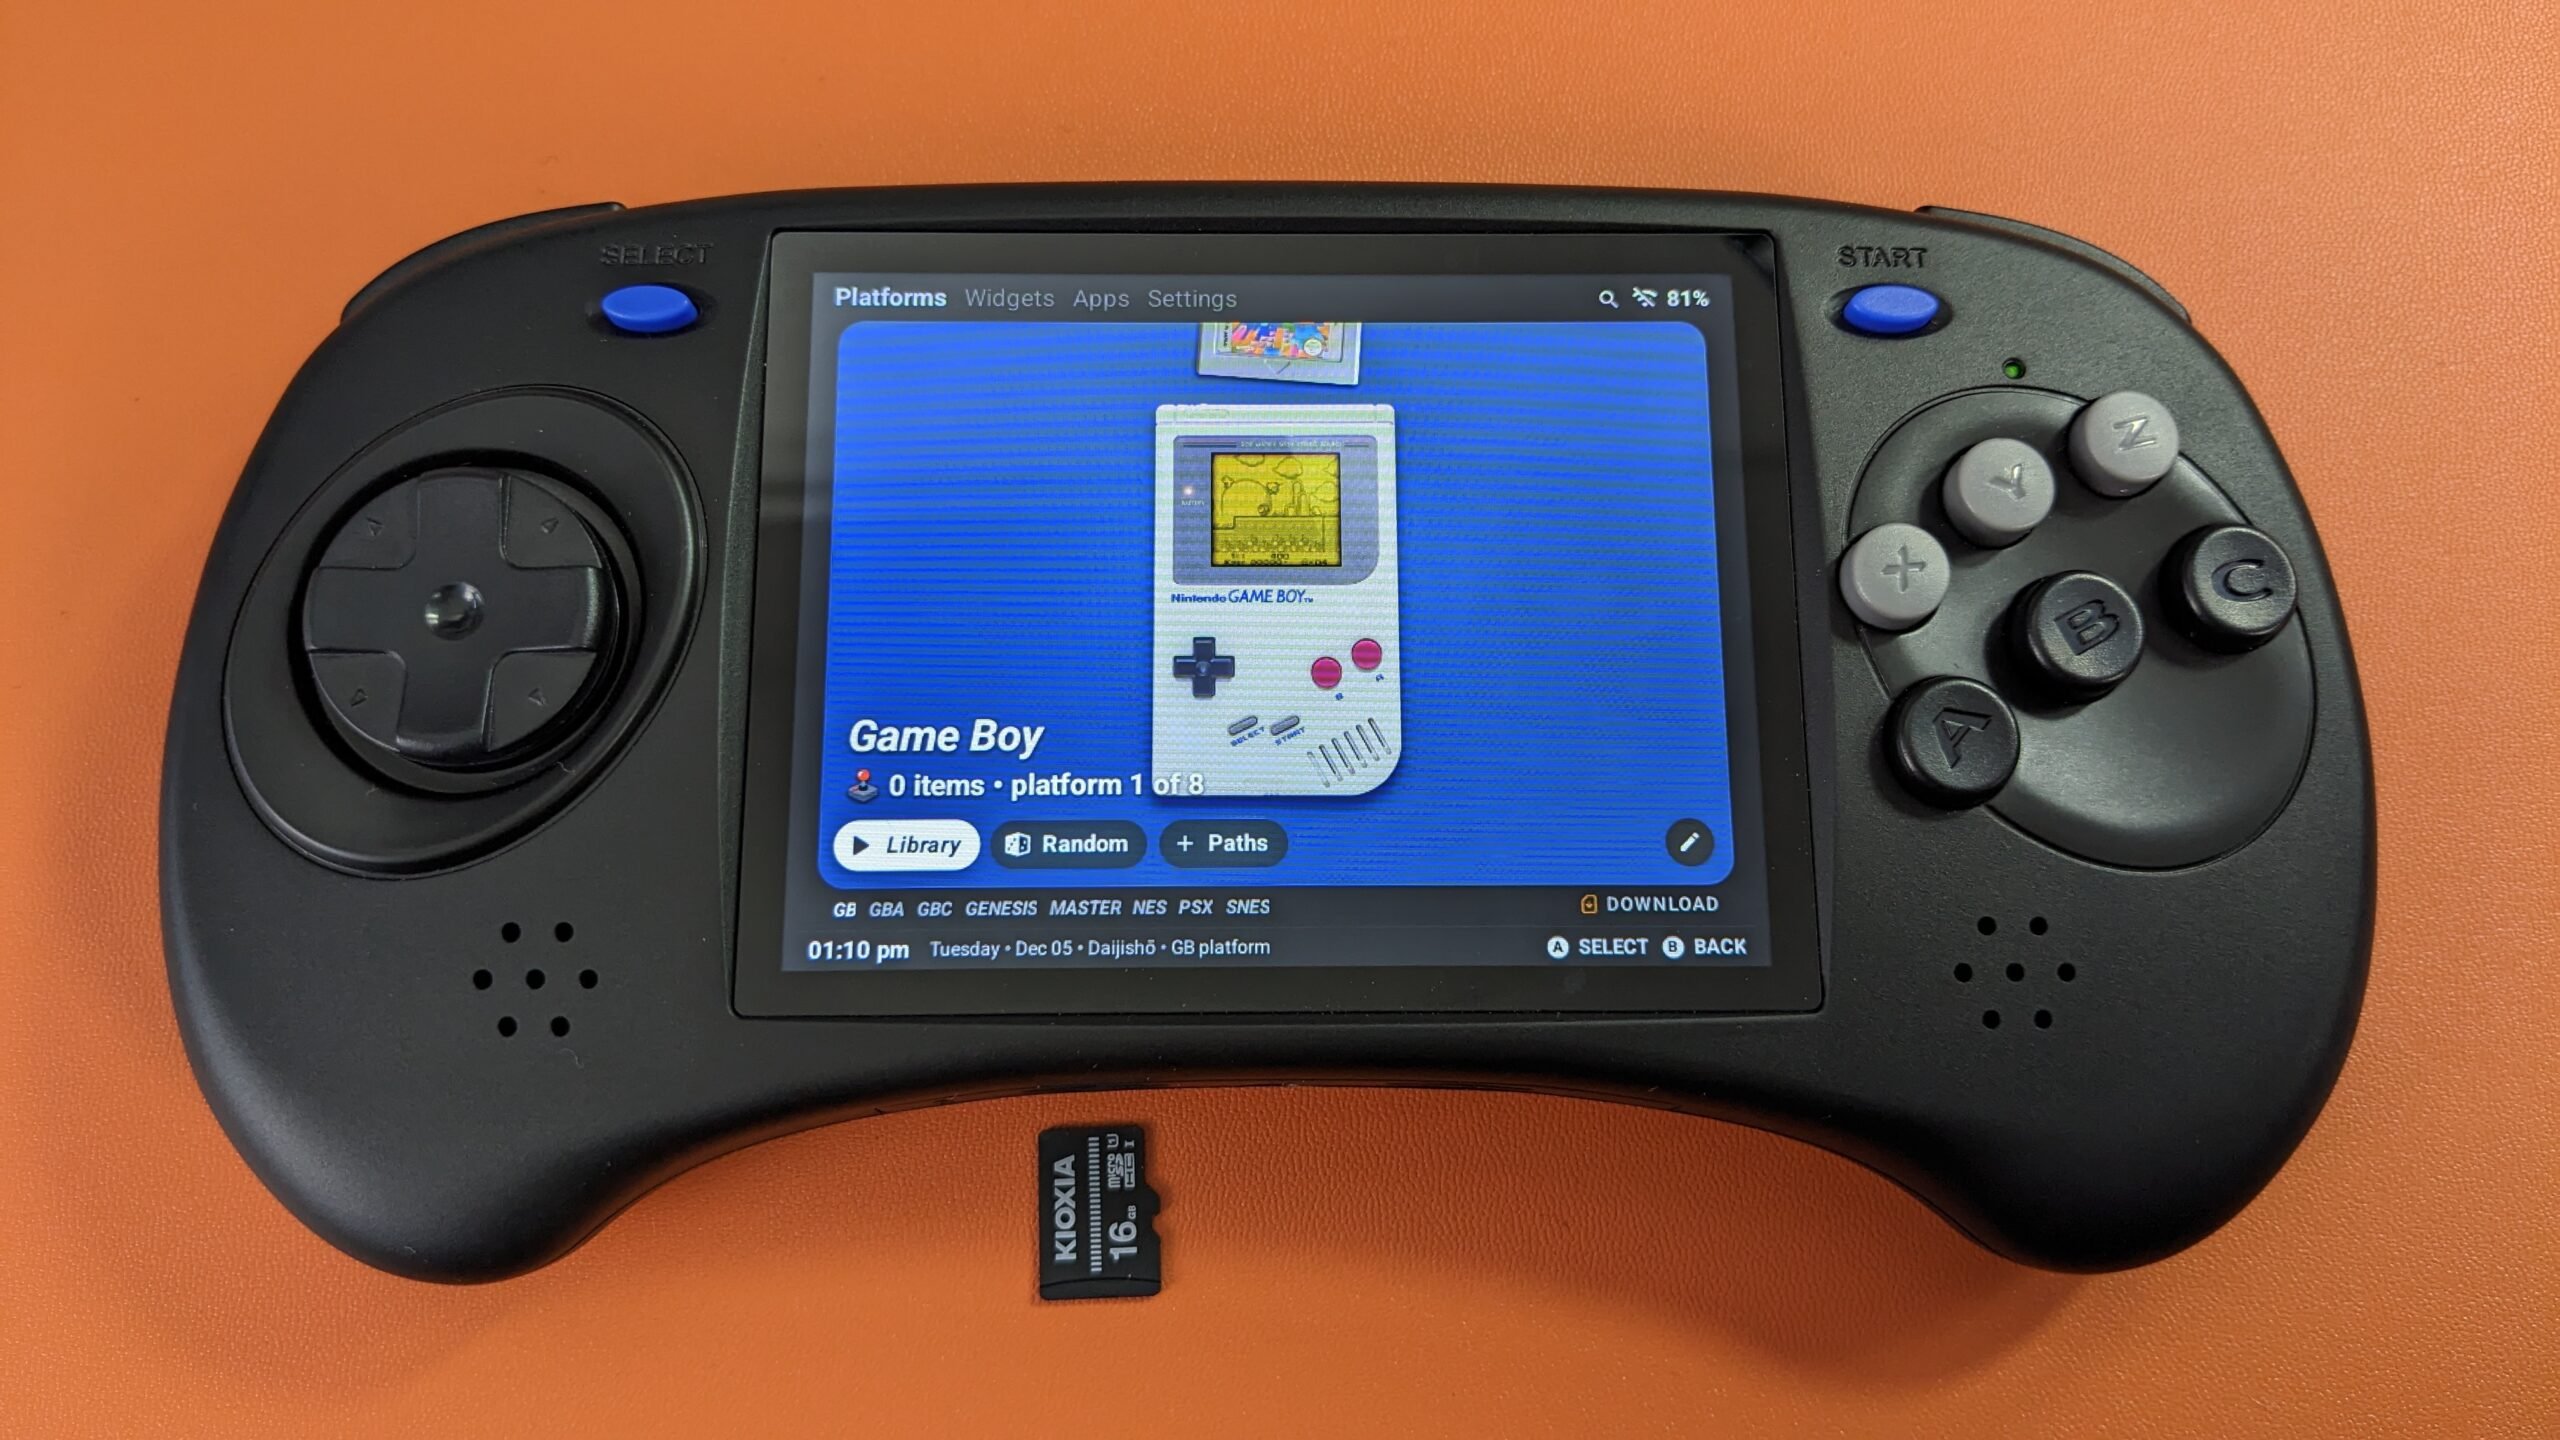
Important Note: From this point onward, the MicroSD Card is no longer needed for booting the device. The default firmware on your device has been replaced with GammaOS (refer to Image 7 below). You can now power on and off your device as usual without the MicroSD card in the TF1/INT slot.
Reinstalling Anbernic Stock Firmware
If you need to revert to the stock firmware on your Anbernic RG ARC-D or encounter issues post-installation, such as booting problems, you can easily switch back to the Anbernic Stock Firmware. Follow the steps outlined below – they are similar to the steps prior but with some slight modifications, which we’ll cover now.
Instead of installing the GammaOS custom firmware, download the stock firmware provided by Anbernic. We provide a link to all the stock firmware provided by Anbernic for the RG ARC-D, along with an alternative link directly to the official RG ARC-D’s firmware page.
| Stock Firmware | Links |
| Android OS | Download, Alternative Link |
| Linux OS | Download, Alternative Link |
The stock firmware from Anbernic also includes a disk image file, so you can follow the same process as before in the Create Firmware Upgrade Tool section. Just remember to select the Android disk image file, named update.img at the time of writing (refer to Image 1 below), instead of the custom firmware file.

To initiate the firmware update, make sure your device is completely powered off (not in sleep or standby mode). Insert the MicroSD card containing the Android firmware into the TF1/INT slot. Then, press and hold the Volume+ button and then Power on the device. Keep holding the Volume+ button until the Anbernic logo appears. After some time, the firmware upgrade screen will appear, and the device will automatically start overwriting the current firmware with the new Android Firmware. This process can take a while, so be patient and avoid any interruptions. Once complete, follow the onscreen instructions as before to finalize the setup.
Your Anbernic RG ARC-D should now be successfully running either GammaOS or back to the stock firmware. Whether you’ve chosen the custom firmware for its expanded features and stylish interface or reverted to stock for its familiarity and preference, we hope this guide has helped navigate the firmware upgrade, setting you up for a smoother and more enjoyable gaming experience on your Anbernic RG ARC-D. Enjoy exploring the new features and happy gaming!
Questions & answers 2
I really don’t understand, when I choose de to reinstall the anbernic firmware I have 2 image Linux and android what should I do exactly ?
It is a dual boot system and you can change between Android and Linux OS.