Congratulations on purchasing your new DroiX SD1 Docking Station! You’ve just opened the door to elevate your handheld gaming experience. This Getting Started guide is your key to maximising all the fantastic features of your SD1 – from three USB 3.0 ports to 4K gaming at 60Hz and a 1000Mbps ethernet connection. We’ll guide you every step of the way. So, gear up and let’s embark on an exciting journey to transform your gaming adventures!
Here at DroiX, we’re big proponents of the user’s Right to Repair. So, if you find any issues and feel confident enough to repair them, we encourage you! You can also contact DroiX Customer Support for any assistance or questions.
Setting Up Your SD1 Dock
What’s Inside the Box?
When setting up, ensure you have all the correct components and accessories. Whilst unboxing, take care to handle the docking station with care to avoid any damage. Inside the box, you should find:
- 1x DroiX SD1 Docking Station
If something is missing or you are not sure, please contact DroiX Customer Service and we will be happy to assist.
What To Do?
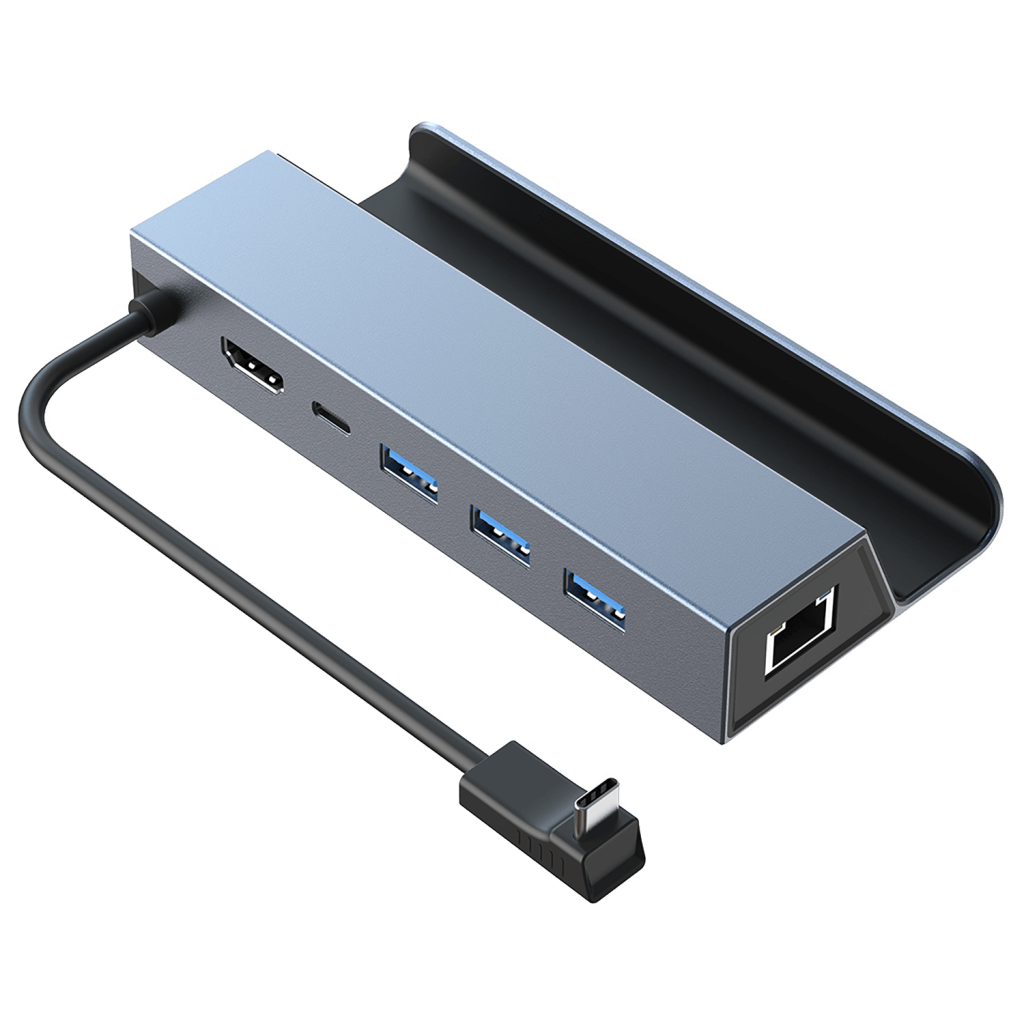
Ensure that the SD1 Dock is placed on a flat and stable surface. Any unevenness in the surface or accidental bumps can potentially affect or even damage both the dock and the handheld device connected to it. When following the steps in this section of the guide, please refer to the image below for the location of each port/connection on the SD1 Docking Station.
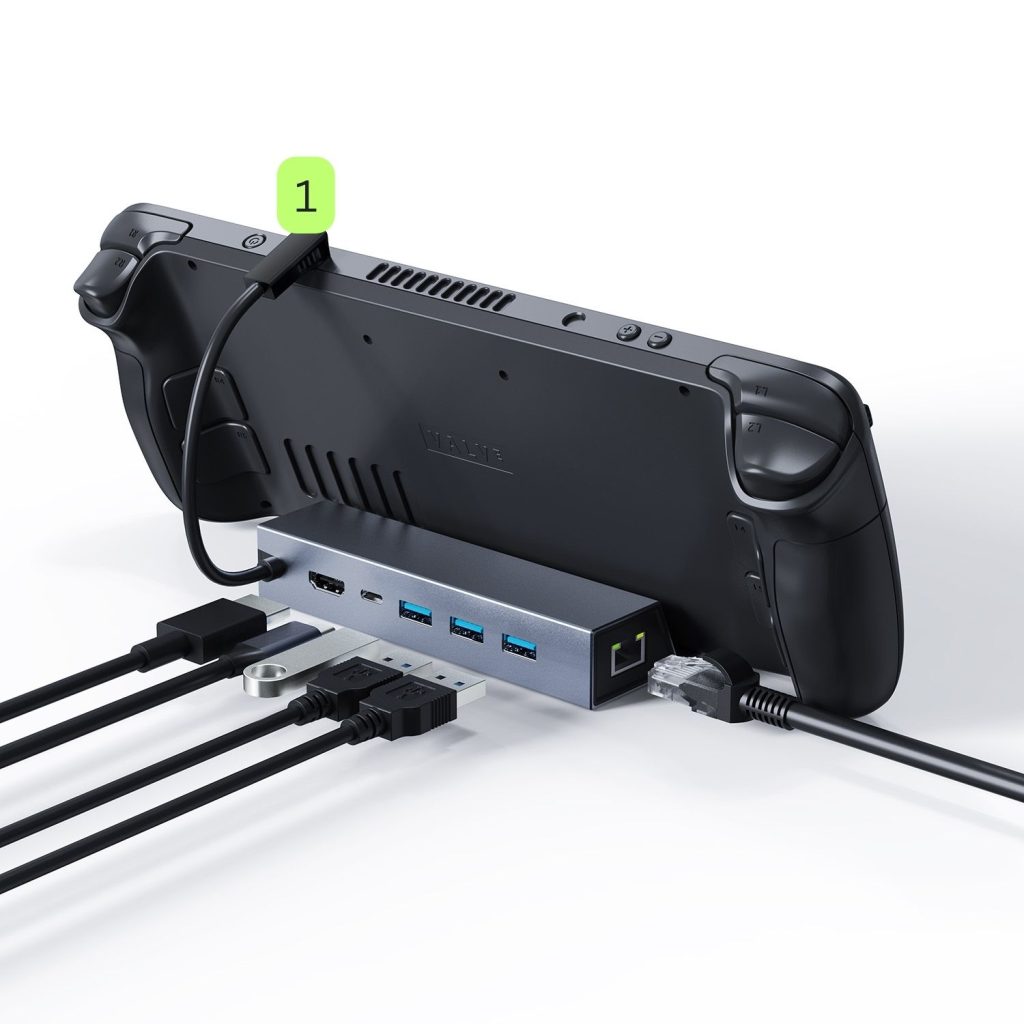
Dock Your Handheld Device
The first thing to do is to simply connect your handheld gaming device using the USB Type-C cable attached to the SD1 (refer to the Image below). Set your device down in the dock to ensure a hassle-free connection.
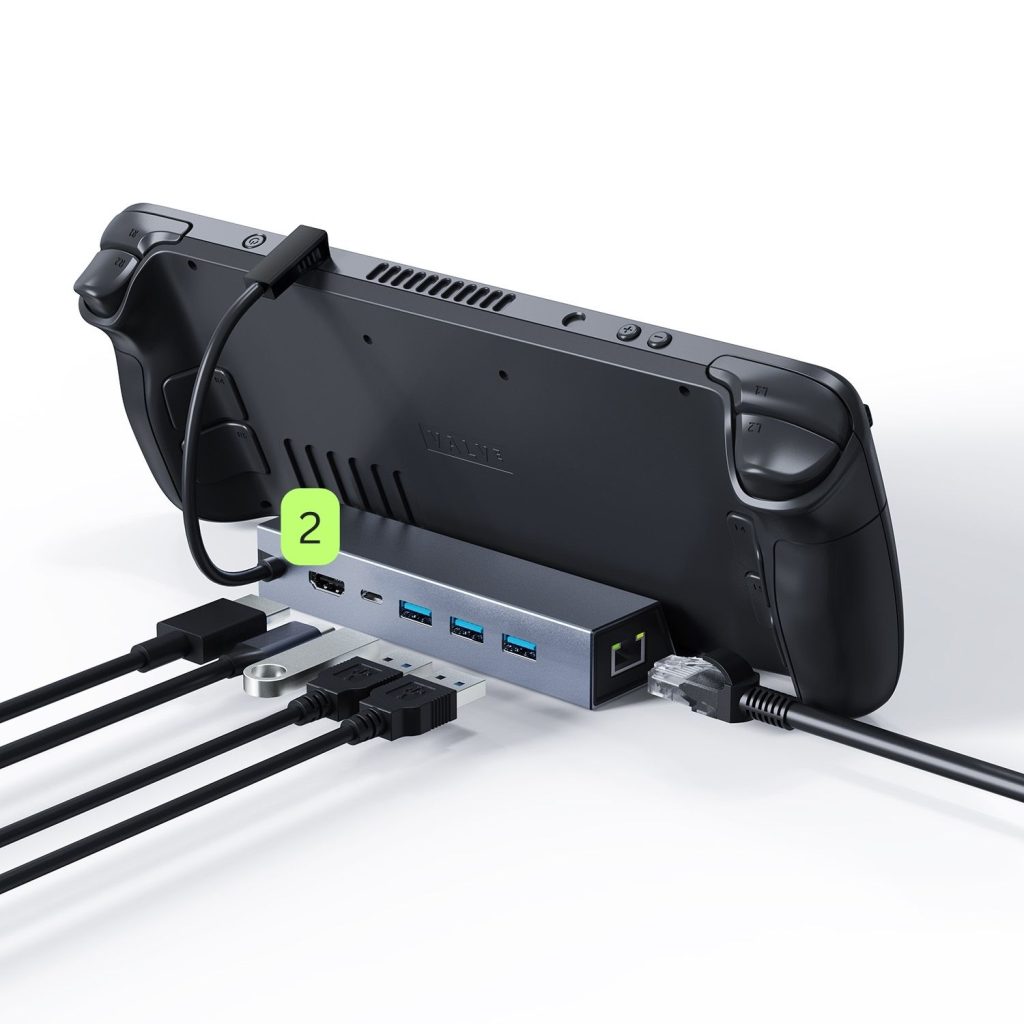
Connect Your Display
To elevate your gaming experience to a larger screen, connect an HDMI cable between your SD1 dock and the display (refer to the Image below). This could be a TV, monitor or projector (and many more)! Remember to change the display input source to the HDMI source if required. The SD1 supports up to 4K resolution @ 60Hz refresh rate, providing an immersive experience and allowing you to enjoy your games or media in the highest quality. It’s important to note that the HDMI cable is not included in the packaging.
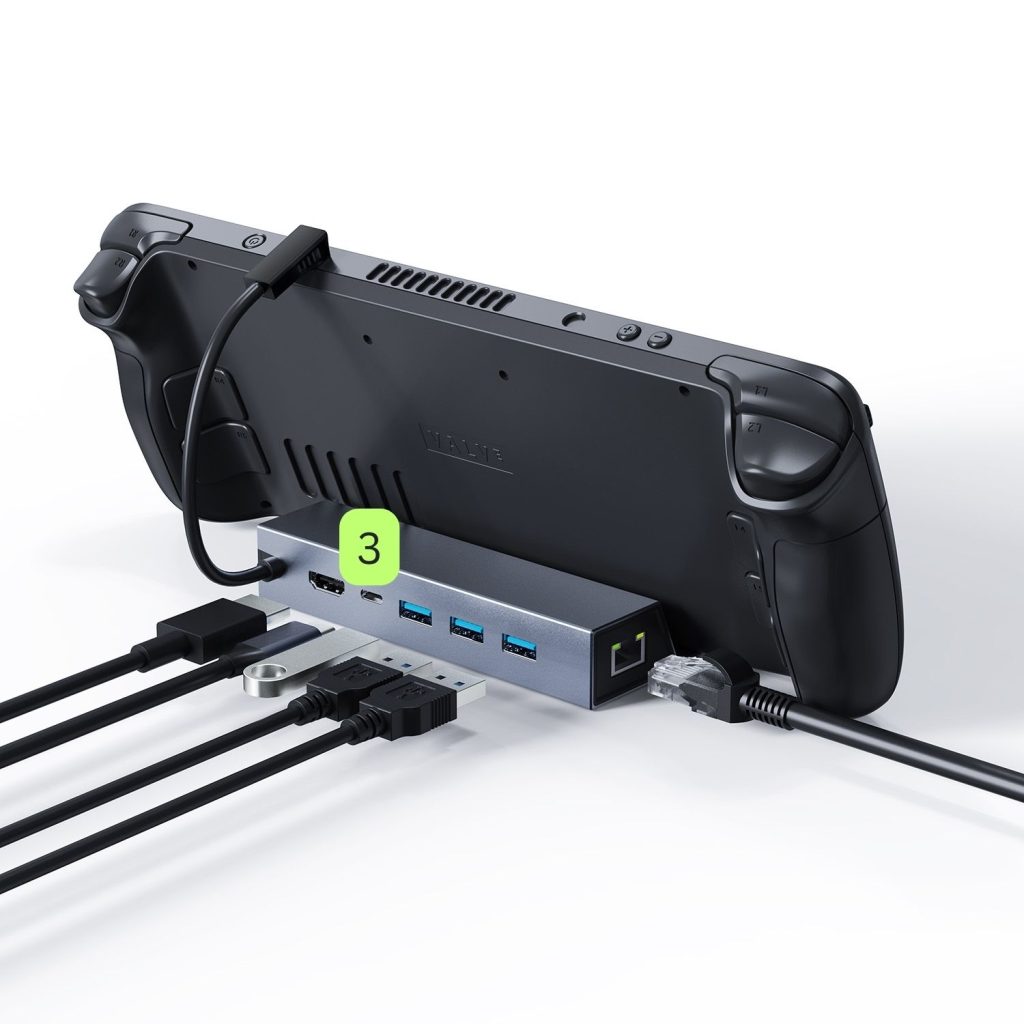
Power & Charge Your Device
Next, ensure that power is being supplied and that your device stays charged during those intense gaming sessions. Connect a charger to the USB-C PD Port located at the back of the SD1 docking station (refer to the Image below). The SD1 supports up to 100W charging to ensure your device never dies. This super-fast charging feature is perfect for a quick power boost before taking your handheld on the go. Please note, the charger is not included with the dock. You can use the charger that comes with your handheld device or look at investing in a 100W charger for a bigger boost!
At this point in the setup, you can dive into any game on the big screen without delay. However, there’s more to explore and set up to fully maximize the capabilities of your SD1 Dock.
USB-A 3.0 Ports
The DroiX SD1 Docking Station features 3x USB-A 3.0 ports located at the back of the device (refer to the Image below). This opens a world of possibilities, enabling you to connect multiple peripheral devices such as a controller, headset, keyboard and mouse, or other USB-based peripherals. It enhances your gaming experience, but it can also transform your Windows handheld device into a much more versatile tool. Allowing you to easily browse the internet, watch videos, shop, and engage in general PC activities, extending the functionality of your handheld device far beyond gaming.
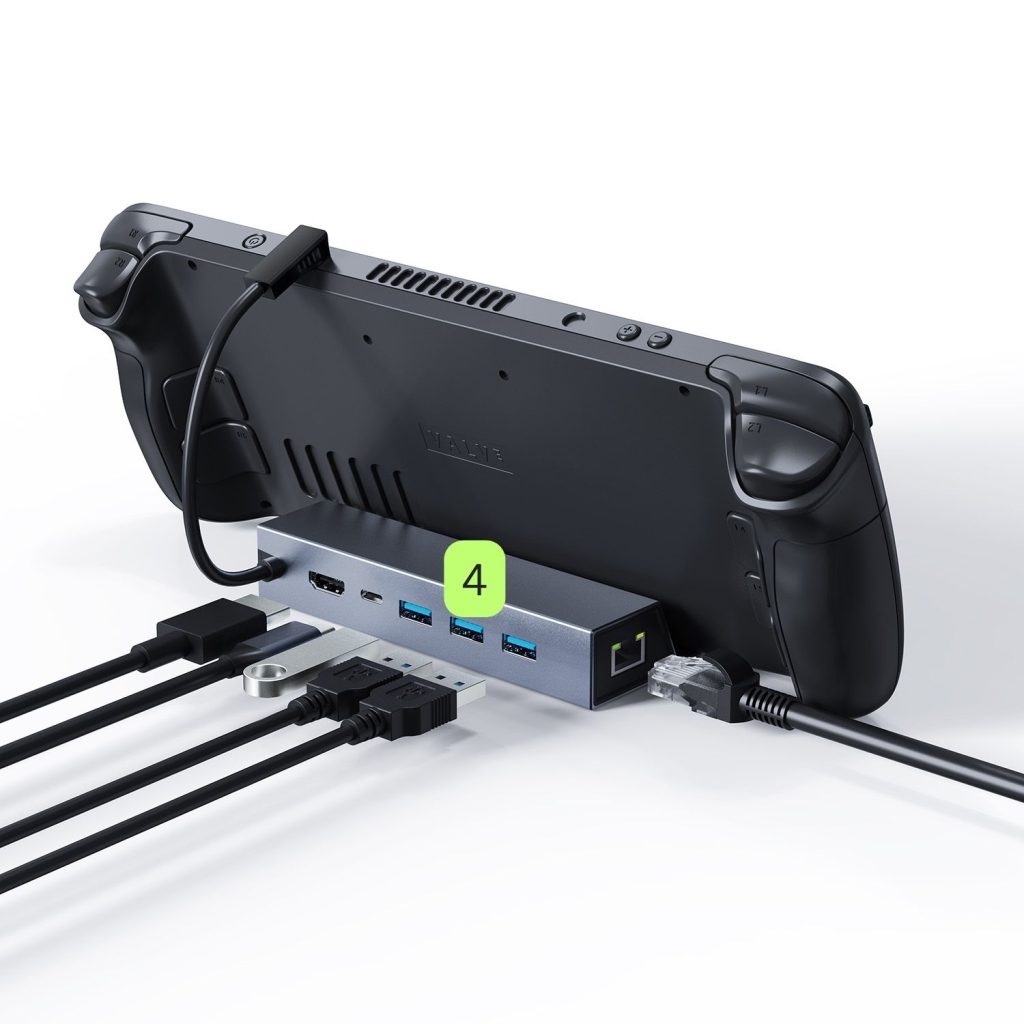
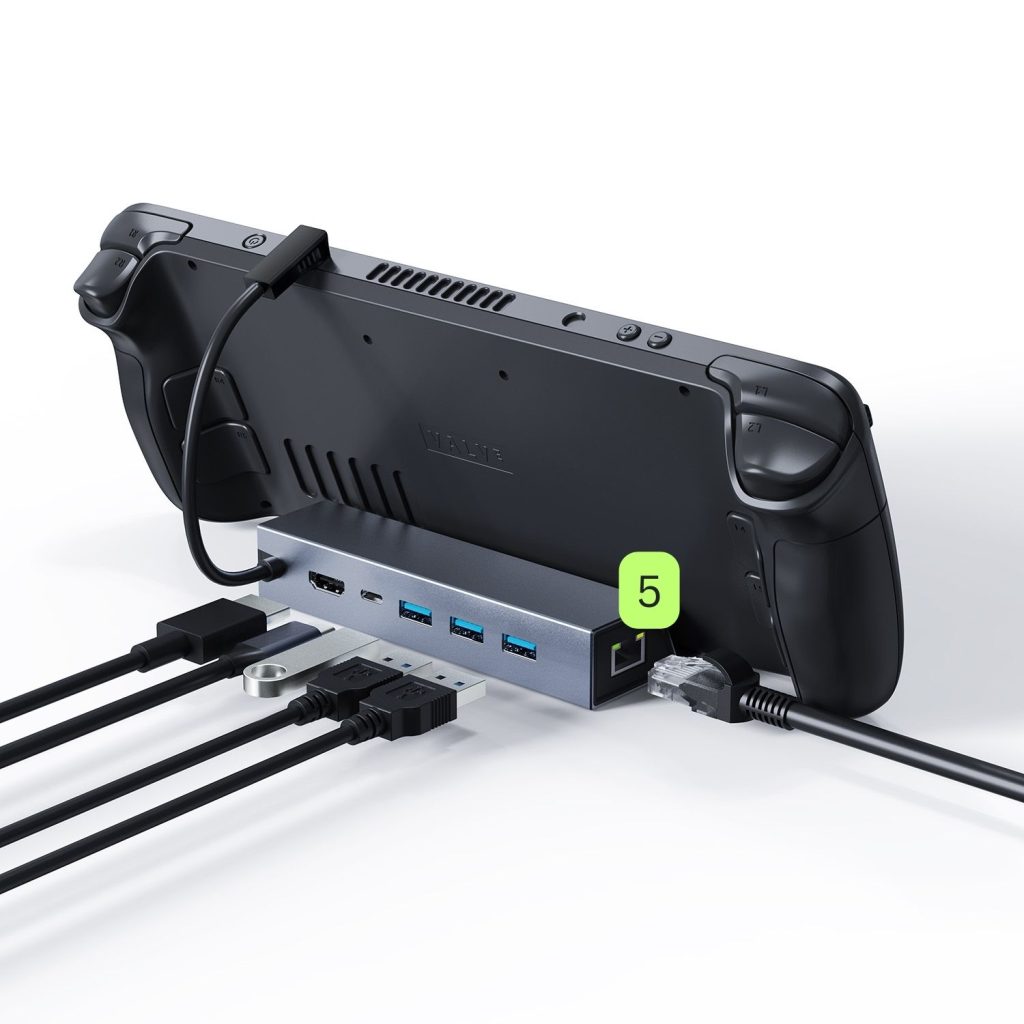
Ultra-fast Internet Connection
For a direct, ultra-fast, and stable internet connection, you can connect an ethernet cable to the dock, minimizing latency and improving your performance in online games and multimedia streaming. The ethernet port is conveniently located on the side of the SD1 dock (refer to the Image below). Please be aware, the ethernet cable is not included.
Device Settings
Windows Display Settings
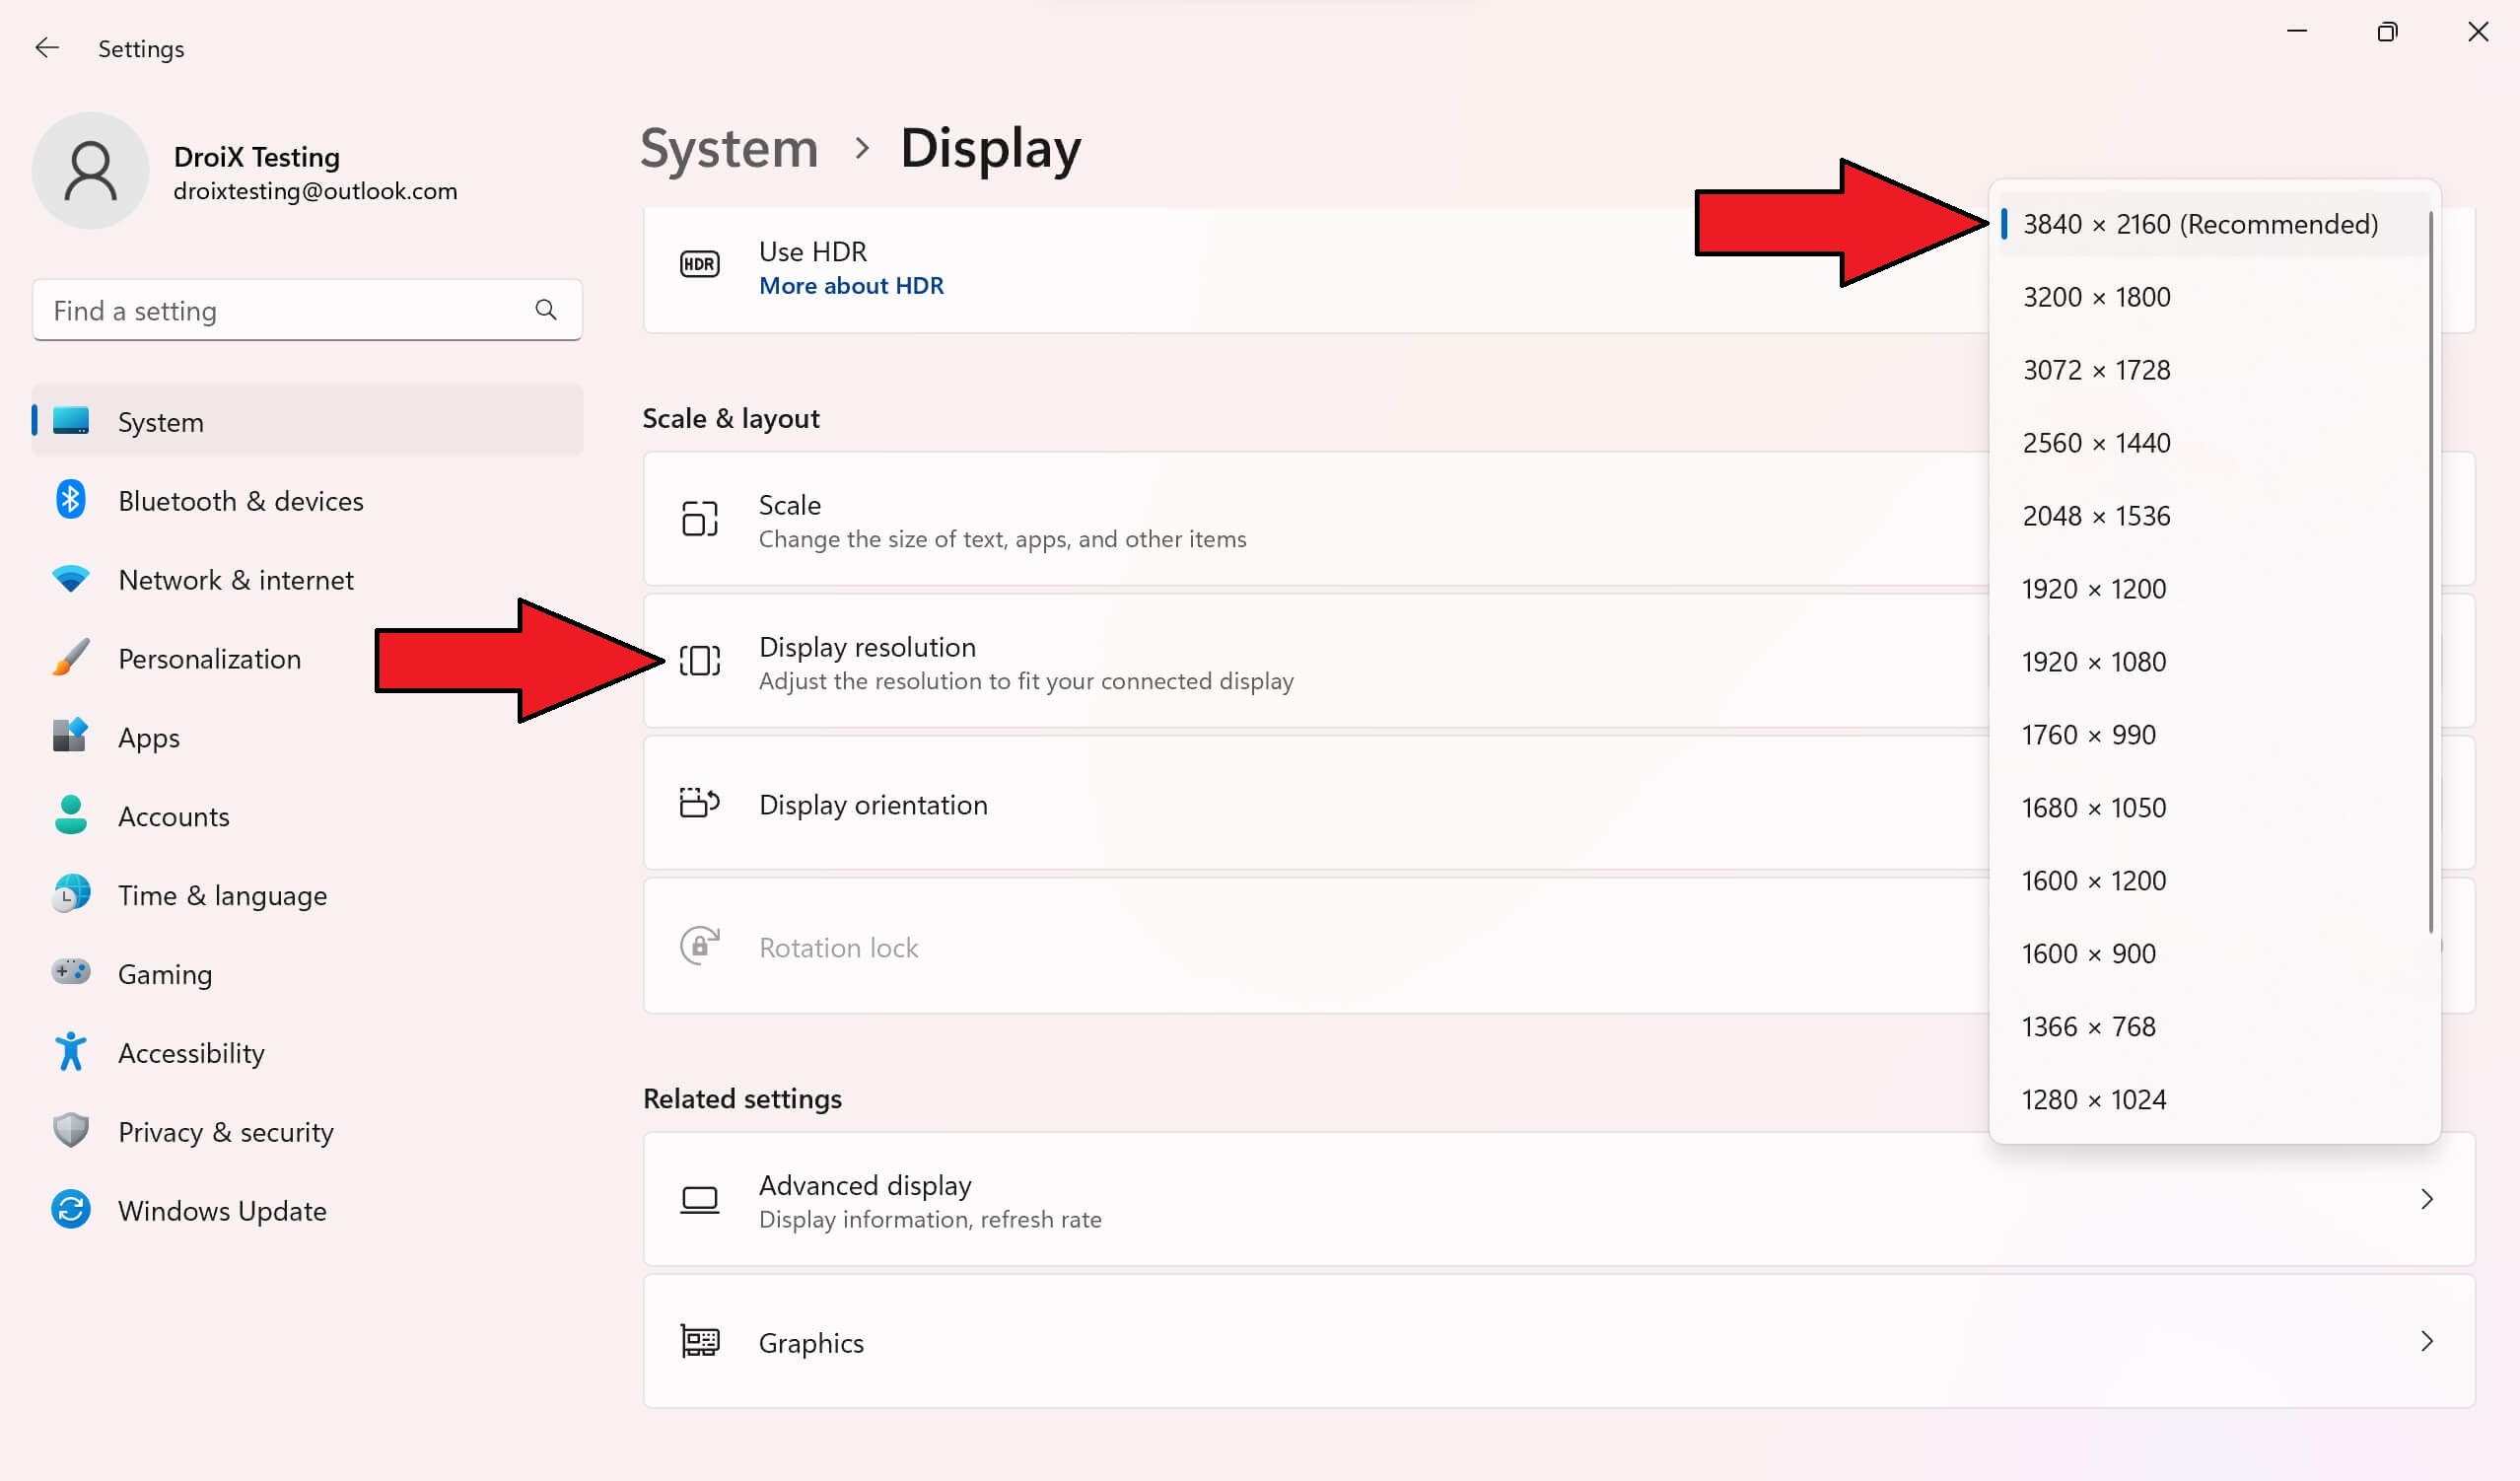
The SD1 Dock is a game changer when it comes to visual quality and fluidity. It supports up to 4K resolution and a smooth 60Hz refresh rate through its HDMI port, ensuring that your games look stunning and play seamlessly. If both your connected device and display support higher resolutions, we highly recommend setting them to the maximum resolution and refresh rate available. This will significantly enhance your gaming experience and when docked, bring out the best in your games’ graphics and ensure smoother gameplay.
Increasing the resolution and refresh rate can result in increased battery consumption. This is important to keep in mind when using your device in handheld mode. To balance performance and battery life, you may want to adjust these settings based on your current usage scenario.
To adjust your settings in Windows 11:
- Type ‘Display Settings’ in the Windows search bar and open it.
- Change Display Resolution to the highest option.
- Select Keep Changes.
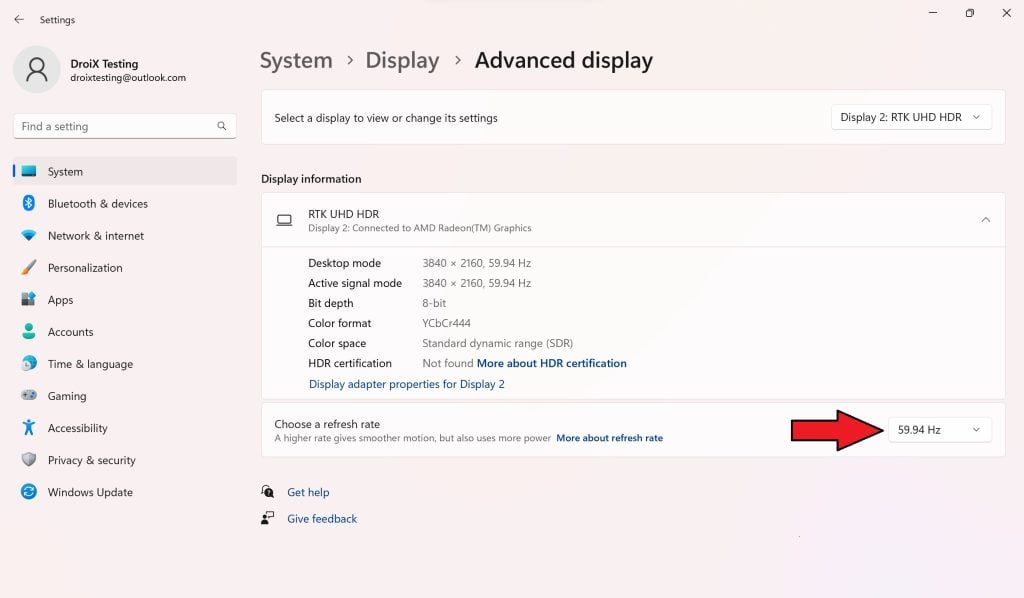
- Select the Advanced Display option.
- Change the Refresh Rate to the highest option.
- Select Keep Changes.
Please note, that your handheld device may look slightly different.
Testing Your Hardware
Once you’ve completed the initial hardware setup, it’s time to put the SD1 through some tests to confirm it’s working as intended. If a particular test isn’t functioning correctly, it is necessary to test with multiple cables to determine whether the issue lies with the cable or dock. When troubleshooting it is important to ensure all cables are firmly and securely connected to the correct ports.
Here at DroiX, we’re big proponents of the user’s Right to Repair your device. So, if you find any issues and feel confident enough to repair them, we encourage you! Reach out to DroiX Customer Support for any assistance in doing so.
SD1 Dock Station
- Physical Damage: Inspect the outer casing of the dock for any damage.
- Dock Connection: Connect your handheld device to the SD1 Docking Station. To confirm the device is recognised please refer to either the PD port test or HDMI test.
- USB-C PD Port: plug your charger into the PD port located at the back of the dock and ensure the device is charging.
- USB-A 3.0 Port: Plug different USB devices into each of the USB Type-A ports and ensure each of them is recognised and functions as intended.
- HDMI Port: Power on your device and display and switch to the correct HDMI input. If an image appears on the display, the port is working.
- Ethernet Port: Ensure the cable is plugged into the dock and your router or modem. Once connected, check the handheld device to ensure it has internet access via an ethernet connection.
Other Troubleshooting
- Device Not Charging: Some devices have multiple ports but only a few dedicated charging ports. So not all ports may power the device. Please refer to your handheld product manual to figure out what each port does.
- No Display: Some devices have dedicated charging ports, meaning these ports cannot read data. We recommend trying different ports and referring to your handheld product manual to understand which ports are which.
Handheld Compatibility
The DroiX SD1 supports numerous handheld devices, but it’s essential to understand which are compatible and which ones aren’t. So, we’ve created a list of all the supported devices and some others that we’ve managed to test! We’ll add notes to any of the devices in case you’re having a hard time!
Supported Devices:
- Steam Deck
- ROG ALLY
- GPD WIN 4 – requires the front screen to be lifted.
- GPD WIN 4 (2023) – requires the front screen to be lifted.
- ONEXPLAYER 2
- AOKZOE A1 Pro – stand up vertically.
Not Supported:
- AYN Loki: not supported – no top port.
- AYN Loki MAX: not supported – no top port.
Accessories & Add-Ons
Input Devices
Lovaky Wireless Keyboard & Mouse: A wireless keyboard and mouse set is a game-changer for your SD1 Dock, effectively transforming your handheld gaming device into a versatile, PC-like experience. Imagine navigating, typing, and interacting with your device from the comfort of your couch, whilst your handheld is docked to your TV or monitor.
Whether you’re in intensive gaming sessions that are just better with a keyboard and mouse, casually browsing the internet, or managing files, these wireless peripherals add a layer of convenience and functionality that’s hard to beat. This dynamic duo not only elevates your gaming experience but also turns your SD1 setup into an all-in-one hub for entertainment, work, and web surfing, blending comfort with versatility in every use.
Output Devices
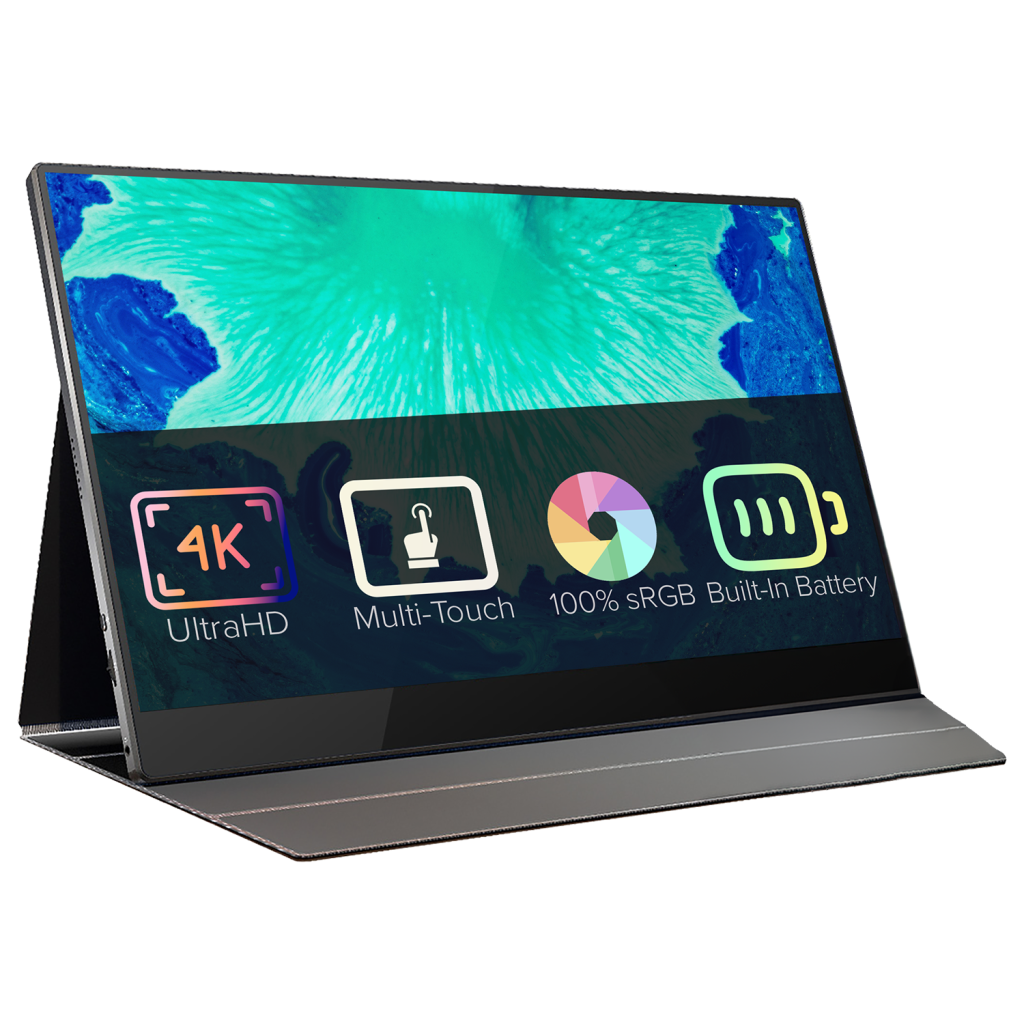
15.6″ 4K portable monitor with Adobe RGB: This portable monitor offers a stunning 4K resolution across their 15.6″ display. The monitor offers Adobe RGB support and even has touchscreen capabilities. The colours you see are true to life thanks to 100% coverage of Adobe RGB’s colour space, ensuring a rich and authentic visual experience. It is fantastic for gamers, designers, video editors and more. It’s the perfect addition to get that extra screen space and provides a display capable of 4K display. Its slim and lightweight design makes it easy to set up and carry around.
Cables
Amazon Basics HDMI Cable: this cable is a must-have to enhance your gaming and multimedia experience by connecting your SD1 Dock to a larger display or TV. It unlocks the potential of the SD1 Dock’s support up to 4K resolution at a 60Hz refresh rate, providing crisp, vibrant images and smooth gameplay. It’s a simple yet impactful accessory that can transform your handheld into a home entertainment system.
UGREEN Ethernet Cable: an ethernet cable is necessary when it comes to getting the smoothest online gaming and streaming experience from your handheld. An ethernet cable provides a direct internet connection, reducing latency and ensuring you get the most stable and highest speeds possible. For gamers, streamers and even those who don’t have the most stable internet access, an ethernet cable is a simple way to maximise the reliability of your connection with the SD1 Docking Station. Please ensure the ethernet cable can connect from your router to your SD1 Docking Station.
Storage Devices
Kingston DataTraveler 128GB USB 3.2: A USB drive is an invaluable accessory for your SD1 Dock and handheld gaming device, offering a seamless way to expand storage capacity. With a USB drive connected to your SD1 Docking Station, you gain easy access to additional files, perfect for storing games, software, videos, and more. So, whether you’re gaming, watching movies, or even browsing the web, a USB drive adds a layer of convenience and capacity, that ensures that your favourite content is always within reach, even when you’re not connected to the internet. If you encounter any issues with the USB drive not being recognized, reformatting it to FAT32 or exFAT file systems often solves the problem.
Whew! That was a long read. That should cover just about everything to get you up and running with your new device. Go have fun and binge all your faves!
Questions & answers